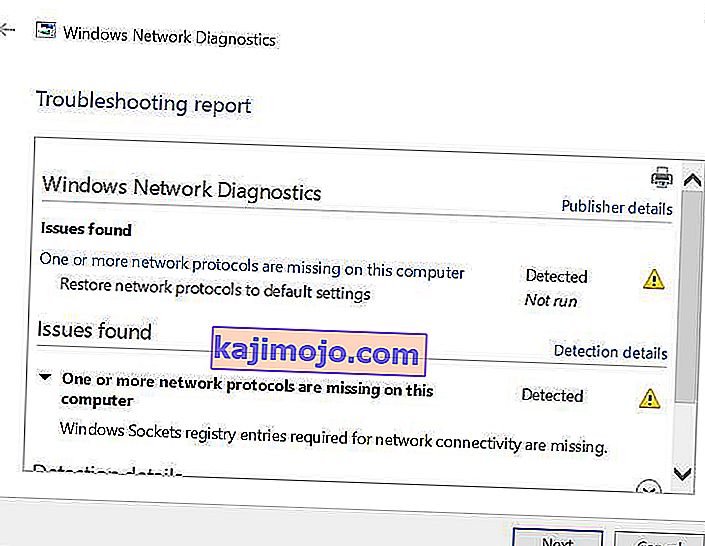
Šiame kompiuteryje trūksta vieno ar daugiau tinklo protokolų. Tai klaida, atsirandanti dėl „Windows Sockets“ registro įrašų, reikalingų prisijungti prie tinklo. Kai trūksta šių įrašų, tai sukelia šią klaidą, apie kurią pranešė „Windows“ tinklo diagnostika. Tai rodoma, kai jūsų sistemai nepavyksta prisijungti prie interneto, o jūs spustelėsite mygtuką Diagnozuoti. Gali būti, kad galėsite pinguoti paskirties adresą, tačiau jūsų naršyklė negalės to padaryti. Daugeliu atvejų pagrindinė šios problemos priežastis yra „Windows Sockets“ API, dar vadinamo „Winsock“, nenuoseklumas.
Ji yra atsakinga už gaunamas ir siunčiamas programų tinklo užklausas. Ši problema taip pat gali kilti iš jūsų interneto tiekėjo, tačiau jei internetas veikia kituose jūsų įrenginiuose, prijungtuose prie to paties interneto paslaugų teikėjo, interneto paslaugų teikėjas yra gerai ir mes galime tęsti trikčių šalinimo veiksmus.
Trūksta vieno ar daugiau tinklo protokolų taisymo būdų
Šis vadovas suderinamas su visomis „Windows“ versijomis.
1 metodas: atkurkite trūkstamus protokolų failus
Atsisiųskite ir paleiskite „Restoro“, norėdami nuskaityti sugadintus failus spustelėdami čia . Jei nustatoma, kad failai yra sugadinti, pataisykite juos.
2 metodas: išjunkite IPv6
Peržiūrėkite čia nurodytus veiksmus, kaip išjungti IPv6
3 metodas: iš naujo nustatykite „Winsock“
Žinoma, kad Winsocko korupcija sukelia tokias klaidas. Daugeliu atvejų problema išsprendžiama iš naujo nustatant „Winsock“. Norėdami iš naujo nustatyti „Winsock“, atlikite toliau nurodytus veiksmus.
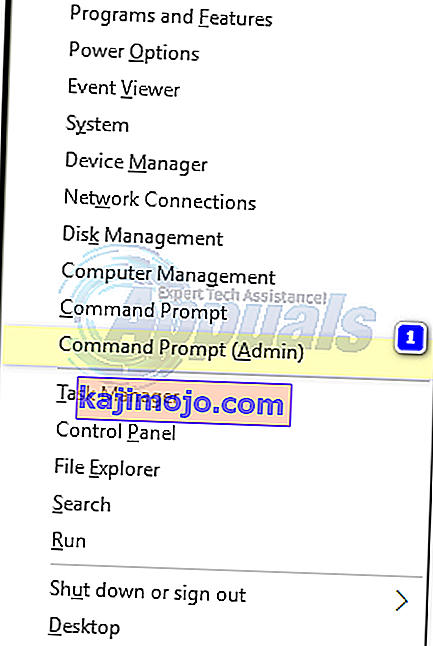
- Paspauskite „ Windows“ klavišą . Paieškos laukelyje įveskite cmd . Iš rodomų rezultatų sąrašo; dešiniuoju pelės mygtuku spustelėkite ant cmd ir spauskite Vykdyti kaip administratorius . Jei naudojate „Windows 8“ arba „10“, laikykite nuspaudę „Windows“ klavišą ir paspauskite X. Pasirinkite komandų eilutę (administratorius) ir spustelėkite ją.
- Juodoje komandų eilutės lange įveskite netsh winsock reset ir paspauskite Enter .

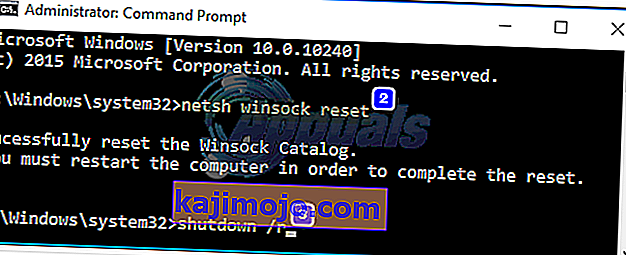
Paleiskite sistemą iš naujo ir išspręskite problemą.
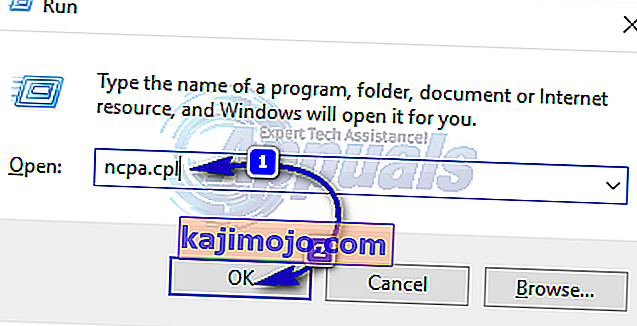
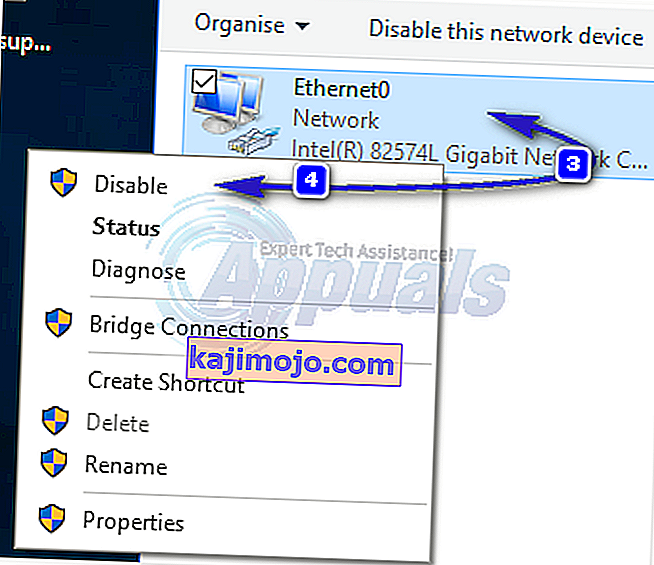
4 metodas: iš naujo paleiskite tinklo adapterius
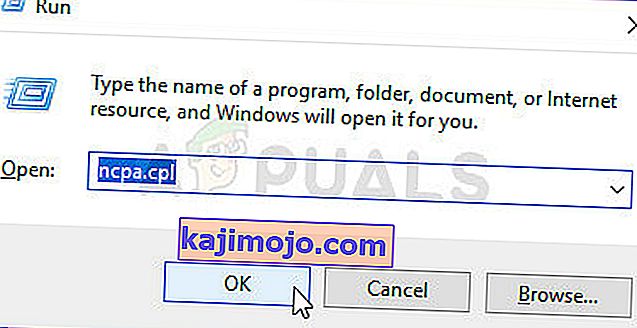
Laikinas tinklo adapterių sutrikimas gali neleisti jam pasiimti protokolų. Paprastas paleidimas iš naujo taip pat gali išspręsti problemą. Padaryti tai; Laikykite Windows Key ir paspauskite R . Vykdymo dialogo lange įveskite ncpa.cpl ir spustelėkite Gerai.
Pamatysite tinklo adapterių sąrašą. Jei nežinote, kuris iš jūsų, tada galite pakartoti toliau nurodytus veiksmus su visais išvardytais adapteriais, kitaip atlikite jį tuo, kurį naudojate prisijungdami.
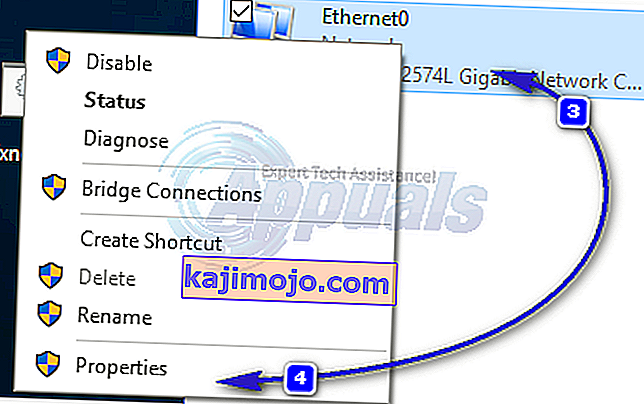
Dešiniuoju pelės mygtuku spustelėkite savo tinklo adapterį ir pasirinkite Išjungti . Tada dešiniuoju pelės mygtuku spustelėkite jį dar kartą ir pasirinkite Įgalinti .
5 metodas: nustatykite komponentus iš naujo
Šiame sprendime atkursime ir atnaujinsime komponentus, susijusius su tinklo ryšiu.
Sukurkite tekstinį failą ir išsaugokite jį kaip fixnetwork.bat su tokiu kodu.
ipconfig / flushdns ipconfig / registerdns ipconfig / release ipconfig / atnaujinti netsh winsock reset katalogą netsh int ipv4 reset reset.log netsh int ipv6 reset reset.log pristabdyti išjungimą / r
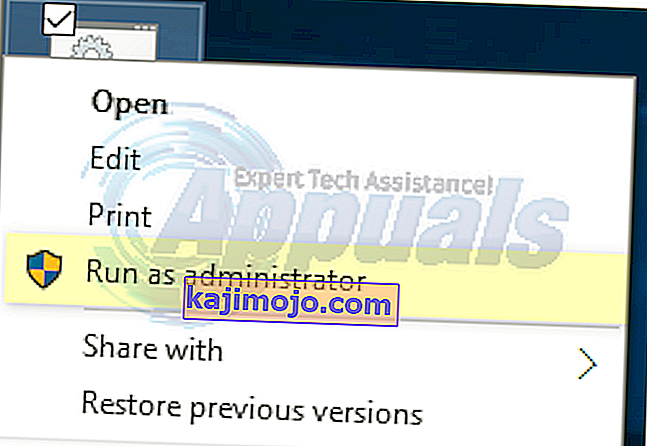
Dešiniuoju pelės mygtuku spustelėkite atsisiųstą failą arba sukurtą šikšnosparnio failą (naudodami anksčiau pateiktas komandas) ir spustelėkite Vykdyti kaip administratorius . Atkreipkite dėmesį į uždraustus pranešimus, jei tokių pastebite, tada atlikite toliau nurodytus veiksmus, jei norite paleisti iš naujo, paspauskite bet kurį klavišą, kai jis sako ant juodo lango. Paleidus iš naujo, TEST.
Importuoti reikia sukurti registro atsarginę kopiją prieš atliekant registro veiksmus. Tai galite padaryti spustelėdami Failas -> Eksportuoti (su kompiuteriu), pasirinktą viršutiniame kairiajame skydelyje, ir eksportuodami (išsaugodami kur nors savo kompiuteryje). Tai turėtų būti daroma kiekvienam metodui, kurį naudojate, kai keičiamas registras.
Norėdami modifikuoti teises redaguokite šį registro raktą:
Norėdami tai padaryti, laikykite nuspaudę "Windows klavišą ir paspauskite R . Įveskite regedit į run dialogo ir paspauskite Enter . Bus atidaryti registro rengyklės langai.
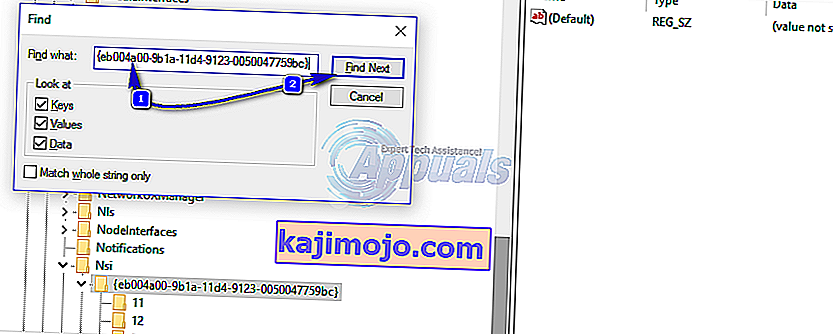
Laikykite CTRL klavišą ir paspauskite F . Lauke Rasti ką įveskite šią reikšmę ir spustelėkite Rasti toliau.
Palaukite, kol jis ieškos rakto, kai tik jis jo ieškos, išplėskite šį raktą, kad rastumėte aplanką, pavadintą 26
eb004a00-9b1a-11d4-9123-0050047759bc
Visas kelias iki rakto
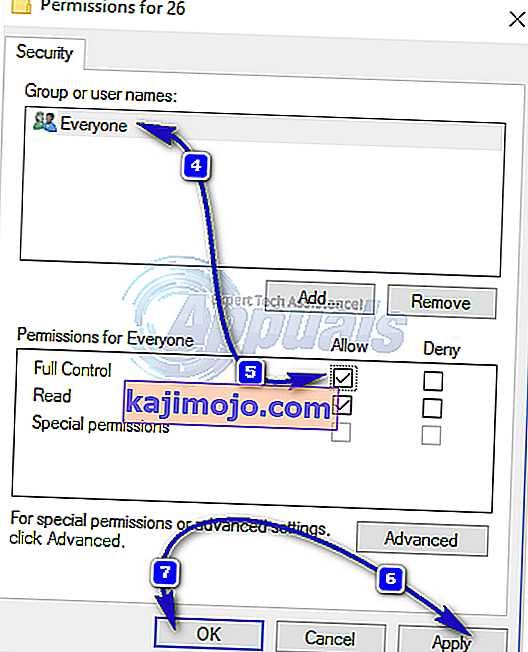
H KEY_LOCAL_MACHINE / SYSTEM / CurrentControlSet / Control / Nsi / {eb004a00-9b1a-11d4-9123-0050047759bc} / 26 .Dešiniuoju pelės mygtuku spustelėkite 26 ir spustelėkite Leidimai .
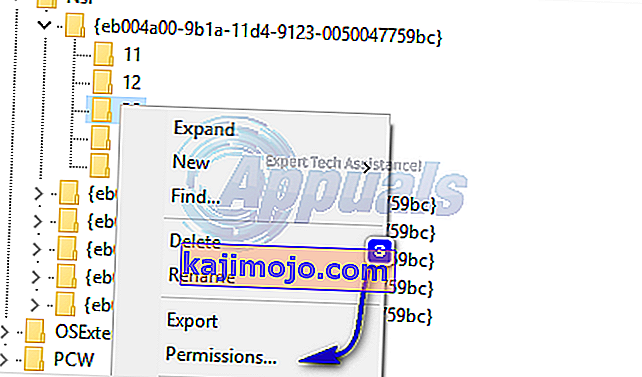
Spustelėkite mygtuką Pridėti . Įveskite visiems į teksto laukelį ir paspauskite OK . Jei visi jau yra, suteikite visišką prieigą. Spustelėkite Gerai . Dabar paleiskite atsisiųstą failą kaip administratorius.
6 metodas: iš naujo įdiekite TCP / IP
TCP/IP are a set of protocols that defines how you connect to the Internet. Any discrepancy in them can block your internet access immediately. Hold the Windows Key and Press R. Type ncpa.cpl and Click OK
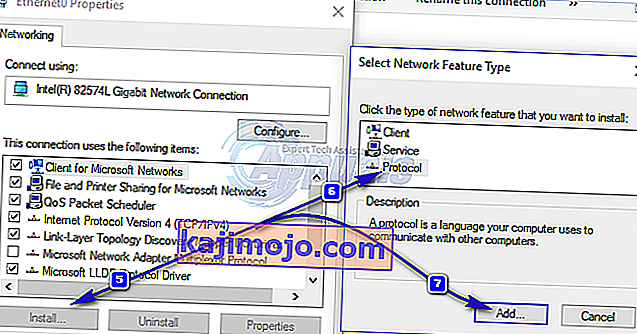
You will either have a wired connection or wireless, whatever is the active connection, right click on it and choose Properties.
Under This Component Uses the Following Items, click Install button. Click Protocol, then click the Add button.
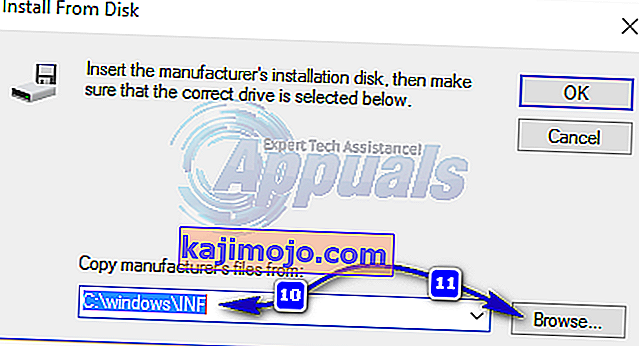
Click the HaveDisk button. Under Copy Manufacturer’s files from box, type C:\windows\inf and click OK.
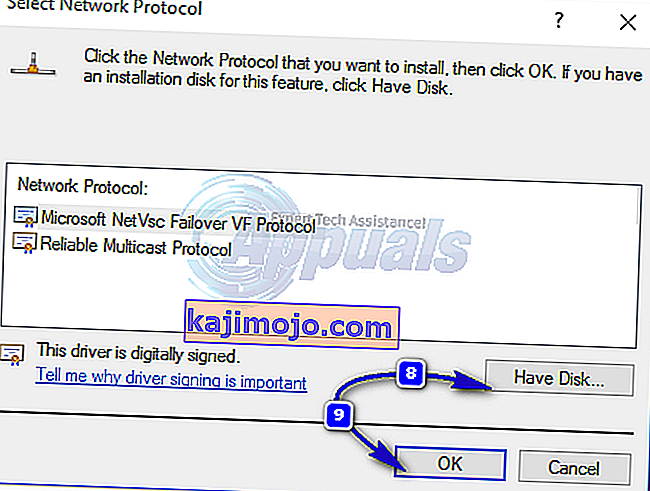
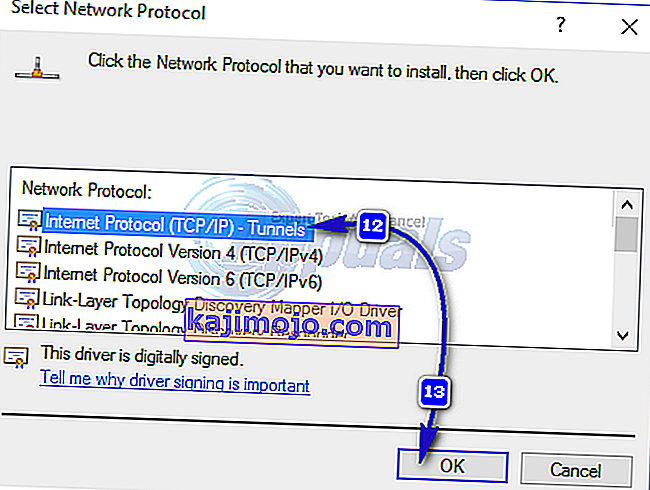
Under the Network Protocol list, click Internet Protocol (TCP/IP) and then click OK.
If you get the This program is blocked by group policy error, then there is one other registry entry to add to allow this install. Hold Windows key and press R.
Type regedit and press Enter.
In the Registry Windows, navigate to HKEY_LOCAL_MACHINE\SOFTWARE\Policies\Microsoft\Windows\safer\codeidentifiers\0\Paths
Right click on paths in the left pane and click Delete. Now repeat the above process to reinstall TCP/IP.
Close all windows, and restart your system. Your problem should be gone now. If not, move on to the next solution. This method does not apply to home based versions of windows.
Method 7: Uninstall and Reinstall Your Security/Antivirus Software
If you have recently installed any Internet Security Software, it may be blocking your access to the internet. Temporarily disable it to check if that’s what causing the problem. Quicket way is to just uninstall it, reboot the PC and then test – if system works without it, then re-install another AntiVirus. Hold the Windows key and press R. In the run dialog type appwiz.cpl and click OK. In the programs list, find your security software and right click on it. Click Uninstall. Follow the onscreen instructions to remove it and restart your system.
Method 8: Powerline Adapters
If you are using a Powerline Adapter, then it can interfere with your network. A reset can solve most of these problems. Refer to the instructions manual for the adapter to reset your Powerline Adapter.
Method 9: Disable Proxy
Go to Settings -> Network -> Proxy -> Manual Proxy Settings and turn it off.
Method 10: Change your internet router’s Wireless Mode to 802.11g
Many people have had luck with fixing this issue by changing their wireless router’s Wireless Mode to 802.11g instead of 802.11b+g+n. By default, almost all wireless routers are set to the 802.11b+g+nWireless Mode out of the box. In order to change your internet router’s Wireless Mode to 802.11g, you need to:
Login to your wireless router’s administration and settings panel through a browser of your choice. Instructions for accessing your wireless router’s administration and settings panel will be found on the user manual that came with your wireless router.
Scour everything under the Wireless category for a setting by the name of Wireless Mode or Mode.
Set your wireless router’s Mode/Wireless Mode to 11g or 11g – whichever applies in your case.
Save the changes and exit your wireless router’s administration and settings panel.
Restart both your wireless router and your computer.
Check to see whether or not the issue has been fixed once your computer boots up.
Method 11: Hard reset your wireless router
If none of the methods listed and described above have worked for you, there is still one more thing that you can try, and that is to hard reset your wireless router. Hard resetting your internet router will cause all of its settings and preferences to revert to their default values, and that, in many cases, has been able to fix this issue and restore internet access. In order to hard reset your wireless router, you need to:
Get your hands on a paperclip or a pin or any other pointy object.
Locate the recessed Reset button on your router. This button is basically a tiny hole normally located at the back of a router with the term Reset written above or below it.
Put the pointy end of the pointy object you acquired into the Reset button and push it all the way in. Press and hold the button for a good few seconds. This will successfully reset your router.
Once the router has been reset, restart it and then start reconfiguring it.
Method 12: Install Protocol
It is possible that the right protocol hasn’t been installed for internet settings. Therefore, in this step, we will be installing the correct protocol for the computer. For that:
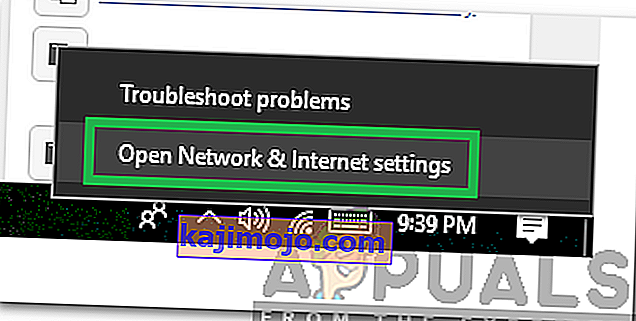
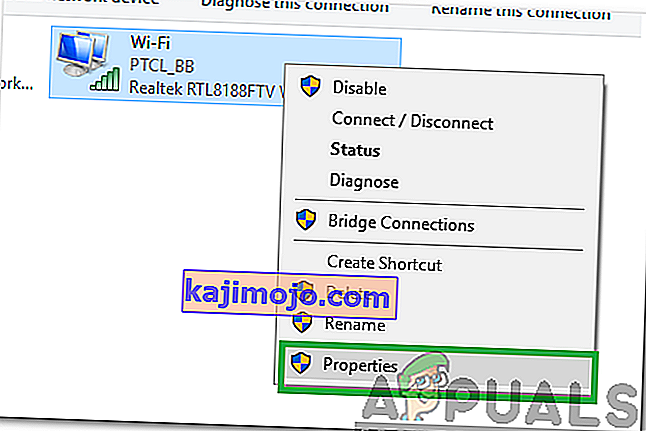
- Right–click on the “Wifi” icon in the system tray and select “Network and Internet Settings“.
- Click on the “Wifi” option in the left pane if you are using wifi and “Ethernet” option if you are using an ethernetconnection.
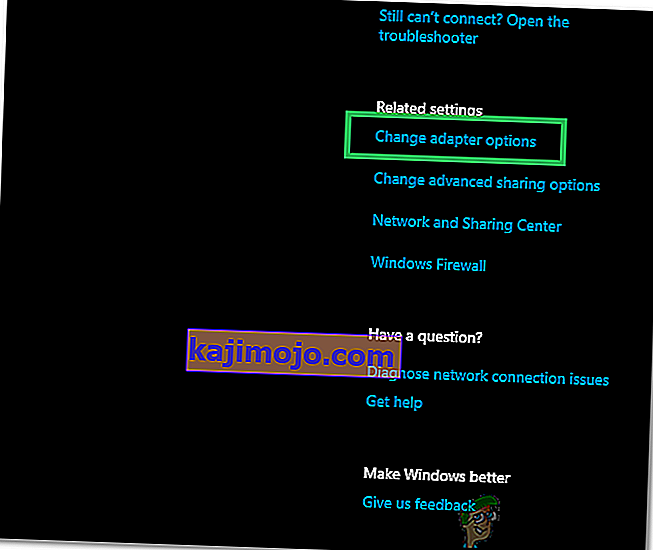
- Click on the “Change Adapteroptions” option.
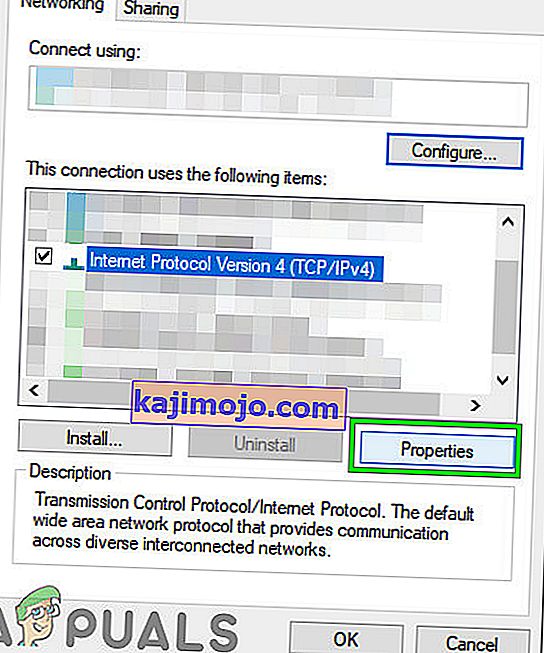
- Right-click on the connection you are using and select “Properties“.
- Click on the “Client for Microsoft Networks” option and select “Install“.
- Select the “Reliable Multicast Protocol” option and select install.
- Uždarykite langus ir patikrinkite , ar problema išlieka.


13 metodas: naudokite automatinius nustatymus
Gali būti, kad jūsų kompiuteris buvo sukonfigūruotas naudoti tam tikrą DNS adresą, tačiau tai neteikia tinkamų tinklo konfigūracijų jūsų tinklo adapteriui. Todėl šiame žingsnyje naudosime automatinius nustatymus šiai problemai išspręsti. Už tai:
- Paspauskite „Windows“ ir „R“ mygtukus ir įveskite „ncpa.cpl“.
- Dešiniuoju pelės mygtuku spustelėkite interneto ryšį ir pasirinkite „Ypatybės“.
- Dukart spustelėkite parinktį „IPV4“ ir pažymėkite „ Automatiškai gauti DNS serverio adresą “.
- Spustelėkite „Gerai“ ir patikrinkite, ar problema išlieka.

