„Windows 10“ yra viena iš labiausiai laukiamų „Microsoft“ versijų. Nors „Windows 8“ sukūrė naują tendenciją darbalaukio OS pasaulyje, ji turėjo keletą problemų dėl dizaino ir našumo, į kuriuos daugiausia dėmesio skyrė „Microsoft“ sistemoje „Windows 10“. Taigi „Windows 10“ galutinė versija buvo atskleista 2015 m. Liepos 29 d. taip pat išmaniuosius telefonus.
Jame buvo daug modifikacijų, atsižvelgiant į „Windows 8“ trūkumus. Tiesą sakant, tai yra pažangi „Windows“ versija, tačiau vis tiek kiekvieną dieną kyla įvairių pasekmių , susijusių su skirtingais vartotojais.
Didžiąją šių pasekmių dalį sudaro klaidos, atsirandančios bandant atlikti tam tikrą užduotį. Nemažai žmonių per klaidos pranešimą gavo bandydami atidaryti skirtingą programinę įrangą ir naršykles savo „Windows 10“ sistemoje. Ši klaida pateikiama su klaidos pranešimu, kad programa negalėjo tinkamai paleisti (0xc0000005). Spustelėkite Gerai, kad uždarytumėte programą . Ši klaida dažniausiai įvyksta naudojant interneto naršykles, tačiau ji neapsiriboja jomis. Dėl šios klaidos bet kuri „Windows“ programa gali nebeatsakyti. Taigi, ją reikia ištaisyti, kad ši pagrindinė programinė įranga vėl veiktų.

2016 11 12: Vartotojai pranešė, kad toliau išvardyti metodai taip pat veiks „Windows 7“.
„Windows 10“ klaidos 0xc0000005 priežastis:
Yra keletas žinomų priežasčių, dėl kurių ši klaida gali sutrikdyti įvairios programinės įrangos operacinę sistemą „Windows 10“. Viena iš tų priežasčių, kurios laikomos pagrindine priežastimi, yra trečiųjų šalių antivirusinė programa, sukelianti konfliktus su vykdomaisiais failais ir daranti įtaką jų veiklai. Kita vertus, registrai gali būti sugadinti dėl kenkėjiškų programų ir virusų, dėl kurių programos elgiasi neįprastai. Kartais šią klaidą gali sukelti ir blogos aparatinės įrangos tvarkyklės .
Sprendimai, kaip išspręsti „Windows 10“ klaidą 0xc0000005:
Remiantis aukščiau paminėtomis priežastimis, sprendimai yra tiesūs. Taigi, atlikite šiuos metodus, kad atsikratytumėte šio varginančio klaidos pranešimo.
Pataisykite sugadintus sistemos failus
Atsisiųskite ir paleiskite „Restoro“, norėdami nuskaityti ir atkurti sugadintus ir trūkstamus failus iš čia , atlikę toliau pateiktus sprendimus. Prieš tęsdami toliau pateiktus sprendimus, svarbu įsitikinti, kad visi sistemos failai yra nepažeisti ir nesugadinti.
1 metodas: Antivirusinės programos taisymas
Antivirusinės programos gali paveikti daugelio programų vykdomuosius failus. Taigi, norėdami išspręsti šią problemą, turite išjungti trečiosios šalies antivirusinę programą, kad patikrintumėte, ar ji buvo kaltininkė, ar ne. Atkreipkite dėmesį, kad išjungus antivirusines programas gali kilti rimtų grėsmių jūsų kompiuteriui, kai esate prisijungę prie interneto.
Taip pat galite pasikliauti pačios „Windows“ saugos programine įranga, ty „ Windows Defender“ . Jis turi tokią pačią funkciją kaip ir bet kuri kita antivirusinė programa. Antivirusinę programą galite išjungti pereidami į jos nustatymus ir išjungdami skydą.

Kai jis bus išjungtas, dar kartą patikrinkite, ar nėra klaidos. Jei vis tiek išlieka, pereikite prie kito metodo.
2 metodas: Registrų taisymas
Registro yra centrinė duomenų bazė, Windows, kuri yra nuolat naudojamas kompiuterio, kad padėtų jai skaityti daug įvairių failų ir parametrų, kad reikia paleisti. Registrai gali būti sugadinti dėl kai kurių tam tikrų failų, reikalingų kaupti viską vietoje, sugadinimo. Todėl dauguma ekspertų rekomenduoja atsarginę savo registro kopiją laikyti ir laikyti atsarginę kopiją įprastoje USB atmintinėje, kad sugadinimo atveju galėtumėte atgaivinti registrą ankstesnėje būsenoje. Bet jei nesukūrėte atsarginės registro kopijos, atlikite šiuos veiksmus, kad išspręstumėte registrus, kad išspręstumėte klaidą 0xc0000005 .
1. Atsisiųskite registro valymo programinę įrangą iš šios nuorodos .
2. Atsisiųsdami įdiekite jį naudodami rekomenduojamus parametrus. Baigę diegimo procesą atidarykite programinę įrangą.
3. Sąsajoje spustelėkite kairiajame skydelyje esantį skirtuką Registras ir spustelėkite mygtuką, pažymėtą kaip Nuskaityti . Jis pradės ieškoti klaidų registre ir, kai paieška bus baigta, bus suaktyvintas mygtukas Ištaisyti pasirinktą problemą . Spustelėkite tą mygtuką ir viskas bus sutvarkyta.

3 metodas: sugedusių tvarkyklių taisymas
Tvarkyklės yra programinės įrangos programos, padedančios kompiuteriui bendrauti su prie jo prijungta aparatūra. Taigi, kai jie yra sugadinti, aparatūra paprastai sukelia trikdžių . Šių sugedusių narų sutvarkymas gali padėti jums keliais būdais. Atlikite toliau nurodytus veiksmus.
1. Atidarykite „ Device Manager “ paspausdami „ Win + X“ ir pažymėdami jį iš sąrašo.
2. Įrenginių tvarkytuvėje slinkite žemyn, kad pamatytumėte, ar yra aparatūros su geltonu ženklu. Jei yra, tada dešiniuoju pelės mygtuku spustelėkite ten ir pasirinkite Atnaujinti tvarkyklės programinę įrangą . Jei neseniai įdiegėte tvarkykles, iš naujo įdiekite ir tuos tvarkykles.

3. Po pasirodžiusiame lange spustelėkite „ Ieškoti automatiškai, jei norite atnaujintos tvarkyklės programinės įrangos“ , kad ji galėtų automatiškai ieškoti ir įdiegti tvarkykles. Jei tvarkykles atsisiuntėte rankiniu būdu, spustelėkite toliau pateiktą parinktį, kad galėtumėte jas naršyti ir įdiegti. Atlikę procesą patikrinkite, ar nėra klaidos.

4 metodas: pataisykite BCD
Šį metodą vartotojai turi atlikti savo pačių rizika. Tai kai kuriems pasiteisino, o kai kuriems - ne. Atlikę šiame vadove nurodytus veiksmus, taip pat turėsite iš naujo suaktyvinti „Windows“.
- Laikykite Windows Key ir spauskite x . Pasirinkite komandų eilutę (administratorius)
- Įveskite „ bcdedit“ ir paspauskite ENTER. Jei jūsų „Windows Boot Loader“ kelias yra xOsload.exe, turite pašalinti kai kuriuos failus ir ištaisyti BCD. Tai galite pamatyti lauke PATH, atlikę komandą „ bcdedit“.
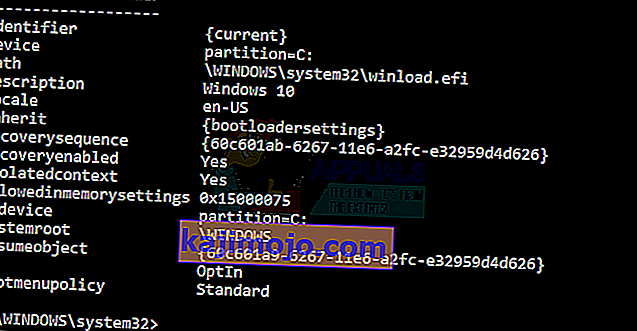
- Kai tai padarysite, vykdykite toliau pateiktas komandas, kai kurios gali grįžti nerastos, bet ignoruoti klaidas ir tęsti iki paskutinės. Įsitikinkite, kad paspaudėte klavišą ENTER po kiekvienos komandos.

Del D: \ Windows \ System32 \ xOsload.exe Del D: \ Windows \ System32 \ xNtKrnl.exe Del D: \ Windows \ System32 \ Drivers \ oem-drv64.sys atributas c: \ boot \ bcd -h -r -s ren c: \ boot \ bcd bcd.old bootrec / rebuildbcd
5 metodas: „Windows“ naujinimų tikrinimas
„Windows“ naujiniuose dažnai yra kai kurių klaidų ir trikdžių taisymai, tačiau jie taip pat garsėja tuo, kad užleido vietą naujoms žmonių kompiuterių problemoms. Tačiau atlikdami šį veiksmą patikrinsime, ar nėra jūsų operacinės sistemos naujinių, nes „Microsoft“ dažnai užtaiso visas problemas, kylančias dėl jų naujinimų. Norėdami tai padaryti, vadovaukitės toliau pateiktu vadovu.
- Paspauskite „Windows“ + „I“, kad atidarytumėte „Windows“ nustatymus.
- Nustatymuose spustelėkite parinktį „Atnaujinimai ir sauga“, o kairėje pusėje pasirinkite parinktį „Windows naujinimas“ .

- Kitame ekrane spustelėkite parinktį „Tikrinti naujinimus“ ir ji automatiškai paragins „Windows“ patikrinti galimus naujinimus.
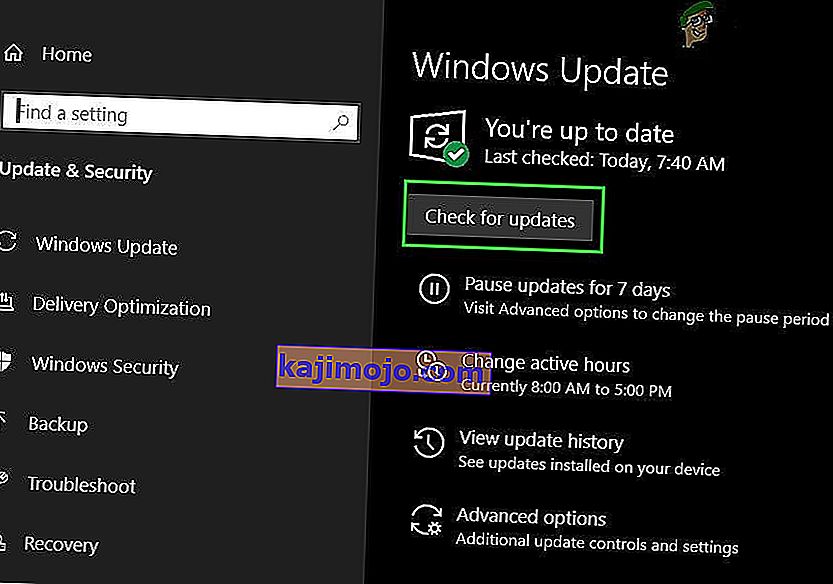
- Užbaigus naujinimo patikrinimą, spustelėkite mygtuką „Atsisiųsti“, kad įjungtumėte naujų naujinimų atsisiuntimą ir diegimą savo kompiuteryje.
- Įdiegę šiuos naujinimus, patikrinkite, ar tai padėjo išspręsti problemą jūsų kompiuteryje.


6 metodas: kompiuterio atkūrimas
Jei ką tik pradėjote spręsti šią problemą, ji gali būti suaktyvinta dėl netinkamo tvarkyklės diegimo ar net dėl nesąžiningos programos, kurią neseniai įdiegėte savo kompiuteryje. Todėl šiame žingsnyje mes pakeisime kompiuterio būseną į ankstesnę datą ir, tikiuosi, tai turėtų išspręsti mūsų problemą, jei tai buvo dėl aukščiau nurodytų priežasčių. Norėdami tai padaryti:
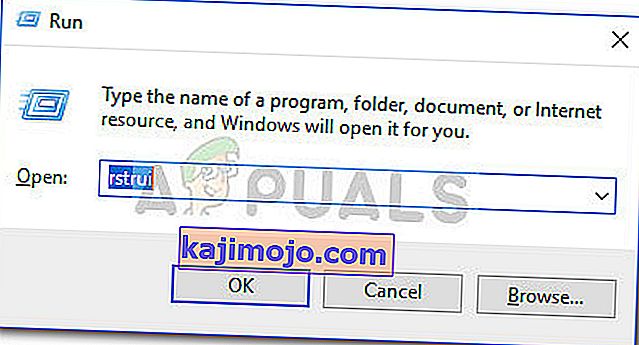
- Paspauskite „Windows“ + „R“, kad atidarytumėte eilutę Vykdyti.
- Įveskite „rstrui“ ir paspauskite „Enter“, kad atidarytumėte atkūrimo valdymo langą.
- Spustelėkite „Next“ ir pažymėkite parinktį „Show more Restore Points“ .
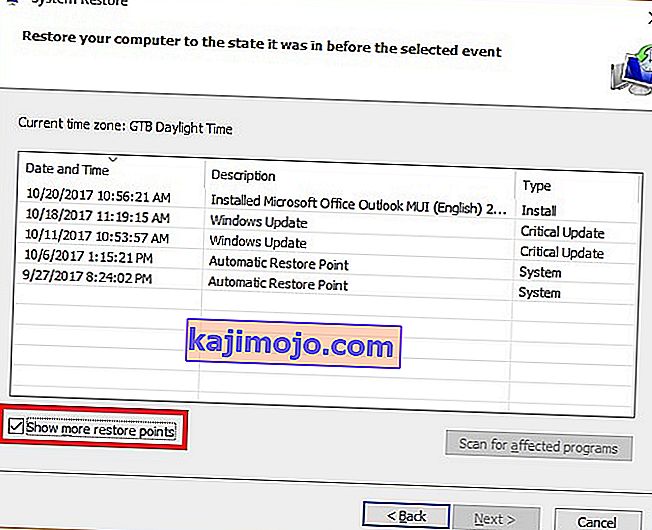
- Iš sąrašo pasirinkite atkūrimo tašką, kuris yra iki datos, kurią ši problema atsirado.
- Dar kartą spustelėkite „Kitas“ ir vykdykite ekrane pateikiamas instrukcijas, kad viskas būtų grąžinta į pasirinktą datą.
- Baigę atkūrimą, patikrinkite, ar problema vis dar išlieka.


7 metodas: įjunkite užkardą
Kai kuriais atvejais gali būti, kad klaida suveikia dėl to, kad programa yra įtartina, arba bent jau, jei ji buvo pažymėta įtartina, o jūsų kompiuteryje neveikia „Windows“ užkarda, kad patvirtintų šią įtartiną. Todėl atlikdami šį veiksmą įsitikinsime, kad įjungta „Windows“ užkarda, kad atsikratytume šios klaidos. Už tai:
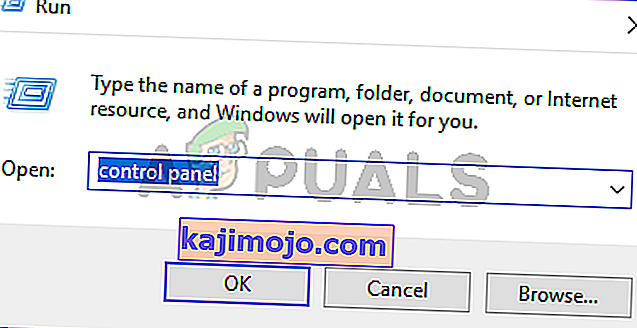
- Paspauskite „Windows“ + „R“, kad atidarytumėte eilutę Vykdyti.
- Įveskite „Control Panel“ ir paspauskite „Enter“, kad paleistumėte klasikinę valdymo skydelio sąsają.
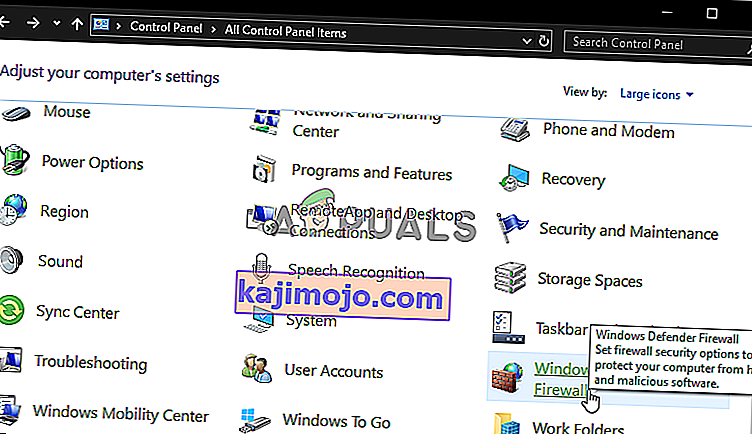
- In the Control Panel, click on the “ViewBy:” option and select the “Large Icons” button.
- After making this selection, click on the “Windows Defender Firewall” option to launch the Firewall and then select the “Turn Windows Defender Firewall On or Off”.
- Make sure to check the “Turn on Windows Defender Firewall” for both the available options to turn the Firewall on.
- After making this selection, save your changes and close out of the Window.
- After doing so, check to see if the issue still persists.


Method 8: Run SFC Scan
In some situations, you might’ve installed a bad driver on your computer or at some point, due to a storage failure, some system files or drivers might’ve been corrupted. Therefore, in this step, we will be running a complete system scan to identify any drivers that are missing signatures or to fix any abnormalities in the system files. For that:
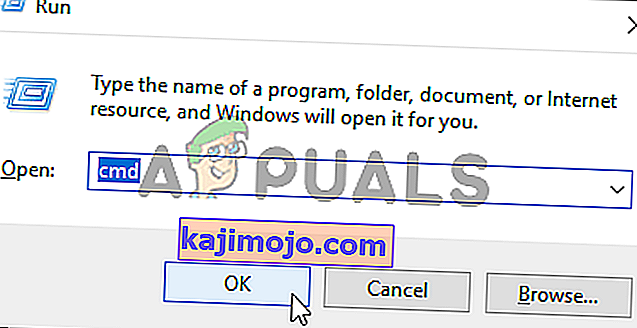
- Press “Windows’ + “R’ to open the Run prompt.
- Type in “cmd” and then press “Shift’ + “Ctrl” + “Enter” to provide admin permissions.Running the Command Prompt
- Type in the following command inside the command prompt and press “Enter” to execute it.
sfc /scannow
- Let the computer scan for any broken or corrupted items and it should automatically replace them with working ones.
- Check to see if doing so fixes the error message.

Method 9: Disabling Data Execution Prevention
Data Execution Prevention is a program that prevents certain programs or executables from being able to run on your computer because it suspects that they might be viruses. Due to this prevention, sometimes, as a false alarm, legit applications might also face issues while trying to run on your computer. Therefore, in this step, we will be disabling this setting from the system configuration panel. For that:
- Press ‘Windows’ + “R’ to open the Run prompt.
- Type in “Control Panel” and press “Enter” to launch the classical control panel interface.

- Inside the Control Panel, click on the “View By:” icon and then select the “Large Icons” option.
- After selecting Large Icons, select the “System” option.
- Click on the “Advanced System Settings” option on the left side of the screen.
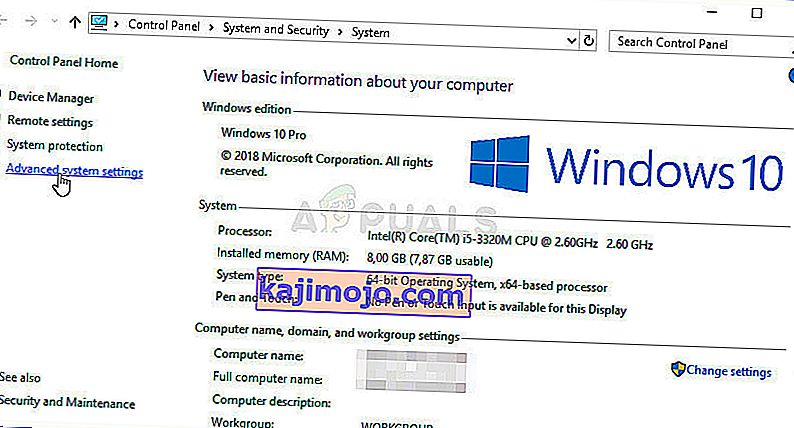
- In the advanced System Settings, click on the “Advanced” tab from the top.
- In the advanced tab, click on the “Settings” option under the “Performance” heading.
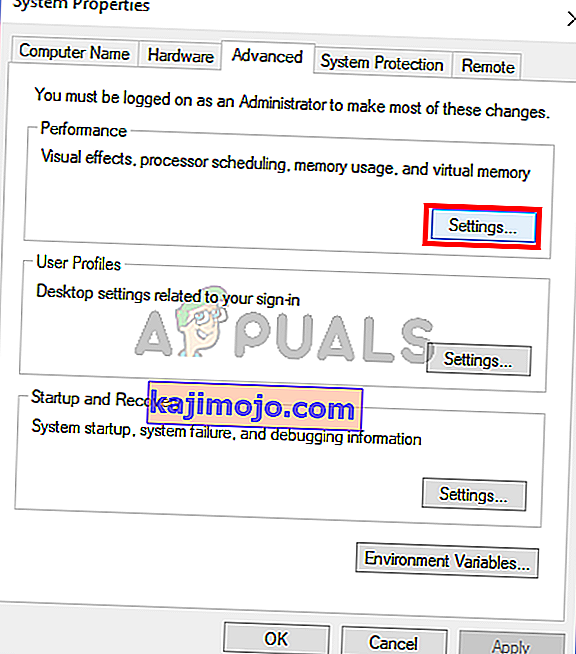
- On the next window that opens up, click on the “Data Execution Prevention” tab, and then select the “Turnon DEP for all programs except thoseI Select” option.
- After that, click on the “Add” option and point to the executable of the application that you are facing issues with.
- This way, that application will no longer come under the jurisdiction of the DEP program.
- Check to see if doing so has fixed the issue.


If the above process is unable to fix the issue, it might be because the executable isn’t the only one being affected by the DEP program. Sometimes the DEP might actually be preventing a herd of executables from being run on the computer and to counter this we will be disabling DEP completely.
Disabling DEP completely cannot be done through any Windows setting and it needs to be done manually through the command prompt. Remember to take this step as a last resort because this can in some cases makes your computer more vulnerable to viruses and malware attacks. In order to disable DEP through the command prompt:
- Press “Windows” + “R’ to open the Run prompt.
- Inside the Run prompt, type in “cmd” and then press “Shift” + “Ctrl” + “Enter” to launch in admin mode.
- Inside the command prompt, type in the following command and press “Enter” to execute it on your computer.
bcdedit.exe /set {current} nx AlwaysOff - Once the command has been executed, run the application that you want to and check to see if the error message still persists.
Method 10: Disable Firewall and Windows Defender
In some situations, the executable that you want to run on the computer might actually be blocked by the Firewall and it would not be able to make contact with its servers this way. Therefore, we will have to allow the executable in our Firewall for both public and private networks which should get it working if the Firewall is preventing it.
In addition to that, sometimes the Windows Defender might prevent the application from running on your computer because its local files might be suspicious and not properly signed. This can be due to a false alarm as well so we will be disabling the Windows Defender for the application as well by adding an exclusion. In order to do that:
- Press “Windows” + “R” to launch the Run prompt.
- Type in “ControlPanel” and press “Enter” to launch the classical control panel interface.
- Click on the “View by:” button, select “Large Icons” and then click on the Windows Defender Firewall option.
- Select the “Allow an app orfeature through the Firewall” button on the left pane and then click on the “Change Settings” button and accept the prompt.
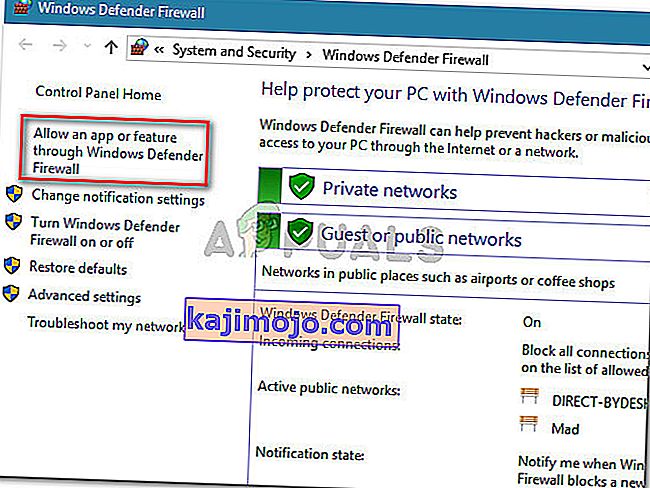
- From here, make sure that you check both the “Public” and the “Private” options for the application and its entries.
- Save your changes and exit out of the window.
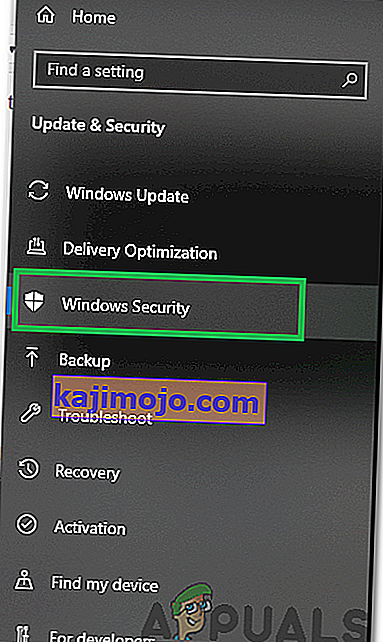
- After that, press “Windows” + “I” to launch the settings and click on the “Updateand Security” option.
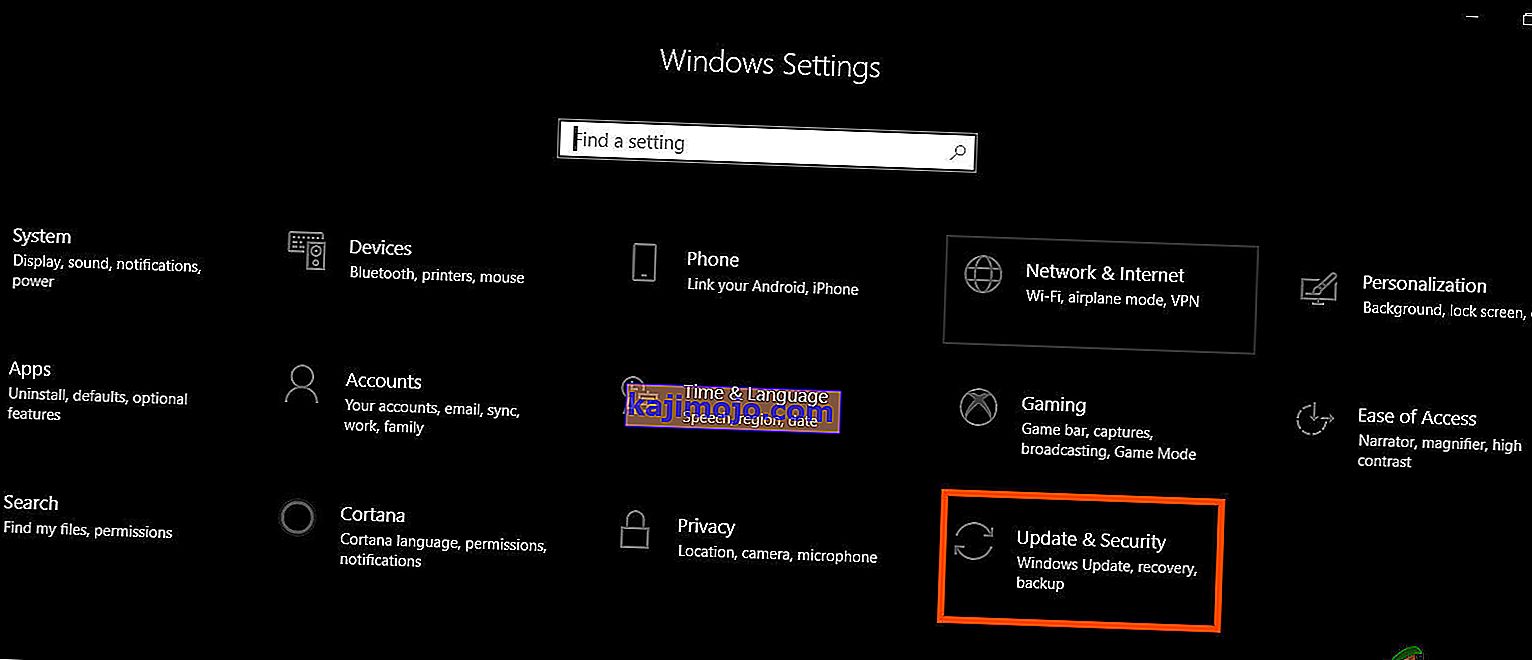
- From the left pane, click on the “Windows Security” button and then click on the “Virus and Threat Protection” button.
- Select the “Manage Settings” button under the Virus and Threat Protection Settings heading.
- Scroll down and click on the “Add or Remove Exclusions” button in the next window.
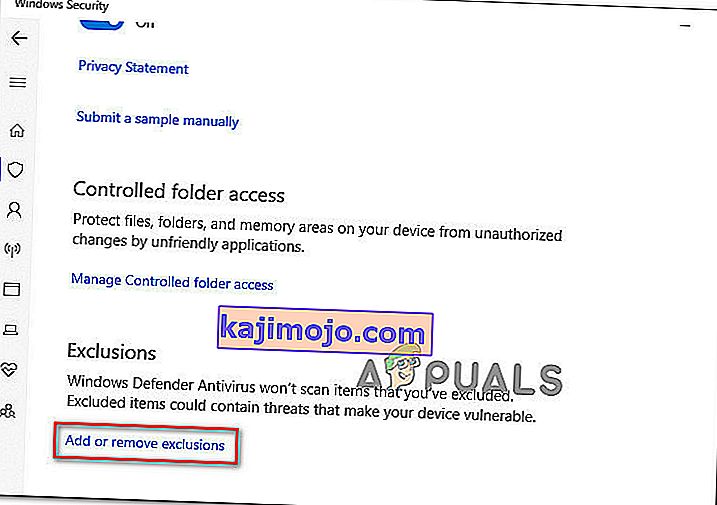
- Click on the “Add an Exclusion” option and select “Folder’ from the File type.
- Make sure to specify the application’s folder with which the issue is occurring and exit out of this window after saving your changes
- Check and see if doing so has fixed the error message.


Method 11: Reinstall Firefox
If you are getting this error while trying to launch Firefox, it might be occurring because the applications haven’t been installed properly on your computer. Therefore, in this step, we will be launching the app management window and uninstalling Firefox after which we will reinstall it completely by downloading it from the Firefox website. For that:
- Press “Windows” + “R” to open the Run prompt.
- Type in “appwiz.cpl” and press “Enter” to open the app management window.

- In the app management window, scroll down and right-click on the “Firefox” application.
- Select “Uninstall” from the list and then follow the on-screen instructions to remove the software from your computer.
- Repeat this step for all instances and bundled applications of the software installed on your computer.
- Make sure to disable any third-party antiviruses at this point to make sure that the software is installed smoothly.
- Head on over to the Mozilla website and click on the download button.

- Click on the downloaded executable and install it on your computer following the on-screen instructions.
- Check to see if doing so has fixed the error message on your computer.


Method 12: Scanning for Malware
It is possible in some cases that the computer has acquired malware that is preventing the user from being able to run all the system functions on their computer. Therefore, in this step, we will be using the default Windows Defender to scan our computer thoroughly for any viruses or malware that might’ve found its way on our computer. For that:
- Press the “Windows” + “I” keys simultaneously on your PC to open the Settings tab.
- Navigate to the Update& Security option and then click on the “Windows Security” button on the left tab.
- After that, click on the “Open Windows Security” and select the “Virus and Threat Protection” option.
- After that, click on the “Scan Options” button below the “Quick Scan” window.
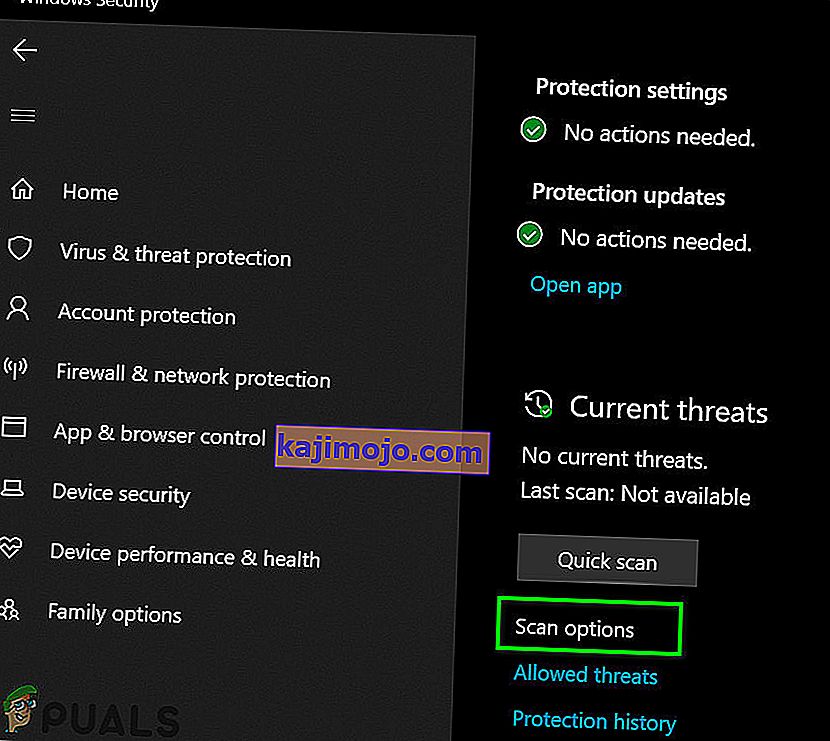
- Click on the “Full Scan” option and then hit the button of “Scan Now”.
- Wait for a few seconds while this process gets completed and then finally check if the error gets resolved now.


Microsoft Security Scanner is an additional tool that you can use to test the system for any further viruses and malware because sometimes the default tool isn’t able to perform the scan properly. Therefore, in this step, if the issue still hasn’t been resolved, we will be using the Microsoft Security Scanner to further make sure for any issues.
- Launch your browser and download the Microsoft Security Scanner from here.
- After downloading the executable, run it on your computer and let it install.
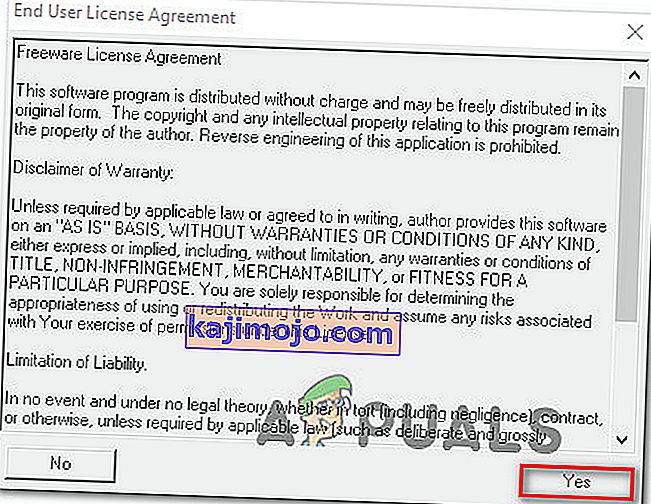
- Accept the License Agreement terms and click on “Next”.
- Select “Full Scan” and click on “Next”.
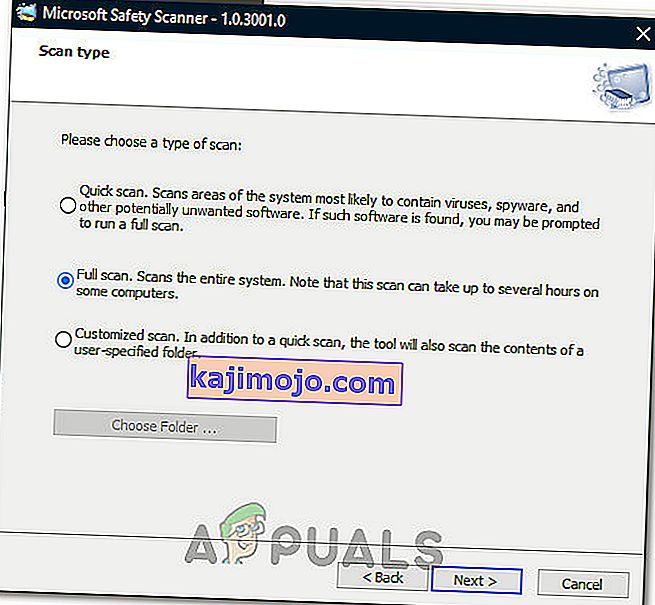
- After you opt for a full scan, the software will start scanning your entire computer to look for any malware or viruses that might’ve disguised themselves as normal executables or applications.
- After this scan has been finished, check to see if the error message still persists.


Method 13: Install Missing Drivers
It is possible in some situations that your device is missing certain drivers due to which this particular issue is being triggered on your computer. Therefore, we will be checking for any missing drivers and then we will check to see if the error is fixed. In order to do this, follow the guide below.
- Download Driver Easy on your computer.

- Run the downloaded executable and install the software on your computer.
- Run the check and see if there are any missing drivers on your computer.
- Install these missing drivers and then install them either manually or automatically using the Software.
- After installing all the missing drivers, check to see if the issue still persists.

Method 14: Reconfigure Registry
It is possible that in some cases, you haven’t properly configured all the registry settings or that you unknowingly configured something incorrectly. Therefore, in this step, we will be reconfiguring our Registry to fix a certain key that sometimes, if misconfigured, causes this particular error on Windows. In order to do this, follow the guide below.
- Press “Windows” + “R” to open the Run prompt.
- Type in “regedit” and press “enter” to launch the registry editor.

- Inside the registry editor, navigate to the following location.
HKLM\SOFTWARE\Microsoft\Windows NT\CurrentVersion\Windows\AppInit_Dlls
- Double click on the “LoadAppInit_DLLs” entry on the right side of the screen.
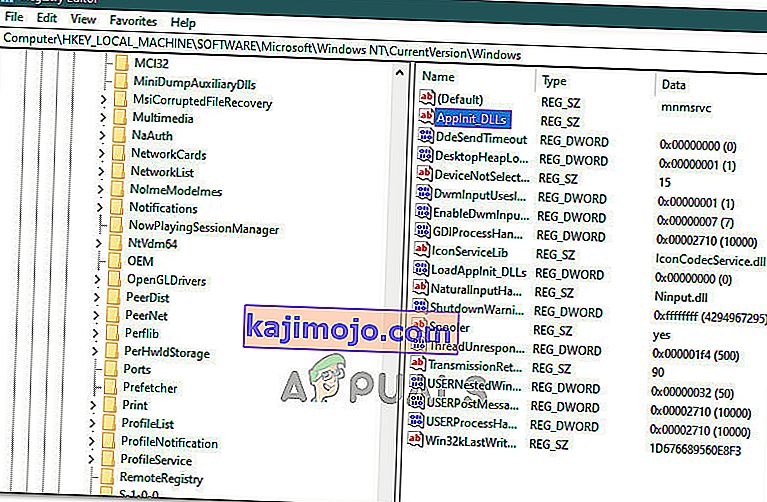
- Change the value of this registry from “1” to “0”.
- Save your changes and exit the registry editor.
- Check to see if doing so has fixed the error.


Method 15: Update Disk Drivers
In some cases, the Disk Drivers that are being used to control your Storage and other Disks installed on the computer might have been outdated due to which the error is being triggered. Therefore, in this step, we will first be opening the Device Management Window and from there, we will be updating these drivers. In order to do so, follow the steps mentioned below.
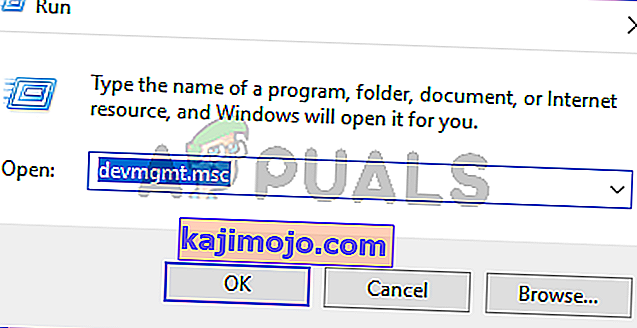
- Press “Windows’ + “R” to open the Run prompt.
- Type in “Devmgmt.msc” and press “Enter” to launch the device management window.
- In the Device Manager, double click on the “DiskDrives” option to expand it.
- Right-click on the storage device listed and select the “Update Driver” option.
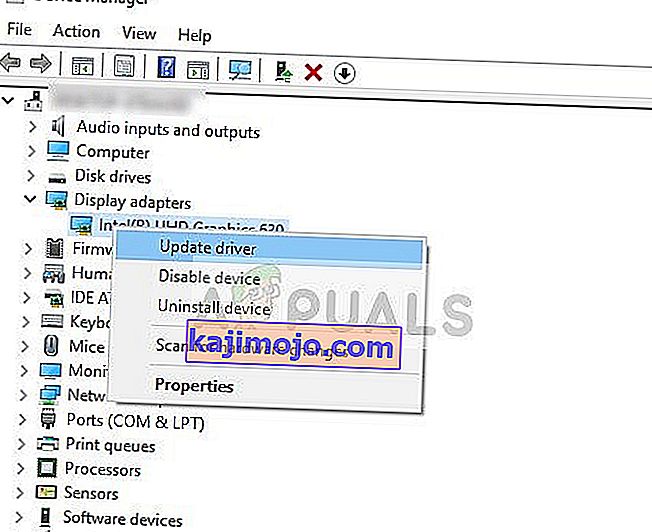
- Select the “Search Automatically for Drivers” option and let the setup search.
- If there are any drivers available, Windows will automatically check for them and install them on your computer.
- Check to see if doing so has fixed the issue.


Method 16: Disabling Automatic Updates and Uninstalling Updates
It is possible in some cases, that this error is stemming from a faulty update install. Microsoft is notorious for pushing out updates that aren’t properly customized to work for all hardware combinations and often go on to break things instead of making them better. Therefore we will make sure that the recent update isn’t installed on our computer.
In order to do this, we will have to first disable automatic updates on our computer and then we will be uninstalling the recently installed updates. Make sure to back up any important data that you don’t want to lose just in case this goes bad.
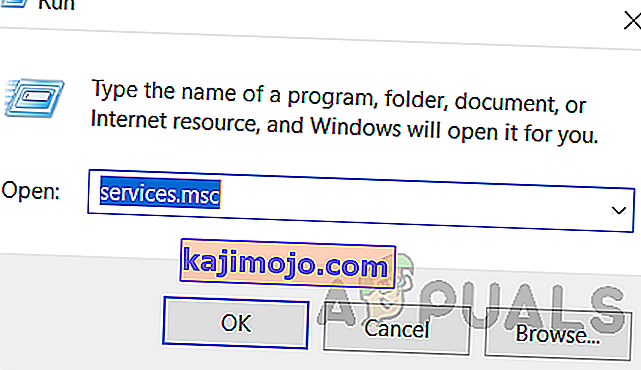
- Press “Windows” + “R’ to open the Run prompt.
- Type in “service.msc” and press “Enter”.
- Scroll through the list and double click on the “Windows Update” service.
- Click on the “Stop” button and then click on the “Startup Type” dropdown.
- Select “Disabled” from the list and select the “Apply” button from the window.
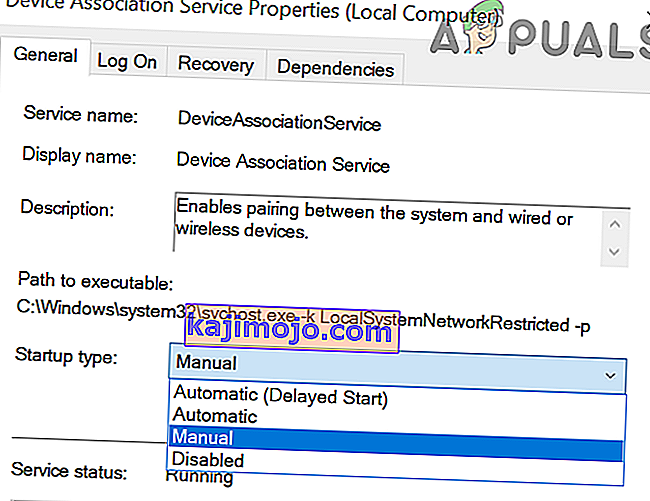
- Click on “OK” to close out of this window.
- Check to see if doing so has stopped your computer from updating.


After stopping the computer from updating, we will now be uninstalling the recent updates that have been installed on your computer. For that:
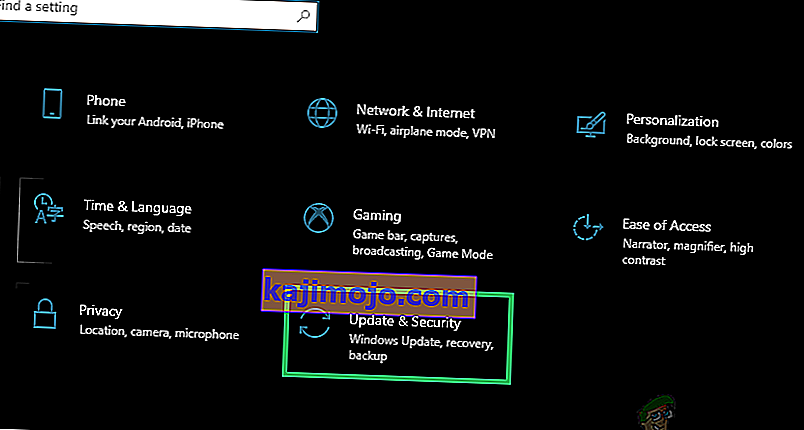
- Press “Windows” + “I” buttons to open the settings.
- In settings, click on the “Update and Security” option and then select the “Windows Update” button from the left pane.
- In the Windows Update, click on the “View Update History” option.
- In the Update History, click on the “Uninstall Updates” option and it should take you to the uninstallation screen where all the recently installed updates will be listed.
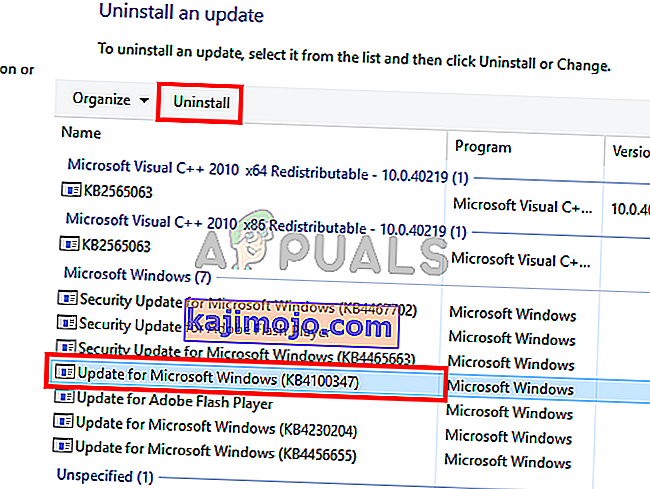
- From the list, right-click on the update that was installed recently and caused this error on your computer.
- Right-click on this update and select the “Uninstall” button to remove it completely from the computer.
- Follow through with the on-screen instructions.
- Check to see if uninstalling has fixed this issue.


Additional Fixes:
- In addition to some of the recommendations given above, you should try to check if there are any bad memory modules (RAM) installed on your computer which can be a cause of this.
- Be to, būtinai patikrinkite, ar nepajudinote RAM atminties, viršijančios rekomenduojamą ribą. Jei tai padarėte, pabandykite grąžinti gamyklinius nustatymus ir patikrinkite, ar tai išsprendžia jūsų problemą.