Nors šiais laikais dauguma iš mūsų naudojasi „Wi-Fi“, yra atvejų, kai interneto ryšiui naudosite „Ethernet“. Turėkite omenyje, kad Ethernet apibrėžimas labai skiriasi nuo to, kuriam mes paprastai naudojame žodį „Ethernet“. Paprastai tai vadinama laidiniu ryšiu su interneto maršrutizatoriumi. Galbūt matėte laidus, einančius nuo kompiuterio galo prie interneto maršrutizatorių. Paprastai, kai kas nors sako, kad jų Ethernet neveikia, tai reiškia, kad jų kompiuteriui kyla problemų prisijungiant prie interneto. Kadangi jų kompiuteris yra prijungtas prie interneto kabeliu, tam kabeliui ar jo tvarkyklei ar tinklo kortelei kyla problemų.
„Ethernet“ neveikimo problema gali būti susijusi su daugeliu dalykų. Kadangi mes nekalbame apie konkretų klaidos pranešimą, yra daugybė dalykų, kurie gali sukelti šią problemą. Tai gali būti probleminė viela, laisvas ryšys, tinklo plokštė, pasenusi tvarkyklė ir dar ne kas. Problemą gali sukelti tiek aparatūros, tiek programinės įrangos problema. Taigi, mes turėsime pereiti kelis metodus, apimančius tiek programinės, tiek aparatinės įrangos problemas, kurios gali sukelti Ethernet problemas.
Patarimai
- Kartais problema gali būti tiesiog sugadintas uostas. Taigi, įsitikinkite, kad naudojate tinkamą maršrutizatoriaus prievadą. Maršrutizatoriuje yra keli prievadai, todėl turėtumėte prijungti savo Ethernet kabelį prie kito. Baigę patikrinkite, ar problema išspręsta.
- Laikinas antivirusinės programos išjungimas yra dar vienas dalykas, kuris gali sukelti problemą. Beveik kiekvienoje antivirusinėje yra išjungimo parinktis. Kelias minutes išjunkite antivirusinę programą ir patikrinkite, ar „Ethernet“ veikia, ar neveikia.
1 metodas: patikrinkite, ar įjungtas „Ethernet“
Kartais problemą gali sukelti išjungtas Ethernet. „Ethernet“ ir įvairius kitus įrenginius galima lengvai išjungti iš „Device Manager“. Net jei neprisimenate, kad išjungėte „Ethernet“, tikslinga patikrinti būseną. Kartais įrenginiai išjungiami atsitiktinai arba dėl klaidos.
Atlikite šiuos veiksmus, kad patikrintumėte ir įgalintumėte „Ethernet“
- Laikykite „ Windows“ klavišą ir paspauskite R
- Įveskite devmgmt.msc ir paspauskite Enter

- Dukart spustelėkite Tinklo adapteriai
- Suraskite ir dešiniuoju pelės mygtuku spustelėkite savo tinklo įrenginį
- Pasirinkite Įgalinti . Jei matote parinktį Išjungti , tai reiškia, kad jūsų įrenginys jau įgalintas. Tokiu atveju spustelėkite Išjungti ir pasirinkite Įgalinti Tai paleis įrenginį iš naujo.

Atlikę patikrinkite, ar Ethernet veikia, ar neveikia.
2 metodas: iškraukite maitinimą
Tai senas triukas, tačiau jis pasiteisino daugeliui vartotojų. Iškraunant energiją iš kompiuterio problema išspręsta. Vykdykite toliau pateiktas instrukcijas, kad atliktumėte šį metodą
- Išjunkite sistemą
- Ištraukite / atjunkite maitinimo laidą. Išimkite bateriją, jei turite nešiojamąjį kompiuterį
- Laikykite maitinimo mygtuką už 30 sekundžių ir tada atleiskite
- Dabar prijunkite sistemą (arba įdėkite akumuliatorių, jei turite nešiojamąjį kompiuterį)
- Įjunkite savo sistemą
Tai turėtų išspręsti problemą. Dabar viskas turėtų būti gerai.
3 metodas: atnaujinkite tvarkykles
Jei pirmiau minėti metodai neveikė, yra tikimybė, kad turite sugedusį tvarkyklę. Yra keli dalykai, kuriuos galite padaryti su savo vairuotojais. Pirma, turėtumėte pabandyti sugrąžinti tvarkykles, jei problema atsirado atnaujinus tvarkyklę. Naujausiuose tvarkyklėse kartais kyla klaida ar suderinamumo problema. Tada turėtumėte atnaujinti tvarkykles į naujausią versiją. Tai galite padaryti tiek automatiškai, tiek rankiniu būdu. Galiausiai turėtumėte pašalinti ir leisti „Windows“ įdiegti bendrą tinklo plokštės tvarkyklės versiją.
Pastaba: kadangi kyla problemų prisijungiant prie interneto, kai kurie iš šių veiksmų gali jums netikti. Pavyzdžiui, negalite ieškoti naujausios tvarkyklės internete ir jos atsisiųsti. Turėtumėte tai padaryti iš kito asmeninio kompiuterio, geriausia iš to, kurį skaitote šį straipsnį, ir nukopijuoti jį į savo problemą.
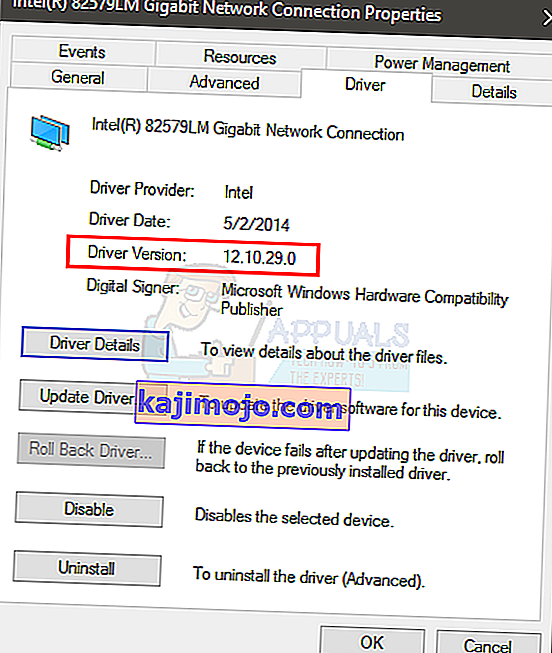
Jei neseniai įdiegėte atnaujintą tvarkyklę
Nors vargu ar atnaujinta tvarkyklė sukels šią problemą, tačiau tai nėra visiškai neįmanoma. Jei neseniai įdiegėte naują versiją, yra didelė tikimybė, kad grįžus į ankstesnę versiją problema bus išspręsta.
- Laikykite „ Windows“ klavišą ir paspauskite R
- Įveskite devmgmt . MSc ir paspauskite Enter

- Dukart spustelėkite Tinklo adapteriai
- Suraskite ir dukart spustelėkite savo tinklo įrenginį
- Spustelėkite skirtuką Tvarkyklė
- Spustelėkite „ Atkurti tvarkyklę ...“ ir vykdykite ekrane pateikiamas instrukcijas. Pastaba: Jei mygtukas „Grąžinti tvarkyklę ...“ yra pilkas, tai reiškia, kad negalite grįžti į ankstesnę versiją.

Jei grįžote į ankstesnę versiją, iš naujo paleiskite kompiuterį, kai procesas bus baigtas, ir patikrinkite, ar problema išspręsta. Jei problema vis dar kyla, pabandykite atnaujinti tvarkyklę.
Atnaujinti
Pastaba: galbūt negalėsite atlikti visų veiksmų, nes šiems veiksmams atlikti reikia interneto prieigos. Taigi atlikite šiuos veiksmus kitame kompiuteryje ir perkelkite atsisiųstą failą per USB.
Tvarkyklę galite atnaujinti automatiškai ir rankiniu būdu. Tačiau automatinis naujinimas jums neveiks, nes jūsų „Windows“ ieškos tvarkyklės ir tam reikalinga prieiga prie interneto. Neautomatiniam atnaujinimui taip pat reikalingas internetas, tačiau galite atsisiųsti tvarkyklę iš kito kompiuterio ir perkelti į aukos kompiuterį.
Neautomatinis atnaujinimas:
- Laikykite „ Windows“ klavišą ir paspauskite R
- Įveskite devmgmt.msc ir paspauskite Enter

- Dukart spustelėkite Tinklo adapteriai
- Prieš atnaujindami tvarkyklę, turėtumėte patikrinti, ar turite naujausią tvarkyklės versiją, ar ne. Norėdami tai padaryti, atlikite toliau nurodytus veiksmus
- Suraskite ir dukart spustelėkite savo tinklo įrenginį
- Spustelėkite skirtuką Tvarkyklė
- Pažvelkite į vairuotojo skyrių . Pamatysite tvarkyklės versiją. Atkreipkite dėmesį į tvarkyklės versiją arba laikykite šį langą atidarytą
- Dabar eikite į vairuotojo gamintojo svetainę ir ieškokite naujausios savo įrenginio tvarkyklės
- Patikrinkite, ar turite naujausią versiją, ar ne. Jei turite naujausią versiją, pereikite prie žemiau esančio skyriaus „ Pašalinti“ . Kitu atveju atsisiųskite tvarkyklę ir tęskite

- Suraskite ir dešiniuoju pelės mygtuku spustelėkite savo tinklo įrenginį
- Pasirinkite Atnaujinti tvarkyklės programinę įrangą ...

- Spustelėkite Naršyti mano kompiuteryje ieškant tvarkyklių programinės įrangos

- Spustelėkite Naršyti ir pasirinkite tvarkyklę, kurią atsisiuntėte anksčiau (mūsų atveju - į vietą, kur nukopijavote atsisiųstą tvarkyklę).
- Spustelėkite Pirmyn ir vykdykite visas papildomas ekrane pateikiamas instrukcijas

Tai atlikę iš naujo paleiskite kompiuterį ir patikrinkite, ar problema išspręsta.
Pašalinti
Jei atnaujinti nepavyko, reikia įdiegti tvarkyklę. Kai pašalinsite tvarkyklę, „Windows“ automatiškai įdiegs bendrą įrenginio tvarkyklę, kai kitą kartą paleidžiate įrenginį. Šie bendrieji tvarkyklės nėra naujausios, tačiau jos yra labiausiai suderinamos versijos. Taigi tai gali būti naudinga jums.
- Laikykite „ Windows“ klavišą ir paspauskite R
- Įveskite devmgmt.msc ir paspauskite Enter

- Dukart spustelėkite Tinklo adapteriai
- Suraskite ir dukart spustelėkite savo tinklo įrenginį
- Dešiniuoju pelės mygtuku spustelėkite ekrano įrenginį ir pasirinkite Vykdyti papildomas ekrane pateikiamas instrukcijas

- Palaukite, kol jis bus pašalintas
Pabaigę pašalinimo procesą, iš naujo paleiskite kompiuterį. Paleidus iš naujo, turėtų būti įdiegti bendrieji tvarkyklės. Tai turėtų išspręsti problemą, jei ją sukėlė vairuotojo problema.
4 metodas: patikrinkite tinklo kabelį
Lange Tinklo ryšiai įgalinę Ethernet ryšį, taip pat galite patikrinti jo būseną. Šis procesas yra labai svarbus norint nustatyti pagrindinę problemos priežastį. Pavyzdžiui, jei jūsų kompiuteris neatpažįsta kabelio nuo pat pradžių, žinoma, nebus jokio ryšio. Šis neatpažinimas gali būti dėl daugelio priežasčių. Norėdami patikrinti tinklo kabelį, atlikite toliau nurodytus veiksmus.
- Paspauskite „Windows“ + „I“, kad atidarytumėte nustatymus.
- „Windows“ nustatymuose spustelėkite parinktį „Tinklas ir internetas“ , tada kairėje pusėje spustelėkite parinktį „Ethernet“ .
- Dabar kitame lange jis parodys keletą „Ethernet“ jungčių arba gali rodyti tik vieną.
- Jei po „Ethernet“ jungtimi parašyta „Neprijungta“ , tai reiškia, kad kabelis neatpažįstamas iš einant ir kyla problemų dėl adapterio, kabelio arba programinės įrangos, kuri turėtų jį atpažinti.


Jei jūsų kabelis atrodo prijungtas, pabandykite jį atjungti ir vėl prijungti. Kabeliai gali sugesti laiku arba dėl netinkamo naudojimo. Jei jūsų Ethernet adapteris vis tiek rodo, kad tinklo kabelis yra atjungtas, pabandykite pereiti prie kito kabelio. Taip pat galite išbandyti kitą maršrutizatoriaus, jungiklio ar modemo prievadą (jei jų yra daugiau), nes kartais šie prievadai gali sugesti.
5 metodas: stebėkite išsamią ryšio informaciją
Kai kuriais atvejais gali būti, kad kompiuteris netinkamai atpažįsta „Ethernet“, nes jūs arba jūsų kompiuteris neteisingai sukonfigūravo kai kurias tinklo detales, reikalingas norint tinkamai užmegzti ryšį. Todėl šiame žingsnyje mes stebėsime kai kuriuos duomenis apie ryšį ir patikrinsime, ar teisingai nustatėme visus parametrus. Už tai:
- Press “Windows” + “R” to open the Run prompt.
- Type in “ncpa.cpl” and press “Enter” to launch the network configuration panel.

- Inside the Network Configuration, right-click on the “Ethernet” adapter that your computer is using.
- Select the “Properties” option from the menu to open the Ethernet properties.
- Inside the “Ethernet Properties” window, double-click on the “Internet Protocol Version4 (TCP/IPV4)” entry and this should open up the IPV4 configuration window.
- In this window, make sure that you have checked the “Obtain an IP Address Automatically” and the “Obtain DNS Server Automatically” option.
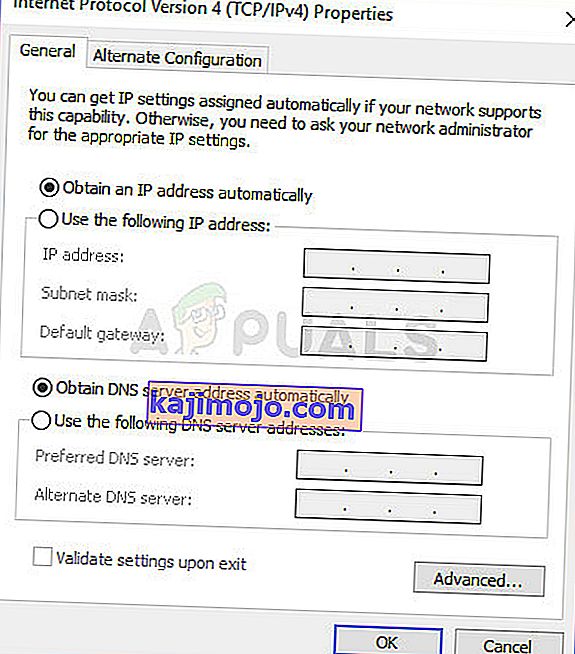
- Although there are scenarios where these details have to be entered manually, but we have to make sure first that the computer is able to correctly obtain this information automatically.
- After making this information extraction automatic, check to see if the issue still persists.


NOTE: While most connections use IPv4, in the Ethernet Properties window you can also find an option called Internet Protocol Version 6 (TCP/IPv6). If your network uses IPv6 then you’ll have to make the changes here and not in the IPv4 option as described above.
Method 6: Turn OFF Antivirus Protection
In some cases, it is entirely possible that a Windows component might actually be the root of this issue on your computer. The Windows Firewall or the Windows Defender might be causing this issue on your computer. Therefore, in this step, we will be disabling both the Windows Defender and the Windows Firewall to make sure that they are not the culprit. It is also possible that the third-party antivirus protection is causing this issue so make sure to disable any third-party protection as well. In order to proceed:
- Press “Windows” + “R” to open the Run prompt.
- Type in “Control Panel” and press “Enter” to launch the classical Control Panel interface.

- In the Control Panel, click on the “ViewBy:” option and select the “Large Icons” button.

- After making this selection, click on the “Windows Defender Firewall” option to launch the Firewall and then select the “Turn Windows Defender Firewall On or Off”.Opening Windows Defender Firewall from Control Panel
- Make sure to uncheck the “Turn On Windows Defender Firewall” for both the available options to turn the Firewall Off.
- After making this selection, save your changes and close out of the Window.
- Press “Windows” + “I” to open the windows Settings.
- Inside the settings, click on the “Update and Security” option and select the “Windows Security” button from the left side.

- On the next screen, click on the “Virus and Threat Protection” option and click on the “Manage Settings” option below the “Virus and Threat protection settings” heading.
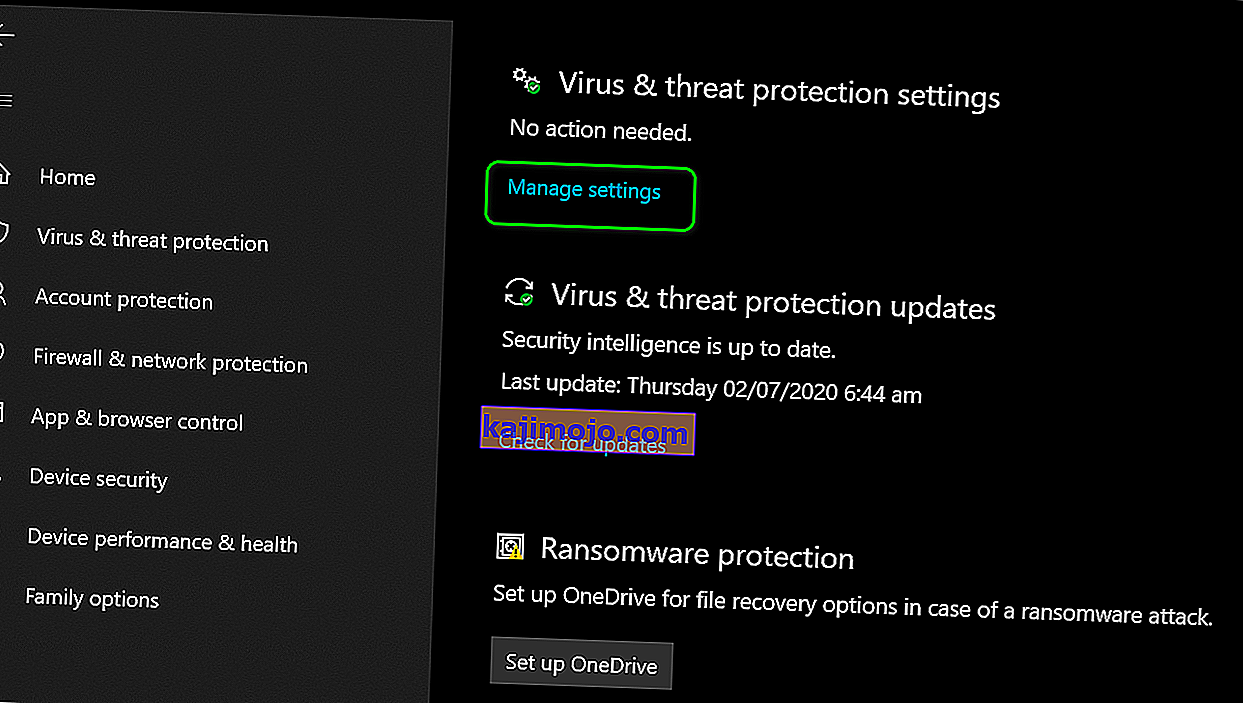
- After clicking on this option, turn the toggle off for “Realtime Protection”, “Cloud-Delivered Protection”, “Automatic Sample Submission” and “Tamper Protection”.
- After disabling all of these, navigate back to the desktop and check to see if the issue still persists.


Method 7: Reset Network Settings
Sometimes, the issue might be caused by some network reconfigurations that we have been unable to fix until now. This might be because these are some root system configurations or cache that have been corrupted and the only way to fix it is by performing a complete overhaul of the network settings. In order to do so, follow the guide below.
- Press “Windows” + “R” to open the Run prompt.
- Type in “Control panel” and press “Enter” to launch the classical control panel interface.
- Inside the Control Panel, click on the “View By:” option and select the “Large Icons” from the list of available options.
- After selecting the Large Icons, click on the “Network and Sharing Centre” option.
- In the Network and Sharing Centre, select the “Internet Options” option and from the left navigation pane at the bottom.
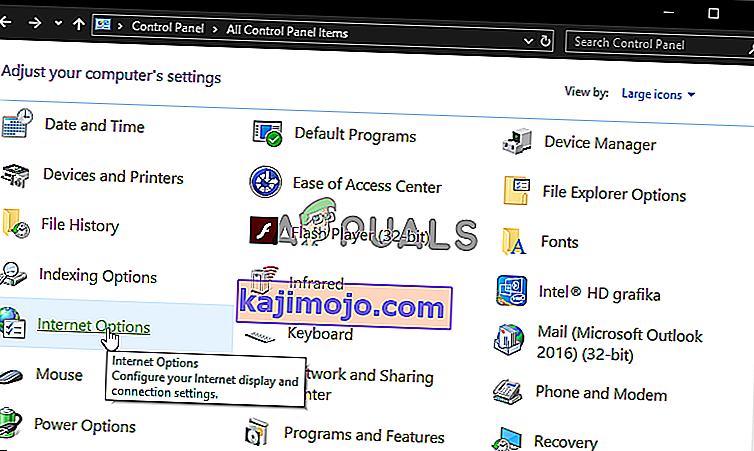
- In the new window that opens up, click on the “Advanced” tab, and then select the “Restore Advanced Settings” option to reset the advanced network settings.
- After this, press “Windows’ + “I” to open the Windows Settings.
- In the settings, click on the “Network and Internet” option and select the “Status” button on the left side of the next screen.
- Scroll down on the next screen until you reach the “Network Reset” option.
- Click on the “Network Reset” option to prompt the computer to initiate the reset request and select the “Reset Now” button on the next screen.
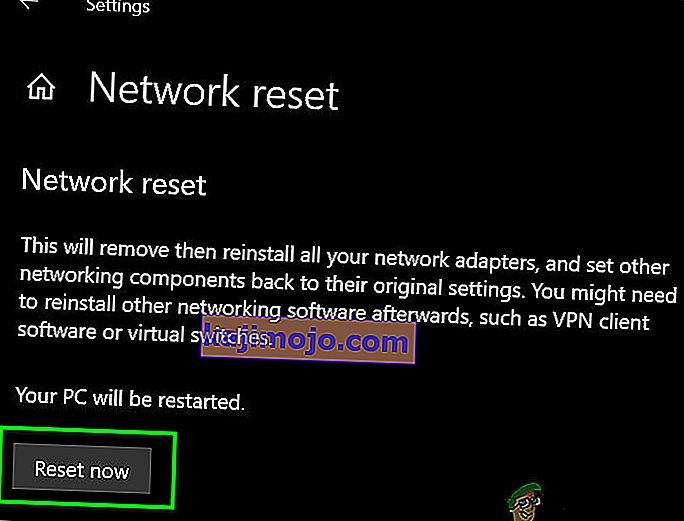
- Confirm any prompts that ask you if you really want to initiate a network reset and prepare to restart your computer.
- The automatic prompt should wait for some time before initiating a restart so you should have some time to back up or save any work that you have unsaved.
- When the computer restarts, you’ll notice that your network connection isn’t active. This is because your network card is firstly reset and then released its previous connection. Just select the network icon, pick the network you want to reconnect to, and choose “Connect”.
- If your TCP/IP settings are set to automatically detect, your network connection should detect the appropriate network settings and connect to the ethernet without any problems.
- Check to see if the issue still persists.


Method 8: Enable Ethernet Adapter Through BIOS
Some motherboard manufacturers might disable the ethernet connection from the Bios in the factory default settings or in some cases while tinkering around with the Bios, you might have disabled this setting yourself. Therefore, in this step, we will be enabling the Ethernet Adapter from the Bios. For that:
- Make sure to completely shut down your computer and turn it back on after a while.
- While the computer is being started, pay close attention to the “Press “X” button to get into the Bios” message that might appear during the startup.
- Press the indicated key quickly and repeatedly to enter your computer’s BIOS. Once in the BIOS, you can use the arrow keys on your keyboard to navigate through the available options.
- Find “Integrated Peripherals,” “Onboard Devices,” “On-Chip PCI Devices,” or a similar option and press the “Enter” key to access the menu. Depending on the type and year of your BIOS, the exact menu text will vary.
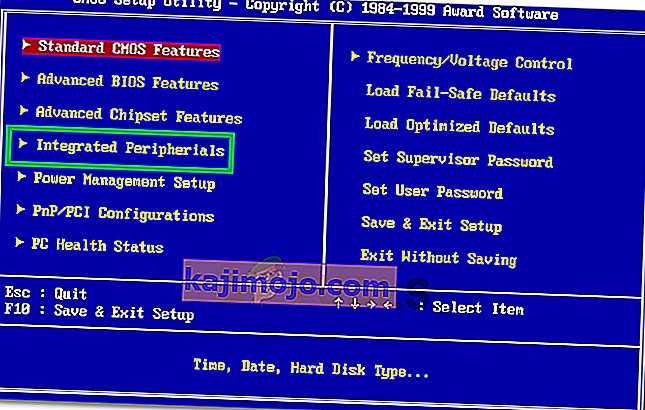
Note: Generally, you should find something that indicates the settings are related to your onboard integrated peripherals.
- Find and select “Integrated LAN,” “Onboard Ethernet,” or a similar option and use the left and right arrow keys to cycle through the available options. In most cases, these are either “Enabled” or “Disabled.”
- Press the “F10” keyboard key, this should display a dialog asking if you would like to save your settings and exit the BIOS. Press the “Y” keyboard button to confirm. This causes the computer to reboot. Windows should now automatically detect and use your Ethernet controller.
- Check to see if the issue still persists.

Method 9: Run the Internet Connection Troubleshooter
If due to some issue, you are still unable to get your ethernet connection functioning properly, a great option to try with Windows 10 is to run the internet troubleshooter. Not only does it provide you the reason due to which the ethernet isn’t working, but it might also attempt to fix the issue. In order to run the troubleshooter, follow the guide below.
- Press “Windows” + “I” on your keyboard to launch the settings.
- In the Settings, navigate to “Update & Security” option and afterward choose “Troubleshoot”.
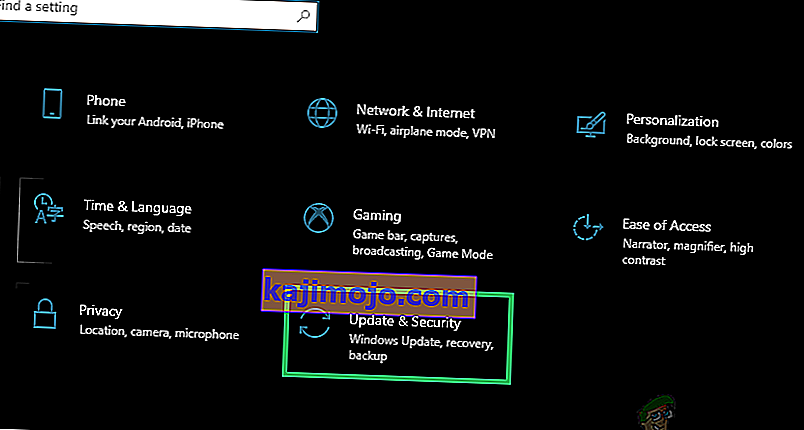
- Click on the “Network Connections” option and then select the “Run the troubleshooter” option to successfully run this troubleshooter on your computer.
- Follow the on-screen instructions to completely run this troubleshooter and then check to see if the issue still persists.

Method 10: Ping the Loopback Address
A loopback address is a special IP address, 127.0. 0.1, reserved by InterNIC for use in testing network cards. This IP address corresponds to the software loopback interface of the network card, which does not have hardware associated with it, and does not require a physical connection to a network. Some users have highlighted that this issue may arise due to system corruption or malware installed that prevents networking from functioning properly, hence perform the ping operation to verify whether your network card is working properly or not:
- Press “Windows” + “R” to open the Run prompt.
- Inside the Run prompt, type in “cmd” and then press “Shift’ + “Ctrl” + “Enter” to provide administrative privileges.
- Type the command, ping 127.0.0.1. This will send a message to the internal network stack on the machine. A response similar to the following should occur:
Pinging 127.0.0.1 with 32 bytes of data: Reply from 127.0.0.1: bytes=32 time<10ms TTL=128 Reply from 127.0.0.1: bytes=32 time<10ms TTL=128 Reply from 127.0.0.1: bytes=32 time<10ms TTL=128 Reply from 127.0.0.1: bytes=32 time<10ms TTL=128 Ping statistics for 127.0.0.1: Packets: Sent = 4, Received = 4, Lost = 0 (0% loss), Approximate round trip times in milliseconds: Minimum = 0ms, Maximum = 0ms, Average = 0ms
- If the command prompt is successful in pinging the IP Address, it means that networking should be working on your computer and the issue most probably lies within a software misconfiguration and you may continue to implement these fixes on your computer.

Method 11: Verify Router’s Firmware
There are often new firmware updates to a router/Access Point that may resolve some issues. These are especially for the equipment more than a few years old that is running the original firmware. Consult the equipment manufacturer’s product documentation or website for details and instructions on how to perform an update.
Often, vendors of the router/Access Points will add features to improve their product. Unfortunately, these extra features are not always compatible with all wired hardware. Consult the product documentation or manufacturer’s website for the router/Access Point about the possible need to disable these features.
Method 12: Reset Network Stack
If you are still unable to fix this issue on your computer, it might mean that the computer has acquired it as a result of some corrupted DNS cache or due to invalid network cache. Therefore, in this step, we will be completely resetting the network stack which should get rid of this invalid cache and replace it with a newly generated one. In order to do that:
- Press “Windows” + “R” to open the Run prompt.
- Type in “Cmd” and then press “Shift” + “Ctrl” + “Enter” to provide admin permissions.
- Inside the command prompt, type in the following commands and press “Enter” after each to execute it on your computer.
ipconfig /release ipconfig /flushdns ipconfig /renew netsh int ip reset netsh winsock reset
- After executing these commands on your computer, make sure to perform a complete restart to ensure that they are properly executed.
- Check to see if the issue still persists.
Note: Please note that these commands affect all of your networking adapters, both physical and virtual, both used and unused, so you will see some errors when running these commands, where the resets targeted adapters that are not being used. These errors are perfectly normal, and not a cause for concern. Please complete each step, in order, even if you have done some of these previously, and even if you encounter errors.
Method 13: Disable Virtual Ethernet Devices
If you haven’t found a solution yet and are still receiving Ethernet port error then you should try to remove any virtual Ethernet drivers on your PC as these can cause major issues with how your PC connects to the internet. A virtual Ethernet driver could be anything from a VPN to software designed to improve ping or packet loss. You can find virtual Ethernet devices and disable them by following the steps below.
- Press “Windows” + “R” to open the Run prompt.
- In the Run prompt, type in “ncpa.cpl” and press “Enter” to open the network configuration panel.

- In the network configuration, right-click on any entry that seems to belong to software and is not a physical connection that your computer is connected to.
- Select the “Disable” option to disable the virtual network connection.
- If you’re unsure, you can Google the name of each network device to learn more before disabling them.

Method 14: Disable Auto-Tuning Feature
The Window Auto–Tuning feature lets the operating system continually monitor routing conditions such as bandwidth, network delay, and application delay. Although it lets the operating system configure connections by scaling the TCP window to maximize the network performance it has proved to be the potential culprit in this case. Hence, temporarily disable the auto-tuning feature to get rid of the Ethernet port problem:
- Press “Windows” + “R” to open the Run prompt.
- Inside the Run prompt, Type in “cmd” and then press “Shift” + “Ctrl” + “Enter” to launch with administrative privileges.
- Type in the following command inside the command prompt and press “Enter” to execute it.
netsh interface tcp show global
- Now, look for the Receive Window Auto-Tuning Level feature and if it’s normal, disable it.
- In order to disable it, type in the following command and press “Enter” to execute it.
netsh int tcp set global autotuninglevel=disabled
- After the commands have been executed, check to see if the issue still exists.
Method 15: Tweak Duplex Settings
There are two types of duplex settings used for communications on an Ethernet network: Half-duplex and full-duplex. According to users, sometimes you might experience Ethernet problems due to your duplex settings. After changing your duplex settings not only the Ethernet port problem would be resolved but your LAN speed will also increase.
- Press “Windows” + “R” to open the Run prompt.
- Type in “ncpa.cpl” and press “Enter” to launch the network configuration panel.
- Inside the network configuration panel, right-click on your ethernet connection and then select “Properties” to open the ethernet properties.
- In the ethernet properties, navigate to the “Advanced” tab and select “Speed/duplex settings”.
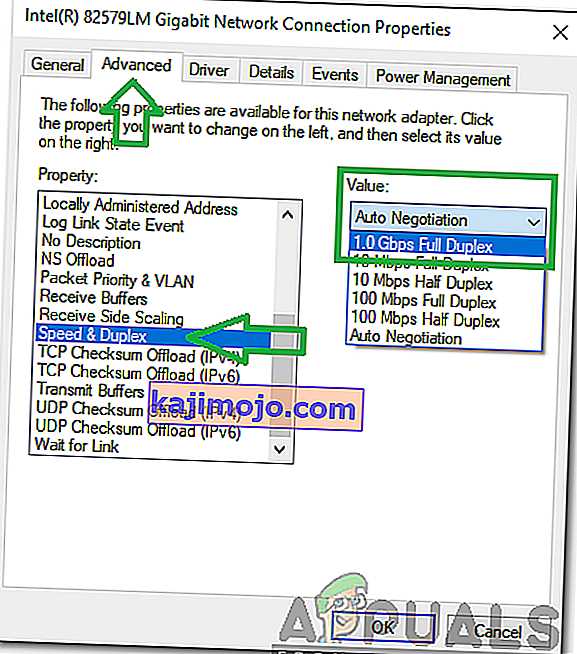
- Now set Value to “100 MB Full Duplex”. You can also try other 100MB values, or you can use “Auto Negotiation”
- After doing that, click “OK” to save your changes.
- Check to see if making this change has fixed our issue.


Method 16: Disable Large Send Offload (LSO)
Large Send Offload is one of the latest features in Windows 10. LSO is actually meant to improve the overall network performance of the system, but contrary to its purpose, this feature actually allows background applications to consume a considerably large amount of network bandwidth. Some users reported that they were able to get around this problem by disabling this feature on their Operating systems:
- Press “Windows” + “R” to open the Run prompt, type in “Devmgmt.msc” in the run prompt and press “Enter” to launch the device manager.
- Double click on the “Network Adapters” panel to expand it and right-click on the network adapter that your computer is using.
- Select the “Properties” option to launch the network properties.
- Inside the network adapter properties, click on the “Advanced” tab from the top.
- Select “Large Send Offload V2 (IPv4)” and set the value to “Disabled”.
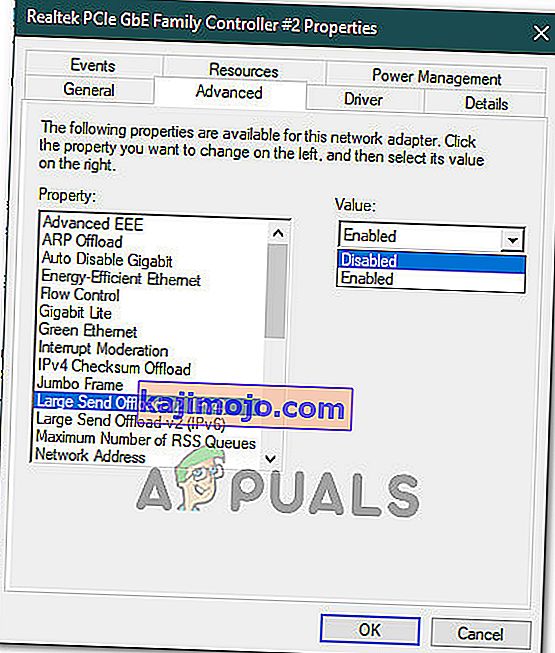
- Do the same for “Large Send Offload V2 (IPv6)” and click “OK”.


Method 17: Resolve Issues With Your Network Adapter
There may be some underlying issues with your network adapter that can be quickly diagnosed within the Windows control panel. If you’ve already updated your network adapter drivers, follow the steps below to try and diagnose other issues.
- Press “Windows” + “R” to open the Run prompt.
- Type in “ncpa.cpl” and press “Enter” to launch the network configuration panel.
- In the network configurations, right-click on the ethernet adapter and select the “Diagnose” option.
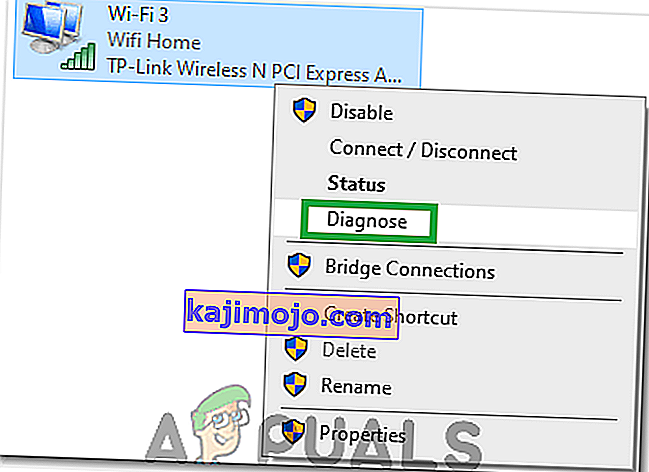
- Let the automatic diagnosing begin and follow the on-screen instructions to fully diagnose issues with the ethernet connection.
- Check to see if running the diagnose window fixes this issue.

By default, if your network adapter is set to use a static IP address but it should be using DHCP, this should fix it. However, it’s a good idea to check yourself too.
Method 18: Verify Whether Ethernet Port is configured for Dynamic IP
If your computer is unable to communicate with other networked devices or connect to the Internet via Ethernet, check your network settings to confirm that the Ethernet port is configured for a dynamic IP address.
- Click on the start menu icon and select the “Settings’ option.
- Click the “Network and Internet” button to open internet settings.
- Afterward, choose the “Network and Sharing Center” option and from the window opened at front choose “Change Adapter Settings” in the window’s left menu.

- Right-click the “Local Area Connection” icon in Windows 7 or the “Wired Ethernet Connection” icon in Windows 8/10 and select “Properties.”
- Double-click “Internet Protocol Version 6 (TCP/IPv6)”
- Confirm that the “Use the Following DNS Address” button is checked.
Note: Get ahold of a PC that is working correctly with the ethernet connection, and monitor its network adapter settings from the “Network and Internet” option in Windows Settings and then from going into the “Status” option. The IP Address and the DNS address that it is using should be listed there, enter this information in its place and you should be able to get your ethernet back to work.
- Now, double-click “Internet Protocol Version 4 (TCP/IPv4).”
- Confirm that the “Use the Following DNS Addresses” radio button is selected and click “OK.”
Note: Enter the same information that we obtained from the sixth step.
- Now, close all remaining windows to return to the desktop.

Method 19: Decrease Your network adapter’s power output
The network adapter allows the device to communicate over the local area network (LAN), connecting to the internet or to other computers. Some computer geeks reported that they were able to get around this problem by reducing the power output of their network adapter, therefore, follow the steps throughout to get rid of this problem:
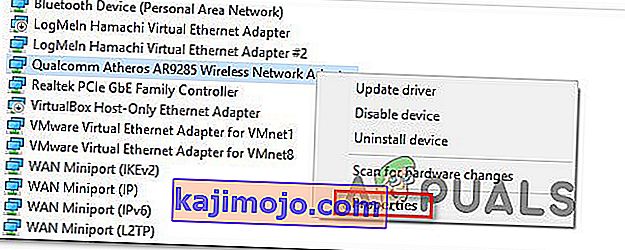
- Press “Windows” + “R” to open the Run prompt, type in “Devmgmt.msc” in the run prompt and press “Enter” to launch the device manager.
- Double click on the “Network Adapters” panel to expand it and right-click on the network adapter that your computer is using.
- Select the “Properties” option to launch the network properties.
- Navigate to the “Advanced”
- Under Property, locate the “Power Output property” and click on it to select it.
- Open the dropdown menu under Value and change it from 100% to 75%. If you are also going to be using an external monitor while your laptop is docked, change the value to 50% instead of 75%.
- Click on “OK”, close the Device Manager, and restart your computer. Now check whether or not the issue has been resolved once your computer boots up.
Method 20: Disable Energy Efficient Ethernet for your network adapter
Energy-Efficient Ethernet (EEE) is a set of enhancements to the twisted-pair and backplane Ethernet family of computer networking standards that reduce power consumption during periods of low data activity. Hence, to reduce the power consumption of modem at the idle state and get rid of the Ethernet problem disable energy-efficient Ethernet by following the steps indexed below.
- Press the “Windows Logo key + X” to open the Menu.
- Click on “Device Manager” in the menu to launch the Device Manager.
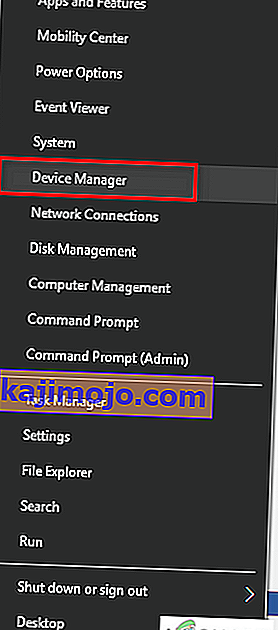
- In the Device Manager, double-click on the “Network adapters” section to expand it.
- Right-click on your computer’s active network adapter and click on “Properties”.
- Navigate to the “Advanced” tab.
- Under Property, locate the “Energy Efficient Ethernet” property and click on it to select it.
- Open the dropdown menu under Value and change it to “Disabled” or “OFF” whichever applies in your case.
- Click on “OK” and close the Device Manager.
- Restart your computer and When your computer starts up, go ahead and check whether the issue still persists.


Method 21: Enable QoS Feature
You might be able to solve this problem by enabling the QoS feature. This feature is in charge of limiting your network speed, but a couple of users reported that the issue was resolved after enabling QoS on their router. To do this, you need to open your router’s configuration page and enable QoS. We have to mention that QoS is an advanced feature, so it might require some configuration before you can properly use it. It’s also worth noting that this feature might not be available on your router, so be sure to check your router’s instruction manual for more information. In order to login to your router’s admin panel:
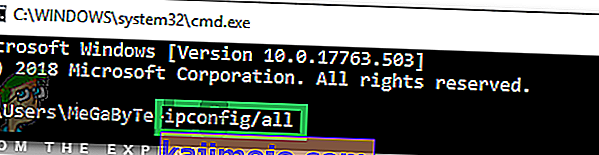
- Launch your browser and type in your IP address in the address bar.
- In order to find our IP address, press “Windows” + ” “R” to launch the run prompt. Type in “CMD” and press “Shift” + “Ctrl” + “Enter” to provide admin permissions. Also, type in “ipconfig/all” in the cmd and press “Enter”. The IP Address that you have to enter should be listed in front of the “Default Gateway” option and should look something like “192.xxx.x.x”.
- After entering the IP Address, press “Enter” to open the Router login page.
- Enter your username and password in the respective categories on the router’s login page both of which should be written on the back of your router. If they aren’t, the default values should be “Admin” and “admin” for both the password and the username.
- After logging in to the router, look to configure the QoS settings as mentioned above and check to see if configuring it fixes this issue.

Method 22: Connect USB to Ethernet Adapter
A USB to Ethernet adapter is a device that is capable of connecting a USB port to an Ethernet cable. USB to Ethernet adapters allow the users to connect multiple devices together via an Ethernet cable which is generally shorter and less reliable. USB to Ethernet adapters rely on Plug and Play technology that allows a user to simply plug the device into any USB port and then connect an Ethernet cable to it. If you are facing the Ethernet port problem then this adapter might be able to do the job for you.
Method 23: Remove any USB devices from the ports below the Ethernet port
If you have any USB devices connected to the USB ports located directly below the Ethernet port, remove these devices, and see if that resolves the problem for you. While it may sound a bit peculiar, something as bizarre as having one or more USB devices connected via the ports located below the Ethernet port is the culprit behind this problem for many people.
Workaround: If you’re sure that there’s nothing wrong with the Ethernet connection, you can check other places like the ports on the router. If the Ethernet port being used is not working or damaged, you will be unable to connect to the router. As for the Ethernet port not working cause, unplug the cable and plug it into another port to check whether the issue still appears.