Juodojo ekrano problema „Windows 10“ paprastai kyla po atnaujinimo arba kai automatinis „Windows“ naujinimas įdiegia naujinimus jūsų sistemoje. Kadangi šis juodas ekranas greičiausiai yra aparatinės įrangos (GPU) problema, mums reikės įvertinti ir pašalinti įvairius nustatymus, kad jį diagnozuotume ir išspręstume.

Šiais laikais asmeniniai kompiuteriai tampa vis tobulesni, kai naudojamos daug grafikos plokštės. Taigi, jei turite grafinę kortelę, išskyrus „ Intel“ įmontuotą grafinį valdiklį , tikriausiai turėtumėte šį įkrovimą dėl juodo ekrano problemos. Kartais „Windows“ tai priima taip, tarsi prie sistemos būtų pritvirtinti du monitoriai. Taigi, „Windows“ įkelia išėjimo signalą į juodąjį ekraną.
Prieš pradėdami išsamų trikčių šalinimą; turime patikrinti kai kuriuos pagrindinius nustatymus. Jei naudojate kelis monitorius, atjunkite / prijunkite ir išbandykite pagrindinį ekraną. Jei tai išspręs problemą; jums sekasi. Jei ne, atlikite šiuos veiksmus:
1 metodas: sutvarkykite aklai
Šis metodas yra skirtas aklai išspręsti problemą, nes juodame ekrane nieko nematote.
- Kai „Windows“ užstringa ties juodu ekranu, palaukite, kol ekrane pasirodys baltas pelės žymeklis . Galite patikrinti jo buvimą perkeldami pelės kilimėlį.
- Kai žymeklis pasirodys ekrane, paspauskite klaviatūros tarpo klavišą ir vieną kartą paspauskite klaviatūros klavišą „ Ctrl“ . Įveskite prisijungimo slaptažodį arba PIN kodą aklai (juodo ekrano nematote) . Jis prisijungs prie „Windows“ naudodamas jūsų kredencialus.
Jei prisijungę prie paskyros nematote darbalaukio ir esate įstrigę juodame ekrane, tada klaviatūroje paspauskite „ Win“ + P + rodyklės žemyn klavišą (du kartus) ir dar kartą įveskite išsamią informaciją.
2 metodas: maitinimo ciklas
Jei tai nešiojamas kompiuteris su vartotojo išimama baterija, tada;
- Išimkite akumuliatorių.
- Atjunkite maitinimo adapterį.

- 10 sekundžių palaikykite paspaudę maitinimo mygtuką
- Atleiskite maitinimo mygtuką.
- Prijunkite įkroviklį atgal ir pabandykite jį įjungti.

Išbandykite ir patikrinkite, ar problema išspręsta; jei ne, pereikite prie 4 metodo
3 metodas: išjunkite greitą paleidimą
„Windows 10“ išleidžiama su greito paleidimo funkcija. Kaip rodo pavadinimas, tai leidžia greitai paleisti operacinę sistemą, kad galėtumėte greitai tęsti darbą ar žaisti.
PASTABA: Greiti Paleidimas funkcija veikia tik tada, kai atlikti shutdown ir tada Įjungti jūsų sistemą, ji netaikoma, kai jūs atlikti Paleisti iš naujo .
Norėdami išjungti greitą paleidimo parinktį; atlikite šiuos veiksmusPaleiskite naudodami „Windows 10“ diegimo laikmeną. Gali tekti pakeisti įkrovos tvarką iš „BIOS“.
žiūrėti: kaip sukurti įkeliamą „Windows 10“ laikmeną
- Apačioje spustelėkite Pataisyti kompiuterį
- Spustelėkite Trikčių šalinimas
- Spustelėkite Išplėstinės parinktys
Pastaba: jei šis metodas neveikia, pabandykite spustelėti „Grįžti į ankstesnes versijas“ ir vykdyti ekrane pateikiamus nurodymus.
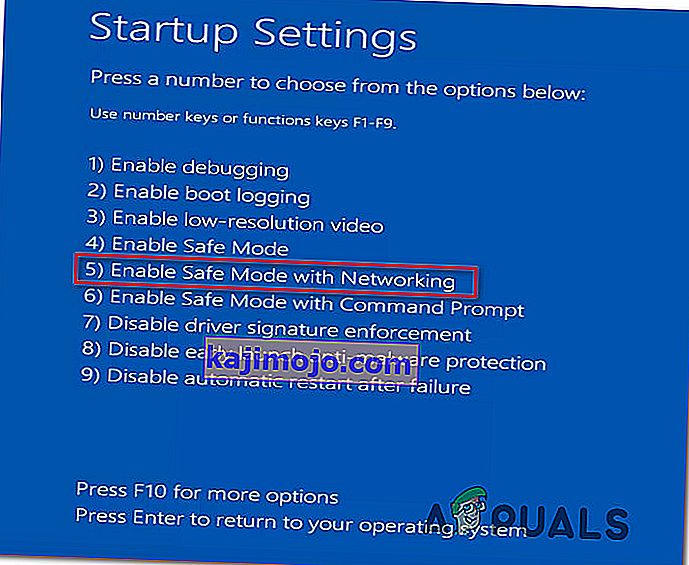
- Spustelėkite „ Startup Settings“
- Spustelėkite „ Paleisti iš naujo“
- Pasirinkite Saugųjį režimą naudodami tinklą
- Kai kompiuteris pradeda eiti į valdymo skydą ;
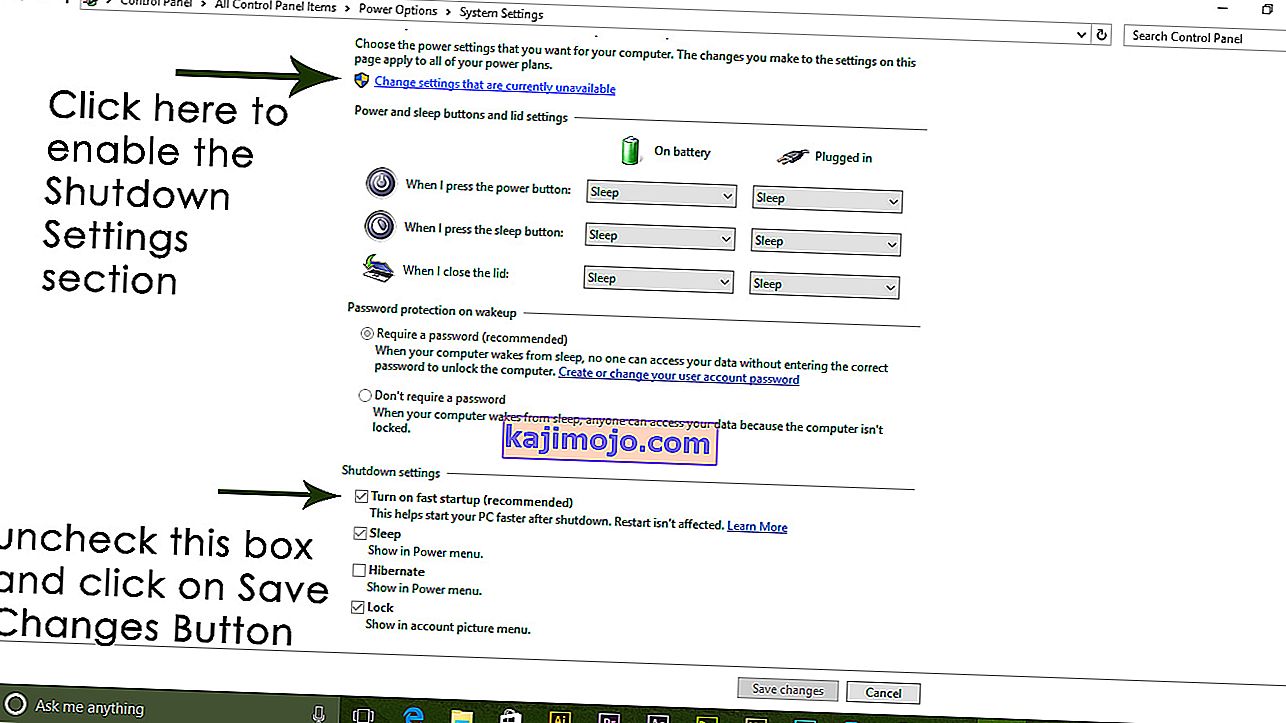
- Pasirinkite maitinimo parinktis ; Pasirinkite Pasirinkite, ką veikia maitinimo mygtukai kairėje.


Čia slinkite žemyn ir raskite parinktį Greitas paleidimas ir panaikinkite jos žymėjimą .
4 metodas: pašalinkite ekrano adapterį
Kai pamatysite juodą ekraną:
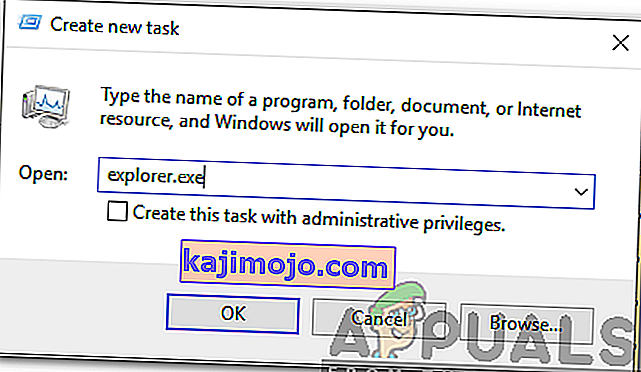
- Laikykite CTRL + ALT + DEL klavišus kartu, kad pamatytumėte, ar pasirodo užduočių tvarkyklė. Jei taip, spustelėkite Failas -> Naujas -> ir įveskite explorer.exe
- Jei jis atidarys langą „Explorer“; prisijunkite ir pašalinkite antivirusinę programinę įrangą / vaizdo plokštę, tada iš naujo įdiekite.
Pastaba: taip pat galite pasirinkti laikinai išjungti „Antivirus“, o ne pašalinti.
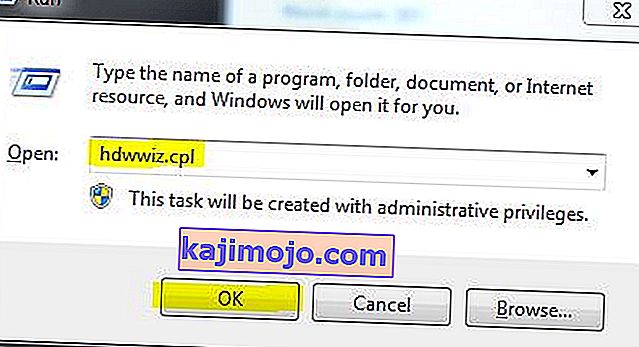
- Norėdami pašalinti grafikos / ekrano adapterį; jei „CTRL + ALT + DEL“ yra sėkmingas ir matote naršyklės langą, palaikykite laimėjimo klavišą ir paspauskite R
- Įveskite hdwwiz.cpl ir spustelėkite Gerai
- Užrašykite ekrano adapterio pavadinimą;
- Išskleisti Display Adapters -> Select Uninstall


Kai jis bus pašalintas, eikite į gamintojo svetainę ir atsisiųskite naujausią tvarkyklę. Perkraukite & TEST
5 metodas: atkurkite savo sistemos gamyklinius nustatymus
Šis metodas ištrins visus jūsų duomenis ir įdės / įdiegs originalią operacinę sistemą, pateiktą kartu su kompiuteriu. Kadangi yra korupcija; ir jei duomenys nėra svarbūs, galime juos grąžinti į gamyklinius nustatymus, tada švariai įdiekite „Windows“. Po to atnaujinimo parinkties gali nebebūti.
Gamyklos atkūrimo instrukcijas rasite savo sistemos vadove.
6 metodas: tiesiog paleiskite kompiuterį iš naujo
Kai kurie „Windows 10“ vartotojai, praeityje patyrę juodojo ekrano problemą, paprasčiausiai išjungė kompiuterį naudodamiesi maitinimo mygtuku ir vėl jį vėl paleidę, padarė apgaulę ir atsikratė problemos. Kad ir kaip keistai tai skambėtų, šis sprendimas tikrai vertas šūvio.
7 metodas: atnaujinkite GPU tvarkykles į naujausias jų versijas
Windows 10 is a big step up from the previous versions of Windows, which is why all GPU manufacturers had to create entirely new drivers designed specifically for the new Operating System. Not having the updated Windows 10-compatible drivers on your computer is another thing that can cause your computer to be affected by the black screen issue. If outdated drivers are behind the black screen problem in your case, all you need to do is go to the official website of your computer manufacturer or your GPU’s manufacturer and download the latest drivers for your GPU (they should be available in both locations). Make sure that the drivers you download are specifically designed for Windows 10 to ensure the success of this solution.
Method 8: Change your laptop’s plugged in brightness to anything but 100%
On laptops that had high-end graphics cards and were updated to Windows 8, the black screen issue often presents itself when they are plugged into an AC power outlet. If that is the case, simply opening the Start Menu, searching for Advanced power settings, opening Advanced power settings and changing your laptop’s screen brightness when plugged into anything except for 100% (even 99% will do) will get rid of the black screen problem.
Method 9: If you have two graphics cards, disable the onboard one
A decent fix for the black screen issue for people whose computers have tow graphics cards – the onboard graphics card that came with the computer and the graphics card that they have added to it (such as an Nvidia or AMD graphic card) – is to simply disable the onboard graphics card. Apparently, having two graphics cards on a Windows 10 computer can result in a clash that consequently gives birth to the black screen issue. If that is the case, simply going into Device Manager, expanding the Display adapters section, right-clicking on the onboard graphics card and clicking on Disable should fix the issue.
If you do not see your onboard graphics card in the Display adapters section, click on View in the top left of the Device Manager dialog and click on Show hidden devices. This will make your onboard graphics card (or, in some cases, cards) visible, and you can then right-click on it and click on Disable.
Method 10: Refresh your computer
The infamous black screen issue on Windows 10 can also be fixed by simply refreshing your computer. Refreshing your computer has almost entirely the same effect as resetting it to factory settings, with the exception of the fact that a refresh only deletes installed programs and applications and keeps your personal data whereas a reset gets rid of everything on your computer. To refresh a Windows 10 computer, you need to:
- Open the Start Menu.
- Click on Settings.
- Out of the array of different options provided, click on Update & Security.
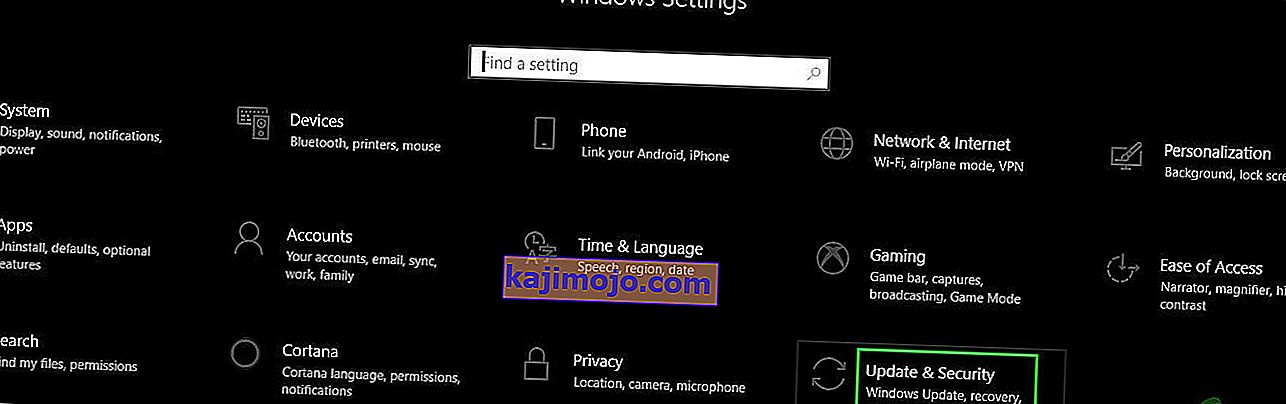
- Click on Recovery in the left pane.
- In the right pane, click on the Get started button under the Reset this PC
- When provided with a choice to either keep your files or remove everything, click on Keep my files.

Method 11: Correcting User Shell
In some cases, the User shell might be preventing the user from being able to boot safely into their computer. In certain situations, the user shell configuration inside the registry might get corrupted due to which this black screen issue can occur. Therefore, in this step, we will be correcting this user shell entry. In order to do that, follow the steps below.
- Boot your computer and wait for the black screen to appear.
- Press “Ctrl” + “Alt” + “Del” and select the “Task Manager” option.
- Click on the “File” option on the top left of the task manager and select “Run New Task” from the list.
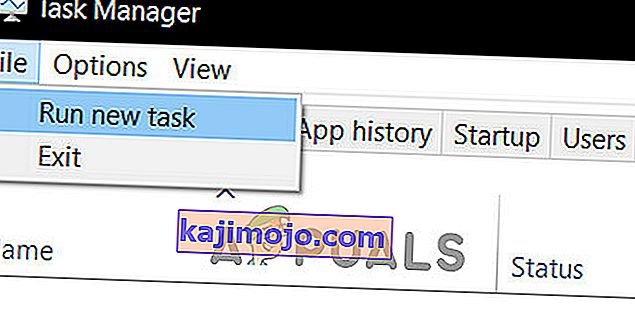
- Type in “regedit” and press “Enter” to open it.
Computer\HKEY_LOCAL_MACHINE\SOFTWARE\Microsoft\Windows NT\CurrentVersion\Winlogon
- Double click on the “Shell” entry on the right pane.
- Type in “Explorer.exe” in the Value data field and save your changes.
- Press “Ctrl” + “Alt” + “Del” again and click on the “Power Options” icon on the lower right side.

- Select “Restart” from the menu and wait for your computer to be restarted.
- Check to see if the issue persists after restarting the computer.


Method 12: Stopping Service
There is a specific service that prevents the computer from being able to function properly in some cases and stopping it can prevent the black screen issue from occurring. Therefore, in this step, we will be stopping this service. For that:
- Press “Ctrl” + “Alt” + “Del” and select the “Task Manager” option.
- Click on the “File” option on the top left of the task manager and select “Run New Task” from the list.
- Type in “services.msc” and press “Enter” to open it.
- Scroll through this list and look for the “RunOnce32.exe” or the “RunOnce.exe” entry. Also, do this same process for the “App Readiness” Service.
- Right-click on it and select “Stop”.
- Double click on it and change its startup type to “Disabled”.
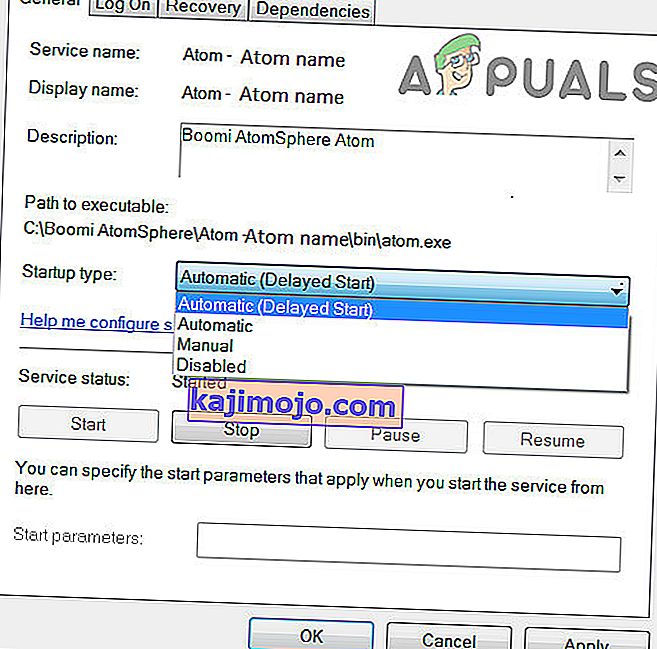
- Wait for the service to be stopped completely and restart your computer.
- Check to see if the issue persists after stopping it completely.

Method 13: Renaming Files
In certain cases, the files in some Windows’ folders might have gotten corrupted due to which this black screen issue is being triggered. Therefore, in this step, we will be renaming these files and then check to see if the issue still persists.
- Press “Ctrl” + “Alt” + “Del” on the black screen.
- Click on the “Task Manager” option and then select “File”.
- Select the “Run New Task” option and then type in “cmd”.
- Type in the following command one by one for each file to rename it.
rename “(File Path) (File Name)” “(New Name)”
- Rename the following files to anything except their original names.
C:\ProgramData\Microsoft\Windows\AppRepository\StateRepository-Deployment C:\ProgramData\Microsoft\Windows\AppRepository\StateRepository-Deployment C:\ProgramData\Microsoft\Windows\AppRepository\StateRepository-Deployment C:\ProgramData\Microsoft\Windows\AppRepository\StateRepository-Machine C:\ProgramData\Microsoft\Windows\AppRepository\StateRepository-Machine C:\ProgramData\Microsoft\Windows\AppRepository\StateRepository-Machine
- Check to see if the issue persists after making these changes.
- If it still does, try the following code to just fix it.
cd "ProgramData\Microsoft\Windows\AppRepository" ren "StateRepository-Deployment.srd" "StateRepository-Deployment-Corrupted.srd" ren "StateRepository-Deployment.srd-shm" "StateRepository-Deployment-Corrupted.srd-shm" ren "StateRepository-Deployment.srd-wal" "StateRepository-Deployment-Corrupted.srd-wal" ren "StateRepository-Machine.srd" "StateRepository-Machine-Corrupted.srd" ren "StateRepository-Machine.srd-shm" "StateRepository-Machine-Corrupted.srd-shm" ren "StateRepository-Machine.srd-wal" "StateRepository-Machine-Corrupted.srd-wal"
- Check to see if the issue persists.
Method 14: Replacing Profile Cache
It is possible the Profile cache for your current user account has either gone missing from some locations or it has been corrupted in certain locations due to which this issue is being triggered. Therefore, in this step, we will be replacing this profile cache after copying it from a location. For that:
- Create a new user account before doing so and log into that.
- Restart your computer in safe mode.
- Log in to your new profile.
- Navigate to the following location and copy the folder named “caches”.
C:\Users\{working-user-profile-name}\AppData\Local\Microsoft\Windows\Caches - Paste this folder in the following location.
C:\Users\{broken-user-profile-name}\AppData\Local\Microsoft\Windows\Caches. - Check to see if the issue persists.
Follow the onscreen instructions and dialogs, and once you are done, your computer will have been refreshed and the black screen issue will be no more.
You can further try to:
- Boot your computer in safe mode and check if the issue persists over there. This will help you to isolate these issues from a specific app that is causing it.
- Press “Windows” + “P” to switch displays that might fix this.
- Update your Bios
- Disconnect the Second monitor
- Try to use an HDMI cable for connection instead of a DVI or VGA one.
- When in the black screen, press the “Windows’ + “Ctrl” + “Shift” + “B” keys to refresh the Graphics Driver.
- You can also try to perform a Startup Repair.
- Try to create a new user account using the last methods listed in this article.
- Atlikite SFC ir DISM nuskaitymą.