Vartotojams, bandantiems prisijungti prie savo „Origin“ paskyros, rodoma klaida „Prisijungimas prie prisijungimo šiuo metu negalimas“. Tai gana varginantis klausimas, nes vartotojai, kuriuos paveikė, pranešė, kad sukėlė chaosą, nes prieš tinkamai prisijungiant negalima paleisti jokios „Origin“.

Laimei, kiti žmonės, patyrę tą pačią problemą, savo scenarijuje paskelbė metodus, kuriuos naudojo problemai išspręsti. Mes surinkome šiuos metodus ir įdėjome juos į vieną straipsnį, kurį galite patikrinti, pateikdami išsamias instrukcijas.
Kas lemia prisijungimo prie interneto prisijungimą, šiuo metu „Windows“ nėra klaida?
Šiame straipsnyje aprašytos problemos priežastis yra nemažai. Tai mes nusprendėme sukurti galimų priežasčių sąrašą, kad galėtumėte išsiregistruoti. Prieš tęsdami, būtinai patikrinkite juos visus, kad galėtumėte nustatyti galimą scenarijų savo kompiuteryje!
- Laikas ir data nustatomi neteisingai - daugeliui internetinių paslaugų reikia, kad jūsų kompiuteryje laikas ir data būtų tinkamai nustatyti. Net kelios minutės tarnyba gali nustoti veikti. Pabandykite tinkamai nustatyti laiką ir datą kompiuteryje, kad išspręstumėte problemą!
- „Internet Explorer“ nustatymai - „Origin“ paleidimo priemonė priklauso nuo „Internet Explorer“ kai kurių funkcijų. Jei „Internet Explorer“ nustatymai yra neteisingi, tai gali turėti įtakos kilmei. Apsvarstykite galimybę iš naujo nustatyti „Internet Explorer“ nustatymus.
- Su tinklu susijusios problemos . Tinklo problemos gali būti gana sudėtingos, o vartotojams kyla sunkumų išsiaiškinant, kas būtent sukelia problemą. Tačiau rekomenduojama pabandyti atblokuoti „Origin“ „Windows“ užkardoje, iš naujo nustatyti pagrindinio kompiuterio failą arba išvalyti „Origin“ talpyklą.
1 sprendimas: Patikrinkite laiką ir datą savo kompiuteryje
Naudojantis daugeliu internetinių paslaugų, savaime suprantama, kad laikas ir data jūsų kompiuteryje yra tinkamai nustatyti. Tai daroma siekiant užkirsti kelią įvairioms saugumo problemoms ir būtina tinkamai nustatyti šiuos nustatymus. Vykdykite toliau pateiktas instrukcijas, kad tinkamai nustatytumėte laiką ir datą savo kompiuteryje!
- Atidarykite „Windows 10“ nustatymus atidarydami „ Pradėti mane“ ir atidarydami programą „Nustatymai“ spustelėdami krumpliaračio piktogramą virš maitinimo piktogramos.
- Arba galite naudoti „ Windows“ klavišų + I klavišų derinį tam pačiam efektui pasiekti. Spustelėkite, kad atidarytumėte skiltį Laikas ir kalba, ir eikite į skirtuką Data ir laikas kairėje lango pusėje.

- Skirtuke Data ir laikas įsitikinkite, kad jūsų kompiuterio data ir laikas yra teisingi. Jei laikas neteisingas, galite pabandyti įjungti arba išjungti parinktį Nustatyti laiką automatiškai , atsižvelgiant į numatytąją būseną.

- Norėdami pakeisti datą, dalyje Data spustelėkite išskleidžiamąjį meniu, kad kalendoriuje rastumėte dabartinį mėnesį, tada spustelėkite dabartinę datą.
- Norėdami pakeisti laiką, skiltyje Laikas spustelėkite valandą, minutes ar sekundes, kurias norite pakeisti, tada slinkite reikšmes, kol sutiksite teisingą pagal savo vietą.
- Baigę keisti laiko nustatymus, spustelėkite Gerai .
Alternatyva : Žmonės, kuriems nepavyko išspręsti problemos tokiu būdu koreguojant nustatymus, taip pat gali tai padaryti Valdymo skydelyje. Nustatymai yra panašūs, tačiau dabar galite nustatyti laiką sinchronizuoti su interneto laiku.
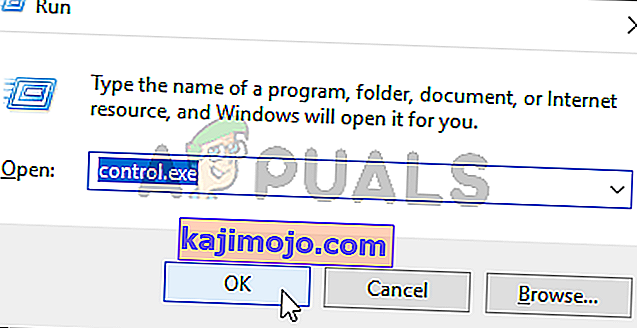
- Atidarykite Valdymo skydą ieškodami naudingumo mygtuke Pradėti arba spustelėdami mygtuką „Ieškoti“ arba mygtuką „Cortana“ kairėje užduočių juostos dalyje (apatinėje kairėje ekrano dalyje). Taip pat galite jį atidaryti naudodami „ Windows Key + R“ klavišų kombinaciją , laukelyje Vykdyti įrašydami „ control.exe “ ir spustelėdami Gerai, kad paleistumėte Valdymo skydą .
- Atsidarius valdymo skydui, pakeiskite rodinį į dideles arba mažas piktogramas ir naršykite žemyn sąraše, kad atidarytumėte parinktį Data ir laikas . Skirtuke Data ir laikas spustelėkite viršuje esantį mygtuką Keisti datą ir laiką ir galite jį nustatyti čia.
- Arba galite pasirinkti sinchronizuoti laiką su internetiniu serveriu atlikdami šiuos veiksmus. Lange Data ir laikas eikite į skirtuką Interneto laikas ir spustelėkite Keisti nustatymus Pažymėkite langelį šalia parinkties Sinchronizuoti su interneto laiko serveriu ir spustelėkite mygtuką Naujinti dabar Tada spustelėkite Gerai, Taikyti, Gerai ir uždarykite Valdymo skydą.
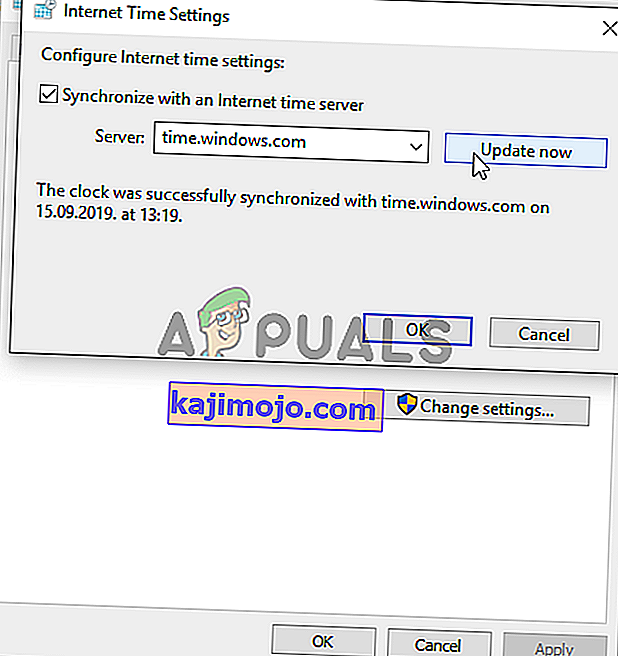
- Baigę sinchronizavimą, problema turėtų būti nedelsiant išspręsta.


2 sprendimas: iš naujo nustatykite „Internet Explorer“ nustatymus į numatytuosius
Nors daugelis žmonių mano, kad „Internet Explorer“ užima vietą jūsų kompiuteryje be jokio realaus tikslo, tai nėra visiškai tiesa. Daugelis interneto ryšio nustatymų eina per „Internet Explorer“. Vartotojai netgi pranešė, kad jiems pavyko išspręsti klaidą „Prisijungimas prie interneto nėra prieinamas“, paprasčiausiai iš naujo nustatydami „Internet Explorer“ nustatymus. Norėdami tai padaryti, atlikite toliau nurodytus veiksmus!
- Atidarykite „ Internet Explorer “ ieškodami jo arba dukart spustelėdami jo nuorodą darbalaukyje, viršutiniame dešiniajame puslapio kampe pasirinkite mygtuką Įrankiai ir pasirinkite Interneto parinktys .
- Jei negalite pasiekti tokių interneto parinkčių , ieškodami jos atidarykite „ Valdymo sritį l“, pakeiskite parinktį „ Žiūrėti pagal“ į „ Kategorija“ ir spustelėkite Tinklas ir internetas . Spustelėkite mygtuką Interneto parinktys, kuris turėtų būti antras naujame lange, ir tęskite sprendimą.

- Eikite į skirtuką Išplėstiniai ir spustelėkite žymės langelį Atstatyti Pasirinkite Ištrinti asmeninius nustatymus, jei norite pašalinti naršymo istoriją, paieškos teikėjus, greitintuvus, pagrindinius puslapius ir „InPrivate“ filtravimo duomenis. Tai rekomenduojama, jei norite iš naujo nustatyti savo naršyklę, tačiau šio scenarijaus pasirinkimas yra neprivalomas.

- Dialogo lange „Reset Internet Explorer Settings“ iš naujo spustelėkite Reset ir palaukite, kol „Internet Explorer“ baigs taikyti numatytuosius nustatymus. Spustelėkite Uždaryti >> Gerai .
- Kai „Internet Explorer“ baigs taikyti numatytuosius nustatymus, spustelėkite Uždaryti, tada spustelėkite Gerai. Patikrinkite, ar dabar galite prisijungti prie „Origin“ be problemų.
3 sprendimas: išjunkite „Internet Explorer“ iššokančiųjų langų blokavimo priemonę
Tai dar vienas „Internet Explorer“ pataisymas, kuris gerai veikia susietas su aukščiau aprašytu metodu. Neaišku, kodėl iššokančiųjų langų blokavimo priemonė gali trukdyti „Origin“, tačiau tai pasiteisino daugeliui vartotojų, todėl būtinai išbandykite!
- Kompiuteryje atidarykite „ Internet Explorer “ ieškodami jos darbalaukyje arba meniu Pradėti. Spustelėkite viršutiniame dešiniajame kampe esančią krumpliaračio piktogramą. Atidarytame meniu spustelėkite Interneto parinktys, kad atidarytumėte susijusių ryšio parametrų sąrašą.
- Jei neturite prieigos prie „Internet Explorer“, atidarykite valdymo skydą ieškodami jo meniu Pradėti arba naudodami „ Windows Key + R“ klavišų kombinaciją , laukelyje Vykdyti įrašykite „ control.exe “ ir spustelėkite Gerai, kad paleistumėte „ Control“ Skydelis .
- Valdymo skydelyje viršutiniame dešiniajame kampe pasirinkite Žiūrėti kaip: Kategorija ir spustelėkite mygtuką Tinklas ir internetas, kad atidarytumėte šį skyrių. Šiame lange spustelėkite „ Interneto parinktys“, kad pereitumėte į tą patį ekraną kaip ir atidarę „Internet Explorer“.
- Eikite į skirtuką „ Privatumas “ ir patikrinkite „Pop-up Blocker“ skyrių. Atžymėkite laukelį šalia Įjungti iššokančiųjų langų blokavimą .

- Įsitikinkite, kad jūs Taikyti keitimus, kuriuos atlikote ir iš naujo paleiskite kompiuterį prieš jums patikrinti, pamatyti, jei jūs galite prisijungti prie Kilmės dabar be problemų.

4 sprendimas: išvalykite kilmės talpyklą
Clearing the Origin cache can often help fix common issues and this simple method was enough to resolve the problem for many users. They claim Battlefield 1 stopped crashing after clearing the Origin cache and we recommend you try it out!
- Navigate to the following location on your computer by opening the Windows Explorer and clicking on This PC:
C:\Users\YOURUSERNAME\AppData\Roaming\Origin
- If you are unable to see the AppData folder, you may need to turn on the option which enables you to view hidden files and folders. Click on the “View” tab and then click on the “Hidden items” in the Show/hide section. File Explorer will show the hidden files and will remember this option until you change it again.

- Delete the Origin folder in the Roaming folder. If you receive a message saying that some files couldn’t have been deleted because they were in use, try exiting Origin and ending its process in Task Manager. Head back to the AppData folder, open the Local folder, and delete the Origin folder inside.
- Either click the Start button or the search button next to it and type “Run” or use the Windows Key + R key combination to bring up the Run dialog box. Type in “%ProgramData%” and click Enter.

- Locate the Origin folder in the folder which opens, open it, and select all files and folders inside except the LocalContent folder. Right-click the selection and choose Delete from the context menu which will appear
- Check to see if the “Origin online login is currently unavailable” error still appears after restarting your computer!
Solution 5: Reset the Hosts File
If you have tried to solve other issues on your computer, you may have edited the hosts file located deep into the System32 folder in various subfolders. The hosts file is used to map hostnames to IP addresses. If for some reason, you find that your hosts file has been compromised or if you start experiencing this problem with Origin, you can reset the file back to default by following the steps below.
- Navigate to the location C >> Windows >> System32 >> Drivers >> Etc by navigating to it after opening the File Explorer. First, click This PC or My Computer from the left side pane to locate and open your Local Disk C.
- If you are unable to see the Windows folder, you may need to turn on the option which enables you to see hidden files and folders. Click the “View” tab in File Explorer’s top menu and click the “Hidden items” checkbox in the Show/hide File Explorer will show the hidden files and will remember this setting until you change it again.
- Locate the hosts file in the Etc folder, right-click on it, and choose to Open it with Notepad. Use the Ctrl + A key combination to select all text and click Delete or Backspace to delete it. After that, paste the following text inside:
# Copyright (c) 1993-2006 Microsoft Corp. # # This is a sample HOSTS file used by Microsoft TCP/IP for Windows. # # This file contains the mappings of IP addresses to hostnames. Each # entry should be kept on an individual line. The IP address should # be placed in the first column followed by the corresponding host name. # The IP address and the host name should be separated by at least one # space. # # Additionally, comments (such as these) may be inserted on individual # lines or following the machine name denoted by a '#' symbol. # # For example: # # 102.54.94.97 rhino.acme.com # source server # 38.25.63.10 x.acme.com # x client host # localhost name resolution is handled within DNS itself. # 127.0.0.1 localhost # ::1 localhost
- Click File >> Save to save the changes. Exit Notepad and restart your computer. Check to see if the problem persists regarding Origin to log in properly.

Solution 6: Allow Origin Through Windows Defender Firewall
If the Origin service can’t connect to the Internet on your computer, you will need to allow through Windows Defender Firewall. It’s quite easy to do and it can resolve your problem almost instantly. Check it out below!
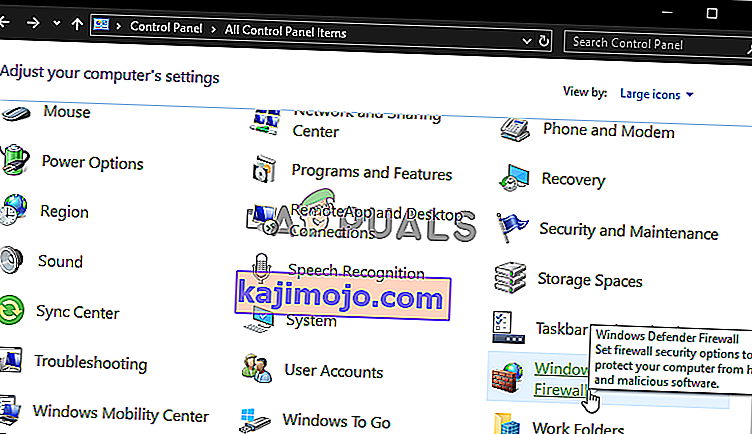
- Open up Control Panel by searching for the utility in the Start button or by clicking the Search button or the Cortana button at the left part of your taskbar (bottom left part of your screen).
- After Control Panel opens, change the view to Large or Small icons and navigate to the bottom to open the Windows Defender Firewall option.
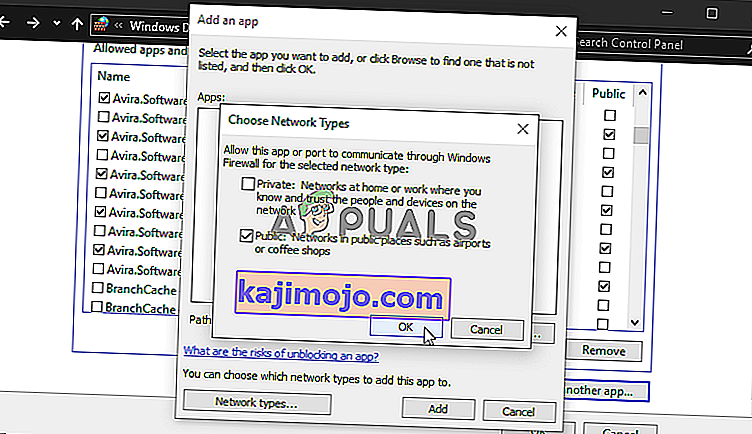
- Click on Windows Defender Firewall and click on the Allow an app or feature through Windows Firewall option from the left side list of options. A list of installed apps should open. Click the Change settings button at the top of the screen and provide administrator permissions. Try locating the executable inside. If it’s not there, click the Allow another app button below.
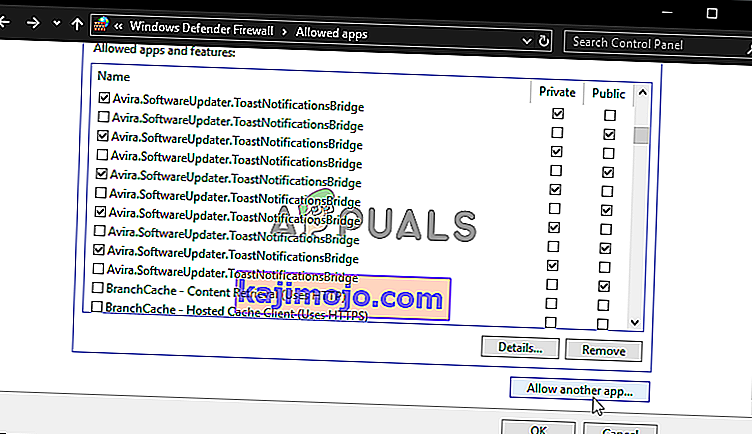
- Navigate to where you installed Origin (C:\Program Files (x86) by default), open the Origin folder, and choose the app’s executable file Origin.exe.
- After locating it, click the Network types button at the top and make sure you check the boxes next to both Private and Public entries before clicking OK >> Add.
- Click OK and restart your computer before checking whether you can log into Origin properly!


