„TeamViewer“ yra naudinga programa vaizdo pokalbiams ir nuotoliniam valdymui. Tai gana populiarus pasirinkimas tarp žaidėjų ir nuotolinės IT pagalbos. Tačiau daugelis vartotojų pranešė, kad tiesiog nesugeba prisijungti. Jie ekrano apačioje, šalia raudonos šviesos, mato probleminį klaidos pranešimą.

Yra nemažai metodų, kuriuos galite naudoti problemai išspręsti, ir mes siūlome juos patikrinti toliau. Paprastai juos atlikti yra gana lengva ir jie gali išspręsti jūsų problemą akimirksniu!
Kas sukelia „TeamViewer“ klaidą „Nesiruošia patikrinti jūsų ryšį“ sistemoje „Windows“?
Ši problema turi daug skirtingų priežasčių ir tiksliai nustatyti teisingą gali būti labai svarbu, jei nenorite išbandyti kiekvieno sąraše esančio metodo. Tai padės greičiau rasti sprendimą, todėl nusprendėme sukurti visų galimų priežasčių sąrašą žemiau!
- Neteisingi failo „hosts“ nustatymai - „hosts“ faile yra svarbios informacijos apie programas, jungiančias prie interneto, ir gali būti, kad „TeamViewer“ įrašas buvo sugadintas. Ištrynus jo įrašą, „Windows“ jį sukurs iš naujo, todėl pabandykite tai išspręsti.
- Antivirusinės ar užkardos problemos - jei jūsų paleista užkarda ar antivirusinė programa neleidžia „TeamViewer“ prieigai prie interneto, pabandykite padaryti išimtį pagrindiniam vykdomajam failui.
- DNS ir „Winsock“ problemos - DNS adresus galima pakeisti ir „Winsock“ nustatyti iš naujo. Daugeliui vartotojų tai viskas, ko reikėjo problemai išspręsti, todėl būtinai išbandykite!
- „IPv6“ ryšys - „TeamViewer“ paprasčiausiai neveikia naudojant „IPv6“, todėl, norėdami išspręsti šią problemą, būtinai apsvarstykite galimybę jį išjungti. Tai nepakenks ir gali sugrąžinti „TeamViewer“!
- Nauja „TeamViewer“ sąsaja - vartotojo sąsaja nėra kažkas, kas turėtų būti siejama su ryšio problemomis, tačiau tikrai taip buvo keliems „TeamViewer“ vartotojams. Grįžus prie senosios sąsajos pavyko išspręsti jų problemą.
1 sprendimas: pašalinkite „TeamViewer“ iš „Hosts“ failo
Labai tikėtina, kad „TeamViewer“ įrašas jūsų kompiuterio faile „hosts“ buvo sugadintas. Jame gali būti rodomi adresai ir duomenys, kurie yra neteisingi, todėl siūlome ištrinti jo įrašą. Kai jį vėl atidarysite, įrašas bus atkurtas ir tikimės, kad problema nustos pasirodyti!
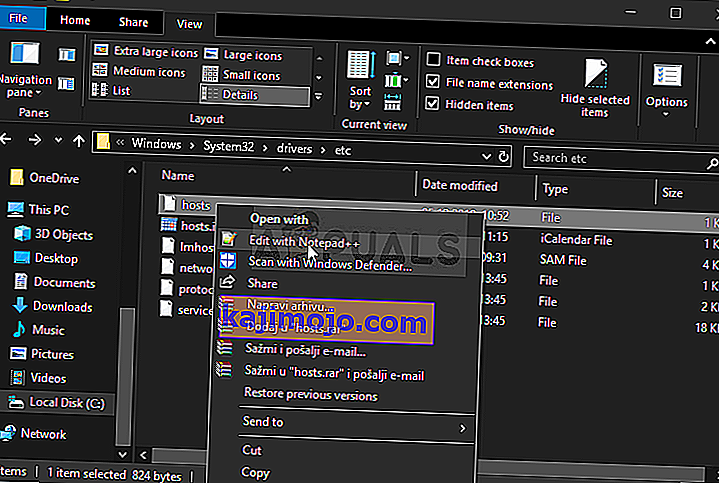
- Eikite į vietą C >> Windows >> System32 >> tvarkyklės >> ir kt. , Naršydami į ją, atidarę failų naršyklę. Pirma, spustelėkite šią kompiuterį arba Mano kompiuteris iš kairės srityje rasti ir atidaryti savo vietinį diską C .
- Jei nematote „Windows“ aplanko, gali tekti įjungti parinktį, kuri leidžia pamatyti paslėptus failus ir aplankus. Spustelėkite „ View “ skirtuką „File Explorer“ viršutiniame meniu ir spustelėkite žymimąjį laukelį „ Paslėpti elementai “, rodant / slėpti „ File Explorer“ rodomi paslėpti failai ir prisimins šį nustatymą, kol vėl jį pakeisite.

- Raskite failą „ hosts“ aplanke Etc , dešiniuoju pelės mygtuku spustelėkite jį ir pasirinkite „ Open with Notepad“ . Naudokite „ Ctrl“ + F klavišų kombinaciją ir prieš spustelėdami „ Rasti kitą“, lauke Raskite, ką įveskite
- Raskite faile skyrių „TeamViewer“. Jis turėtų prasidėti „#Teamviewer“ ir įsitikinkite, kad pasirinkote viską, kas jam priklauso, dešiniuoju pelės mygtuku spustelėkite pasirinkimą ir kontekstiniame meniu pasirinkite mygtuką „Ištrinti“.
- Spustelėkite Failas >> Įrašyti, kad išsaugotumėte pakeitimus, arba naudokite klavišus „Ctrl + S“ . Išeikite iš „Notepad“ ir paleiskite kompiuterį iš naujo. Patikrinkite, ar problema išlieka dėl „TeamViewer“ „Nėra pasirengusi. Patikrinkite ryšį “klaidos pranešimas!
2 sprendimas: pakeiskite savo DNS adresą
Vartotojai teigė, kad jiems pavyko išspręsti problemą paprasčiausiai pakeitus jūsų IPT (interneto paslaugų teikėjo) pateiktą DNS ir pradėjus naudoti kitą. Tai gali būti kompiuterio DNS, kuriame problema nerodoma, tačiau daugelis vartotojų paprasčiausiai naudojo „Google“ DNS, kad išspręstų problemą. Atlikite toliau nurodytus veiksmus, norėdami pakeisti DNS adresą savo kompiuteryje!
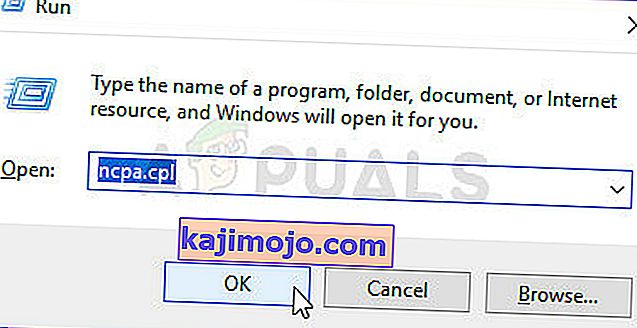
- Naudokite „ Windows + R“ klavišų derinį, kuris turėtų atidaryti naudingumo langą Vykdyti, kur teksto laukelyje turėtumėte įvesti „ ncpa.cpl “ ir spustelėkite Gerai, kad valdymo skydelyje atidarytumėte interneto ryšio nustatymų įrašą .
- Tą patį galima padaryti tiesiog rankiniu būdu atidarius valdymo skydą . Viršutiniame dešiniajame lango skyriuje perjunkite parinktį „ Žiūrėti pagal“ į kategoriją ir viršuje spustelėkite Tinklas ir internetas . Spustelėkite Tinklo ir bendrinimo centras mygtuką, kad atidarytumėte jį prieš sugeba surasti su Pakeisti adapterio nustatymus mygtuką kairiajame meniu ir paspauskite ant jo.
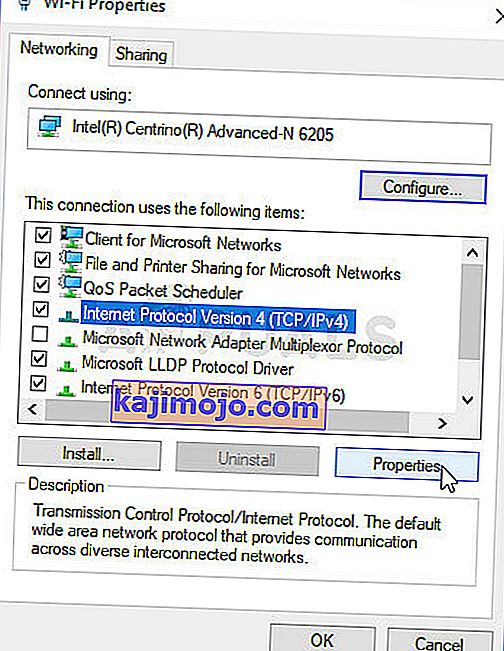
- Dabar, kai interneto ryšio ekranas atidarytas naudojant bet kurį aukščiau nurodytą metodą, dukart spustelėkite savo aktyvų tinklo adapterį (tą, kurį naudojate prisijungdami prie interneto) ir spustelėkite toliau esantį mygtuką „ Ypatybės “, jei turite dabartinės vartotojo paskyros administratoriaus teises.
- Sąraše raskite elementą „ Interneto protokolas 4 versija“ (TCP / IPv4) . Norėdami jį pasirinkti, spustelėkite jį ir spustelėkite žemiau esantį mygtuką Ypatybės .
- Likite skirtuke Bendra ir lange Ypatybės pakeiskite radijo mygtuką į „ Naudoti šiuos DNS serverio adresus “, jei jis buvo nustatytas į kitą parinktį.
- Bet kuriuo atveju nustatykite Pageidaujamo DNS serverio reikšmę 8.8.8.8, o alternatyvaus DNS serverio reikšmę - 8.8.4.4.
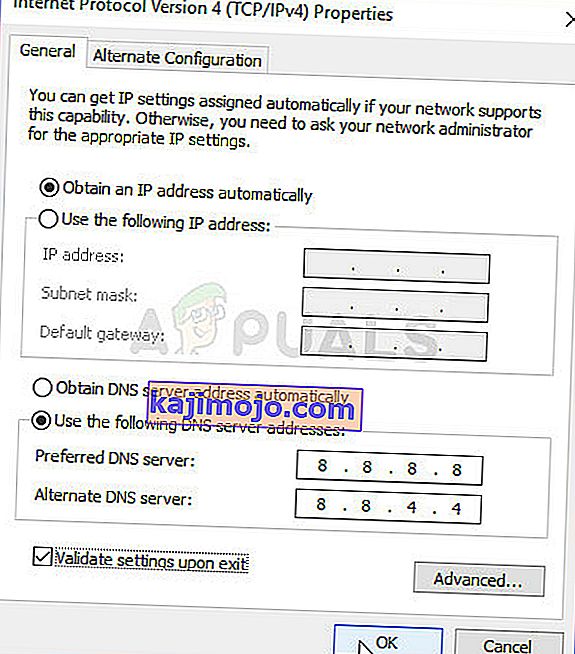
- Laikykite pažymėtą parinktį „ Patvirtinti nustatymus išeinant “ ir spustelėkite Gerai, kad pakeitimai būtų pritaikyti nedelsiant. Patikrinkite, ar „TeamViewer“ nėra pasirengusi. Patikrinkite ryšį “klaidos pranešimas vis tiek rodomas jūsų kompiuteryje!


3 sprendimas: iš naujo nustatykite „Winsock“
„ Netsh Winsock reset “ yra naudinga komanda, kurią galite naudoti komandų eilutėje, norėdami grąžinti „Winsock Catalog“ atgal į numatytąjį nustatymą arba švarią būseną. Galite išbandyti šį metodą, jei nesugebate prisijungti prie „TeamViewer“.
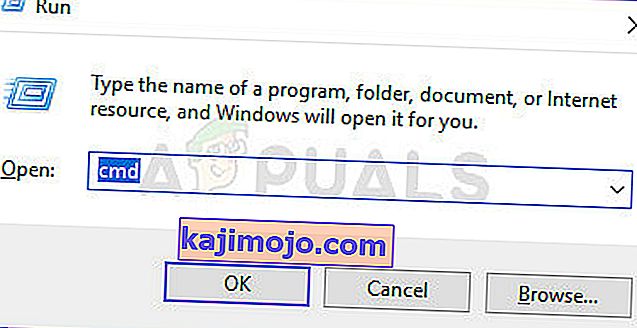
- Ieškokite „ Komandų eilutė “, įvesdami jį tiesiai meniu Pradėti arba paspausdami paieškos mygtuką šalia jo. Dešiniuoju pelės mygtuku spustelėkite pirmąjį įrašą, kuris pasirodys kaip paieškos rezultatas, ir pasirinkite kontekstinio meniu įrašą „ Vykdyti kaip administratorių “.
- Be to, galite naudoti „ Windows“ logotipo klavišą + R klavišų derinį, kad atidarytumėte dialogo langą Vykdyti. Parodytame dialogo lange įveskite „cmd“ ir naudokite klavišus „Ctrl“ + „Shift“ + „Enter“, norėdami paleisti komandų eilutę naudodami administratoriaus teises.
- Įveskite šias komandas lange ir įsitikinkite, kad paspausdami Enter, įvesite kiekvieną iš jų. Palaukite, kol pasirodys pranešimas „ Winsock Reset sėkmingai baigtas “ ar kažkas panašaus, kad žinotumėte, jog metodas pasiteisino ir jūs nepadarėte klaidų rašydami. Patikrinkite, ar problema išlieka.

netsh int ip reset

4 sprendimas: nenaudokite naujos vartotojo sąsajos
Vartotojo sąsaja jokiu būdu neturėtų būti prijungta prie „TeamViewer“ interneto ryšio, tačiau, kaip bebūtų keista, daugelis vartotojų pranešė, kad jie sugebėjo išspręsti šią problemą paprasčiausiai grįždami prie seno programos dizaino. Tai galima padaryti „TeamViewer“ nustatymuose, todėl būtinai atlikite toliau nurodytus veiksmus ir pabandykite išspręsti šią ryšio problemą.
- Atidarykite „ TeamViewer “ dukart spustelėdami piktogramą darbalaukyje arba ieškodami jos atidarę meniu Pradėti ir spustelėdami kairįjį pelės mygtuką viršutiniame rezultate.
- Pradiniame ekrane meniu juostoje spustelėkite mygtuką Extras ir pasirodžiusiame sąraše pasirinkite „ Options“ įrašą.
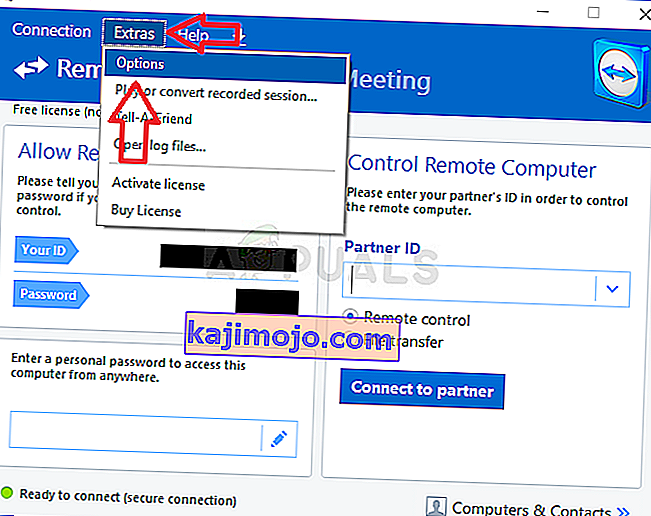
- Kairiajame naršymo meniu eikite į „TeamViewer“ parinkčių skirtuką Išplėstinė ir skiltyje „ Bendrieji išplėstiniai nustatymai “ pažymėkite parinktį „ Naudoti naują vartotojo sąsają “. Prieš patvirtindami atliktus pakeitimus, būtinai nuimkite laukelį šalia jo.

- Atidarykite „TeamViewer“ iš naujo ir patikrinkite, ar „TeamViewer“ nėra pasirengusi. Patikrinkite ryšį “klaidos pranešimas vis tiek rodomas jūsų kompiuteryje!


5 sprendimas: pridėkite failo „Teamviewer_Service.exe“ išimtį
Kartais antivirusiniai įrankiai nesugeba atpažinti programos pastangų prisijungti prie interneto kaip nekenksmingos, todėl „TeamViewer“ funkcijos dažnai blokuoja. Norėdami įrodyti, kad antivirusinė programa yra nekenksminga, turėsite ją įtraukti į savo išimčių / išimčių sąrašą!
- Open the antivirus user interface by double-clicking on its icon at the system tray (right part of the taskbar at the bottom of the window) or by searching for it in the Start menu.
- The Exceptions or Exclusions setting is located in different spots concerning different antivirus tools. It can often be found simply without much hassle but here are some quick guides on how to find it in the most popular antivirus tools:
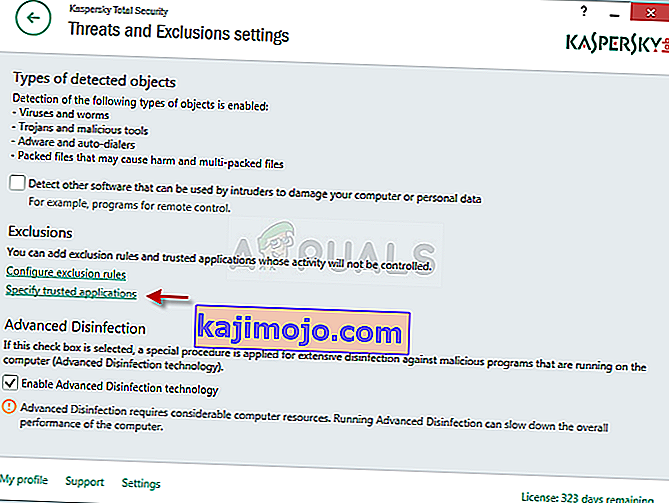
Kaspersky Internet Security: Home >> Settings >> Additional >> Threats and Exclusions >> Exclusions >> Specify Trusted Applications >> Add.
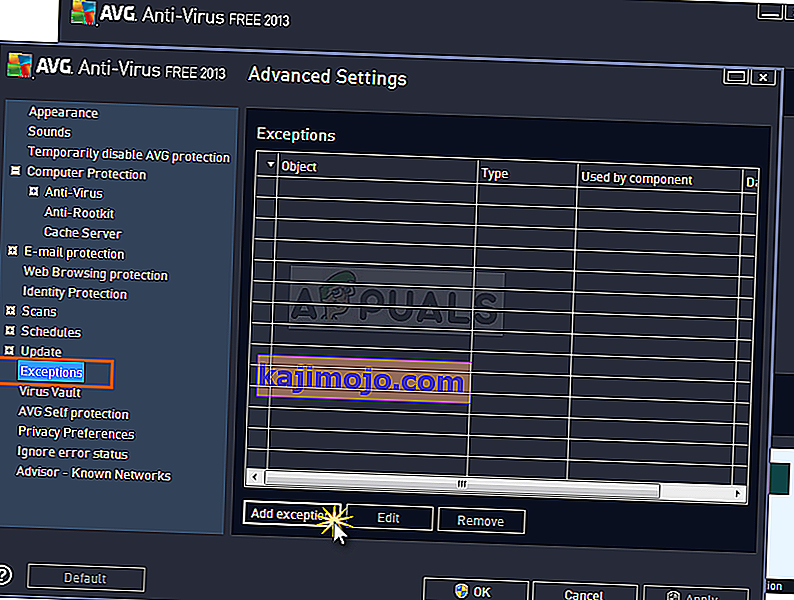
AVG: Home >> Settings >> Components >> Web Shield >> Exceptions.
Avast : Home >> Settings >> General >> Exclusions
- You will need to add the Teamviewer_Service.exe executable in the box which will appear prompting you to navigate to the folder. It should be in the same folder where you decided to install TeamViewer in. By default, it’s:
C:\Program Files (x86)\TeamViewer
- Check to see if you are now able to use TeamViewer without receiving the problematic error message. If it still won’t work, try restarting your computer and try again. The last step would be to uninstall the antivirus and try a different one if the problem persists.


Solution 6: Allow it in Windows Defender Firewall
For TeamViewer’s features to work properly, the app needs to have uninterrupted access to the Internet and its servers to work properly. Windows Defender Firewall is often to blame in such cases and we recommend you make an exception for the Teamviewer_Service.exe executable inside the Windows Defender Firewall!
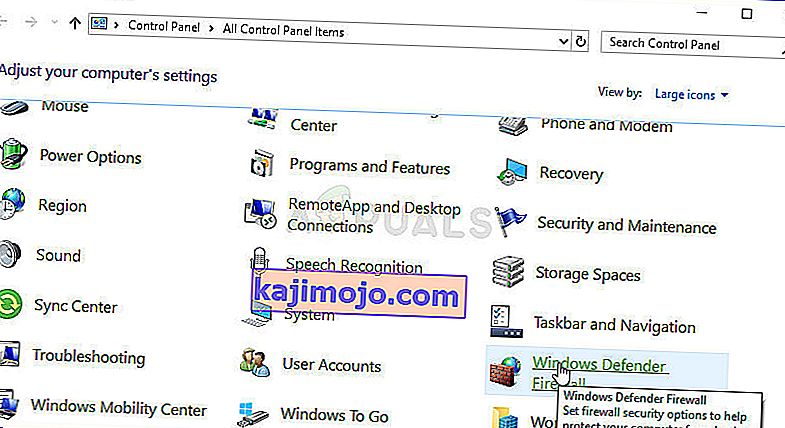
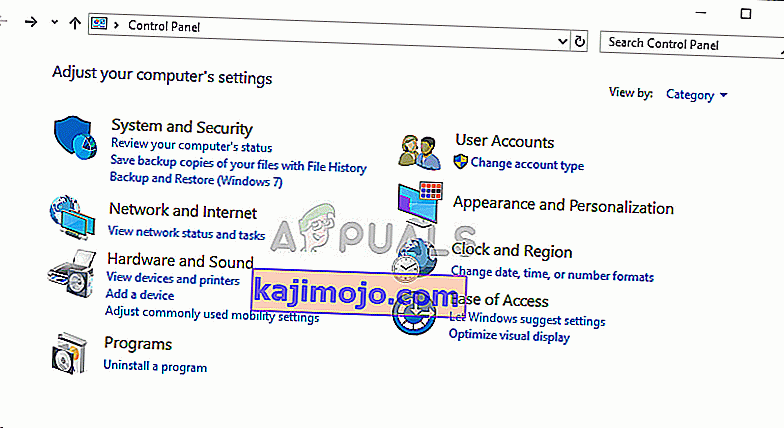
- Open up Control Panel by searching for the utility in the Start button or by clicking the Search button or the Cortana button at the left part of your taskbar (bottom left part of your screen).
- After Control Panel opens, change the view to Large or Small icons and navigate to the bottom to open the Windows Defender Firewall option.
- Click on Windows Defender Firewall and click on the Allow an app or feature through Windows Firewall option from the left side list of options. A list of installed apps should open. Click the Change settings button at the top of the screen and provide administrator permissions. Try locating the executable inside. If it’s not there, click the Allow another app button below.

- Navigate to where you installed TeamViewer (C:\Program Files (x86)\TeamViewer by default) and choose the Teamviewer_Service.exe file.
- After locating it, click the Network types button at the top and make sure you check the boxes next to both Private and Public entries before clicking OK >> Add.
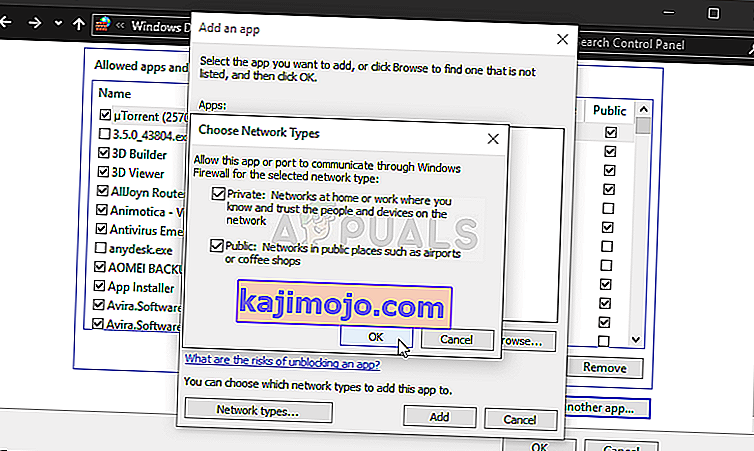
- Click OK and restart your computer before checking whether the TeamViewer “Not ready. Check your connection” error message still appears on your computer.


Solution 7: Disable IPv6
Disabling Internet Protocol version 6 connectivity on your computer managed to resolve the problem for many users and it’s an easy way to resolve the problem. This makes this method worthy and you shouldn’t skip it during your troubleshooting process.
- Use the Windows + R key combo which should immediately open the Run dialog box where you should type ‘ncpa.cpl’ in the bar and click OK to open the Internet Connection settings item in Control Panel.
- The same process can also be done by manually opening the Control Panel. Switch the View by setting at the top right section of the window to Category and click on Network and Internet at the top. Click the Network and Sharing center button to open it. Try to locate the Change adapter settings button at the left menu and click on it.
- When the Internet Connection window opens, double-click on your active Network Adapter.
- Then click Properties and locate the Internet Protocol Version 6 entry on the list. Disable the checkbox next to this entry and click OK. Restart your computer to confirm the changes and check to see if the problem persists.


Solution 8: Restart the TeamViewer Service
Stopping the TeamViewer service from running will effectively restart the whole process and many users have reported that it only took them a few minutes to get TeamViewer to work again. Before starting, make sure you have closed TeamViewer completely.
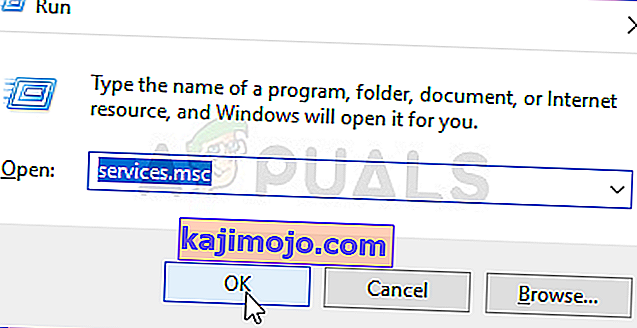
- Open the Run utility by using the Windows Key + R key combination on your keyboard (press these keys at the same time. Type “services.msc” in the newly opened box without the quotation marks and click OK to open the Services tool.
- The alternative way is to open the Control Panel by locating it in the Start menu. You can also search for it using the Start menu’s search button.
- After the Control Panel window opens, change the “View by” option at the top right part of the window to “Large Icons” and scroll down until you locate the Administrative Tools entry. Click on it and locate the Services shortcut at the bottom. Click on it to open it as well.
- Locate the TeamViewer Service on the list, right-click on it and select Properties from the context menu which appears.
- If the service is started (you can check that just next to the Service status message), you should stop it for now by clicking the Stop button in the middle of the window. If it is stopped, leave it stopped until we proceed.
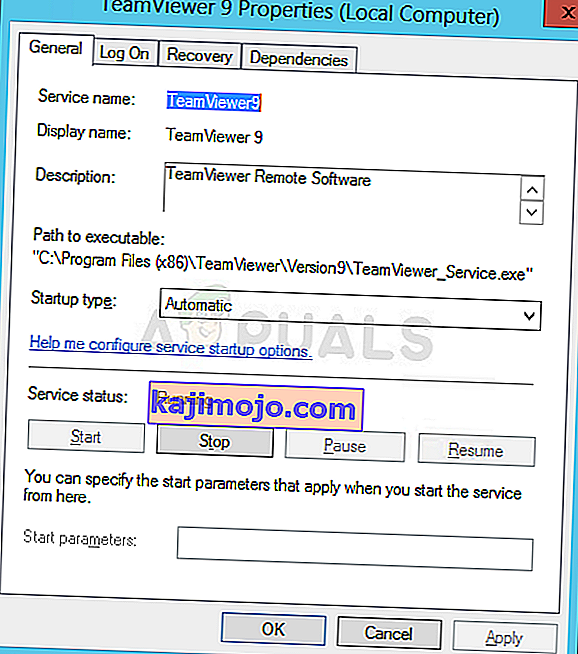
- Make sure that the option under the Startup type menu in the service’s properties window is set to Automatic before you proceed with other steps. Confirm any dialogue boxes which may appear when changing the startup type. Click on the Start button in the middle of the window before exiting.


Solution 9: Reinstall TeamViewer
If all methods above fail to work, reinstalling TeamViewer is the last method which can help you resolve the problem on your computer. It should be fast and painless if you follow all the steps properly! You will also install the latest version which contains the patch to the specific issue you are having!
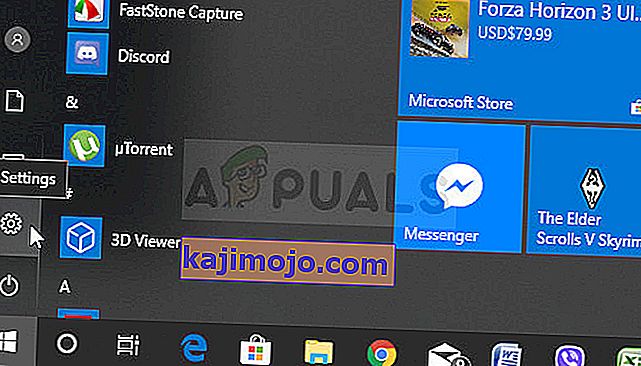
- Click the Start menu and open Control Panel by searching for it simply by typing with the Start menu window open. Alternatively, you can click the cog icon in the lower-left part of the Start menu to open the Settings app if you are using Windows 10.
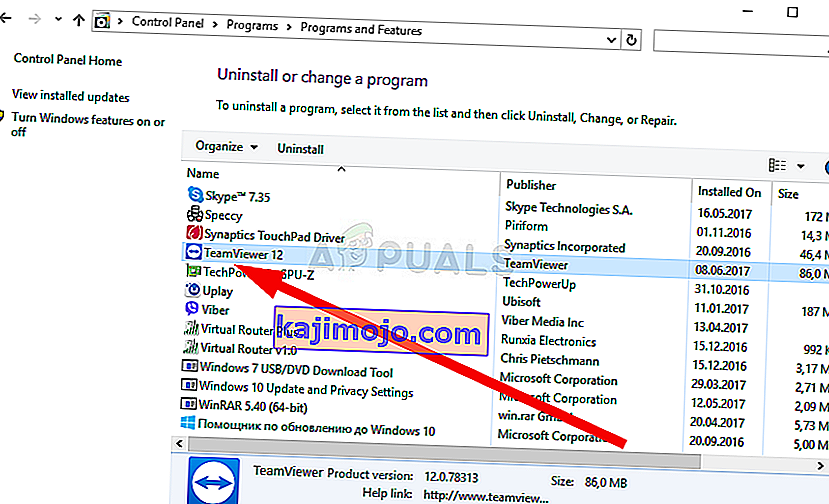
- In Control Panel, select the View as: Category option at the top right corner of the Control Panel window and click on Uninstall a Program under the Programs section.
- If you are using the Settings app, clicking on Apps should immediately open a list of all installed programs on your PC so wait for a while for it to load
- Locate TeamViewer in Control Panel or Settings and click on Uninstall/Repair. Follow any instructions which appear afterward to uninstall it completely.
- Download the latest version of TeamViewer by visiting this link. Download its setup file, run it from the Downloads folder, follow the instructions on screen, and check to see if the problem persists after reinstalling TeamViewer!

