VirtualBox bandant paleisti virtualią mašiną pasirodo klaida „ Neapdorotas režimas nepasiekiamas suteikiant„ Hyper-V “ ( VERR_SUPDRV_NO_RAW_MODE_HYPER_V_ROOT ) klaidą. Kai kuriems vartotojams ši klaida įvyksta nepaisant to, kad „Hyper-V“ technologija jų mašinose yra išjungta.

Bandant ištaisyti šią klaidą, pirmiausia reikia įsitikinti, kad „Hyper-V“ nėra įgalinta „Windows“ funkcijose. Jei jis jau išjungtas, kiti galimi kaltininkai gali būti įjungtas hipervizoriaus patikrinimas, įjungta „Device Guard“ („Credential Guard“) ar kažkokie trukdžiai, kuriuos palengvina „Windows Defender“ saugos funkcija, vadinama „Core Isolation“.
Tačiau senesnėse mašinų konfigūracijose šią klaidą taip pat galite pamatyti dėl to, kad aparatūros virtualizacija išjungta BIOS ar UEFI lygiu.
1. Išjunkite „Hyper-V“ valdymo įrankius
Pirma priežastis, dėl kurios „ Žalias režimas negalimas dėl„ Hyper-V “ klaidos“ yra ta, kad „Hyper-V“ įgalinta jūsų kompiuteryje. Ši patentuota „Microsoft“ virtualizavimo technologija leidžia kurti virtualias mašinas „x86“ ir „x64“ sistemose, kuriose savaime veikia „Windows“ versija.
Tačiau nė viena iš trečiųjų šalių alternatyvų, tokių kaip „VirtualBox“ ar „VMware“, nenaudoja jos dėl stabilumo priežasčių. Dar daugiau, jie specialiai atsisako dirbti, kai ši technologija yra įjungta. Tačiau „Windows 10“ dabar užprogramuota pirmenybę teikti „Hyper-V“, o ne panašiai virtualizavimo technologijai.
Kaip galite įsivaizduoti, tai gali sukelti daug problemų, įskaitant klaidos kodą VERR_SUPDRV_NO_RAW_MODE_HYPER_V_ROOT . Norėdami tai ištaisyti, turėsite išjungti „Hyper-V“, kad trečioji šalis galėtų pasirinkti perėmimą.
Kai tai reikia padaryti, turite du kelius į priekį. Tai galite padaryti tiesiogiai iš terminalo arba meniu Programos ir funkcijos GUI. Nesivaržykite laikytis norimo požiūrio:
Išjunkite „Hyper-V“ per GUI
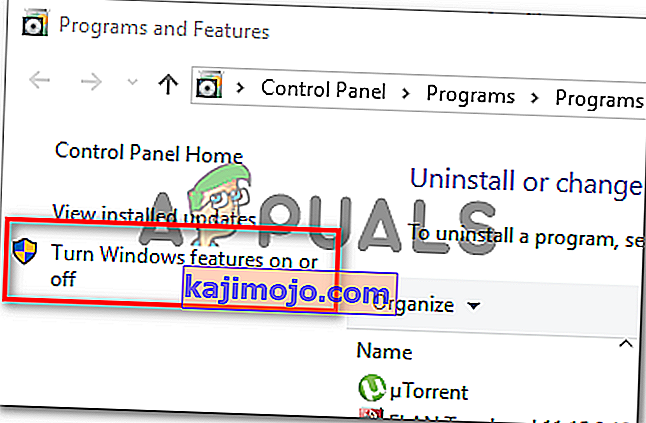
- Paspauskite „ Windows“ klavišą + R, kad atidarytumėte dialogo langą Vykdyti . Tada įveskite „appwiz.cpl“ ir paspauskite Enter, kad atidarytumėte meniu Programos ir funkcijos .

- Kai būsite meniu „ Programos ir funkcijos“ , naudokite dešinėje esantį meniu, kad kairiajame skydelyje spustelėkite Įjungti arba išjungti „Windows“ funkcijas .
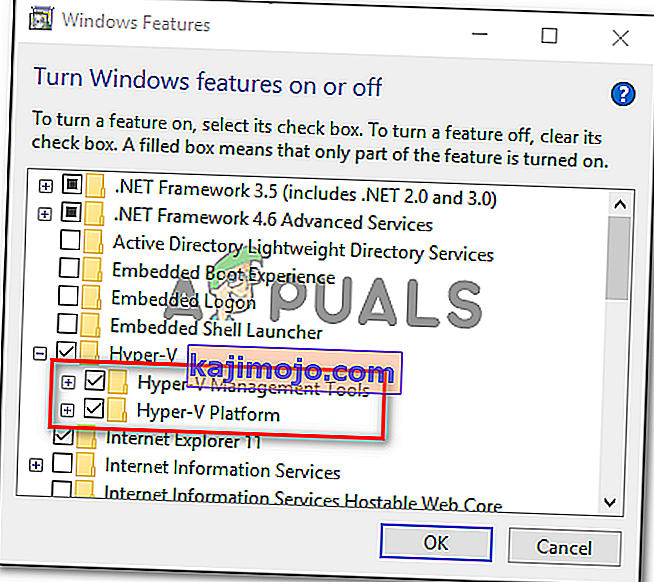
- „ Windows“ funkcijų meniu eikite į priekį ir išplėskite „ Hyper-V“ aplanką . Tada prieš galutinai spustelėdami Gerai , būtinai nuimkite laukelį, susietą su „ Hyper-V“ valdymo įrankiais ir „ Hyper-V Platform“ .
- Palaukite, kol procedūra bus baigta, tada iš naujo paleiskite kompiuterį ir patikrinkite, ar problema išspręsta po kito paleidimo.


Išjunkite „Hyper-V“ per CMD terminalą
- Paspauskite „ Windows“ klavišą + R, kad atidarytumėte dialogo langą Vykdyti . Tada teksto laukelyje įveskite „cmd“ ir paspauskite Ctrl + Shift + Enter, kad atidarytumėte išplėstinę komandų eilutę. Kai pagaliau pamatysite UAC (User Account Control) , spustelėkite Taip, kad suteiktumėte administravimo teises.

- Kai pavyks patekti į aukštesnį CMD terminalą, įveskite arba įklijuokite šią komandą ir paspauskite Enter, kad išjungtumėte „Hyper-V“ funkciją:
dism.exe / Online / Disable-Feature: „Microsoft-Hyper-V“
- Kai komanda bus sėkmingai apdorota, uždarykite CMD langą ir iš naujo paleiskite kompiuterį.
- Kito paleidimo metu pakartokite veiksmą, dėl kurio „ Raw“ režimas yra nepasiekiamas, dėl „Hyper-V“ klaidos ir patikrinkite, ar problema jau išspręsta.

Jei ši operacija neleido išspręsti problemos, vadovaukitės toliau pateiktomis instrukcijomis, kad išspręstumėte kitą problemos sprendimo būdą.
2. Išjunkite „Hypervisor“ patikrą
Kaip paaiškėja, galite susidurti su šia problema, net jei „Hyper-V“ yra išjungta. Vienas populiarus scenarijus, galintis sukelti šią problemą, yra atvejis, kai „ HyperVisorLaunchType“ paslauga nustatyta kaip AUTO. Tai privers jūsų sistemą prieš kiekvieną virtualios mašinos paleidimą patikrinti, ar yra programų, naudojančių VT-x.
Keli paveikti vartotojai sugebėjo išspręsti šią problemą paleidę „Bcdedit“ įrankį, kad patikrintų „ HyperVisorLaunchType“ būseną ir ją išjungtų, jei ji nustatyta į „Automatinė“.
Čia yra trumpas vadovas, kaip tai padaryti bet kuriame „Windows“ kompiuteryje:
- Paspauskite „ Windows“ klavišą + R, kad atidarytumėte dialogo langą Vykdyti. Tada teksto laukelyje įveskite „cmd“ , tada paspauskite Ctrl + Shift + Enter, kad atidarytumėte padidintą CMD terminalą.
Pastaba: atvykę į UAC (vartotojo abonemento kontrolę) , spustelėkite Taip, kad suteiktumėte administratoriaus prieigą.
- Įėję į padidintą CMD terminalą, įveskite šią komandą ir paspauskite Enter, kad patikrintumėte „HyperVisor“ būseną:
bcdedit
Pastaba : Jei „ hypervisorlaunchtype “ būsena nustatyta kaip „ Išjungta“, praleiskite tolesnius toliau nurodytus veiksmus ir pereikite tiesiai į 3 metodą .
- Kai rezultatai bus, slinkite žemyn į „ hypervisorlaunchtype“ skyrių ir patikrinkite, ar būsena nustatyta kaip „ Auto“ .
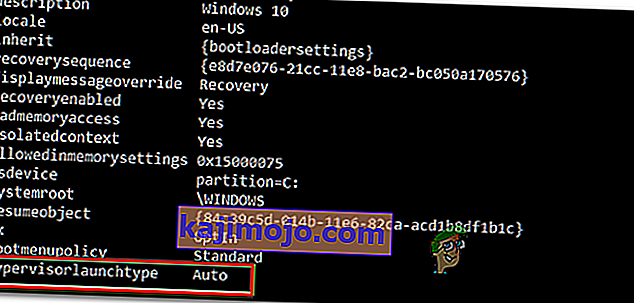
- Jei „ hypervisorlaunchtype “ būsena rodo „ Auto“ , įveskite arba įklijuokite šią komandą ir paspauskite Enter, kad nustatytumėte būseną „ Disabled“:
bcdedit / set hypervisorlaunchtype išjungtas
- Kai komanda sėkmingai apdorojama, uždarykite aukštesnį CMD terminalą, tada iš naujo paleiskite pagrindinę mašiną.
- Kito paleidimo metu paleiskite „VirtualBox“ virtualią mašiną ir patikrinkite, ar problema jau išspręsta.

Jei ta pati problema vis dar išlieka, pereikite prie kito galimo pataisymo, esančio žemiau.
3. Išjunkite „Device Guard“ / „Credential Guard“
Kiti paveikti vartotojai sugebėjo ištaisyti „ Raw“ režimą, kurio negalima pasiekti dėl „Hyper-V“ klaidos, naudodami „Gpedit“ (vietinės grupės politikos redaktorių), kad išjungtumėte „ Device Guard“ (dar vadinamą „ Credential Guard“).
Pasirodo, šis su įmone susijusios programinės įrangos ir paslaugų, skirtų saugumui, derinys gali prieštarauti tam tikroms „VirtualBox VM“ funkcijoms. Jei tai yra „ VERR_SUPDRV_NO_RAW_MODE_HYPER_V_ROOT“ kaltininkas , problemą galite lengvai išspręsti išjungę „Device Guard“ per vietinį grupės politikos redaktorių.
Tačiau nepamirškite, kad ne visose „Windows“ versijose pagal numatytuosius nustatymus yra „Gpedit“ paslaugų programos. „Windows 10 Home“ ir pora kitų susijusių antrinių versijų jo nebus. Tačiau yra veiksmų, kuriuos galite atlikti, kad įdiegtumėte gpedit.msc „Windows 10“ .
Įsitikinę, kad vietinės grupės politikos redaktorius yra pasiekiamas jūsų „Windows“ versijoje, pateikite trumpą įrenginio apsaugos išjungimo vadovą:
- Paspauskite „ Windows“ klavišą + R, kad atidarytumėte dialogo langą Vykdyti. Tada įveskite „gpedit.msc“ ir paspauskite „ Enter“, kad atidarytumėte vietinės grupės politikos redaktorių .

Pastaba: Jei jūsų paprašė UAC („User Account Control“) raginimas, spustelėkite Taip, kad suteiktumėte administravimo teises.
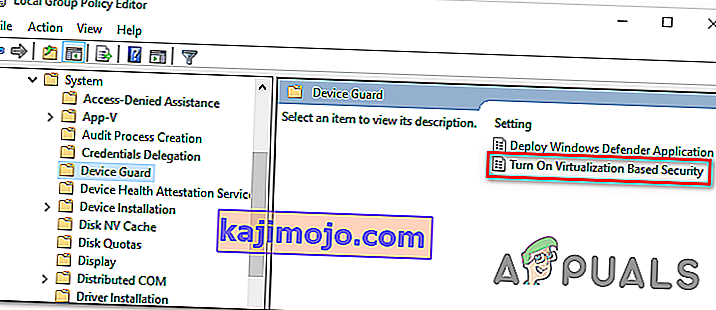
- Įėję į vietinės grupės politikos redaktorių, naudokite kairįjį meniu norėdami pereiti į šią vietą:
Vietinė kompiuterio politika> Kompiuterio konfigūracija> Administravimo šablonai> Sistema> Įrenginio apsauga
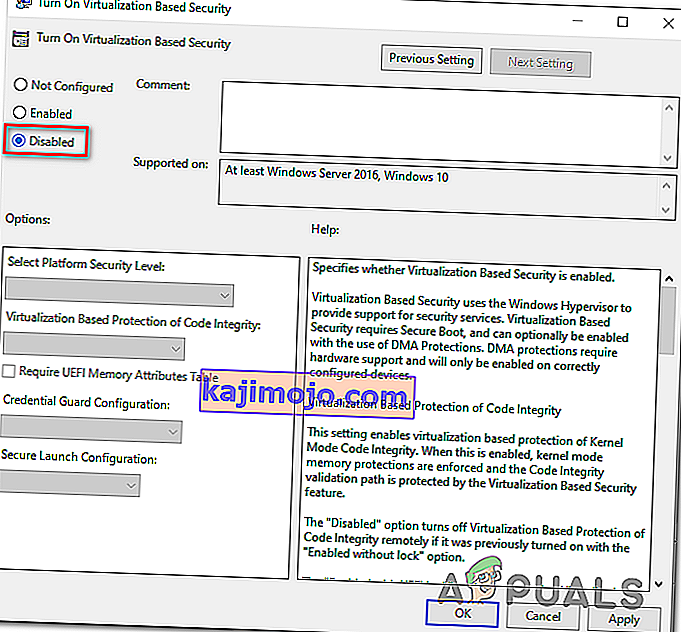
- Kai pavyks pasiekti reikiamą vietą, pereikite prie dešiniojo „Gpedit“ įrankio skyriaus ir dukart spustelėkite Įjungti virtualizavimo saugą .
- Kai esate viduje Įjunkite Virtualizacija pagrįstas saugumo lange, tiesiog pakeisti statusą į neįgaliųjų ir spustelėkite Taikyti , kad išsaugotumėte pakeitimus.
- Po to, kai tai pavyks padaryti, dar NEBEKIEKITE paleisti kompiuterio. Vietoj to, atidarykite padidintą komandų eilutę paspausdami „ Windows“ klavišą + R , įveskite „ cmd “ ir paspauskite Ctrl + Shift + Enter .
Pastaba: Kai pamatysite UAC („User Account Control“) raginimą, spustelėkite Taip, kad suteiktumėte CMD terminalo administratoriaus leidimą.
- CMD lange įklijuokite šias komandas ir po kiekvienos paspauskite Enter, kad ištrintumėte susijusius EFI kintamuosius, kurie vis tiek gali sukelti šią problemą:
mountvol X: /s copy %WINDIR%\System32\SecConfig.efi X:\EFI\Microsoft\Boot\SecConfig.efi /Y bcdedit /create {0cb3b571-2f2e-4343-a879-d86a476d7215} /d "DebugTool" /application osloader bcdedit /set {0cb3b571-2f2e-4343-a879-d86a476d7215} path "\EFI\Microsoft\Boot\SecConfig.efi" bcdedit /set {bootmgr} bootsequence {0cb3b571-2f2e-4343-a879-d86a476d7215} bcdedit /set {0cb3b571-2f2e-4343-a879-d86a476d7215} loadoptions DISABLE-LSA-ISO,DISABLE-VBS bcdedit /set {0cb3b571-2f2e-4343-a879-d86a476d7215} device partition=X: mountvol X: /d copy %WINDIR%\System32\SecConfig.efi X:\EFI\Microsoft\Boot\SecConfig.efi /Y bcdedit /create {0cb3b571-2f2e-4343-a879-d86a476d7215} /d "DebugTool" /application osloader bcdedit /set {0cb3b571-2f2e-4343-a879-d86a476d7215} path "\EFI\Microsoft\Boot\SecConfig.efi" bcdedit /set {bootmgr} bootsequence {0cb3b571-2f2e-4343-a879-d86a476d7215} bcdedit /set {0cb3b571-2f2e-4343-a879-d86a476d7215} loadoptions DISABLE-LSA-ISO,DISABLE-VBS bcdedit /set {0cb3b571-2f2e-4343-a879-d86a476d7215} device partition=X: mountvol X: /dPastaba: atminkite, kad X yra nenaudojamo disko vietos rezervavimo ženklas. Atitinkamai sureguliuokite vertę.
- Sėkmingai apdorojus kiekvieną komandą, iš naujo paleiskite pagrindinį kompiuterį ir patikrinkite, ar problema išspręsta kito paleisties metu.


Jei vis tiek susiduriate su ta pačia klaida „ Neapdorotas režimas negalimas dėl„ Hyper-V “ klaidos“, pereikite prie kito toliau pateikto metodo.
4. Išjunkite „Core Defolation“ sistemoje „Windows Defender“
Kaip paaiškėjo, už šią problemą gali būti atsakinga ir numatytojo AV saugos funkcija. „Windows 10“ sistemoje „Windows Defender“ turi funkciją, sutrumpintą „Core Isolation“ - tai iš esmės papildomas virtualizacija pagrįstas saugumo sluoksnis, skirtas atremti sudėtingesnes atakas.
Tačiau žinoma, kad ši saugos funkcija trukdo gerai veikti virtualioms mašinoms (ypač toms, kurias palengvina trečiųjų šalių alternatyvos).
Several affected users that were also encountering the “Raw-mode is unavailable courtesy of Hyper-V” error have confirmed that they were finally able to fix the issue by enforcing some modifications that allowed them to disable Core isolation from the settings menu of Windows Security.
Here’s a quick guide on disabling Core Isolation from the settings menu of Windows Defender:
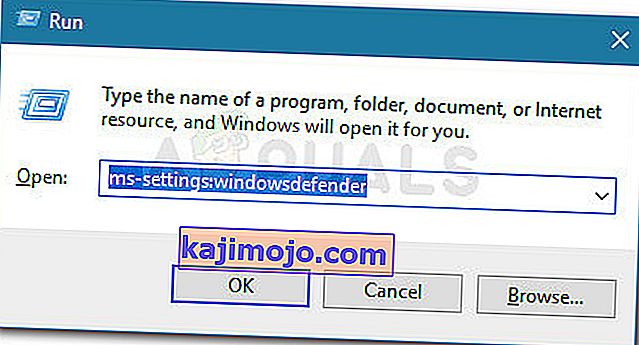
- Press Windows key + R to open up a Run dialog box. Next, type “ms-settings:windowsdefender” inside the text box and press Enter to open up the Windows Security tab (former Windows Defender) of the Settings app.
- Once you’re inside the Windows Security tab, move over to the right-hand section and click on Device Security under Protection areas.
- Next, scroll down through the list of available options and click on Core isolation details (under Core isolation).
- Inside the Core isolation menu, ensure that the toggle associated with Memory integrity is set to Off.
- Once the modification is enforced, restart your computer and see if the problem is fixed at the next startup.


In case the toggle associated with Core Isolation is greyed out or you get an error message when you try to set it to OFF, here’s a quick guide on achieving the same result via Registry Editor:
- Press Windows key + R to open up a Run dialog box. Next, type ‘regedit’ inside the text box and press Enter to open up Registry Editor. Then, click Yes at the UAC (User Account Prompt) to grant administrative privileges.

- Inside Registry Editor, use the left-hand section to navigate to the following location:
Computer\HKEY_LOCAL_MACHINE\SYSTEM\CurrentControlSet\Control\DeviceGuard\Scenarios\CredentialGuard
Note: You can either navigate there manually or you can post the location directly into the navigation bar and press Enter to get there instantly.
- After you manage to arrive at the correct location, move over to the right-hand section and double-click on the Enabled key.
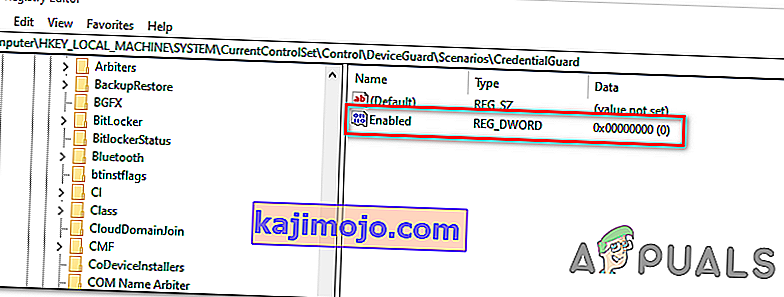
- After you manage to open the Enabled Value, leave the base to Hexadecimal and change the Value data to 0.

- Click Ok to save the modification, then close Registry Editor and restart your computer to see the changes.
- At the next machine startup, repeat the action that was previously causing the VERR_SUPDRV_NO_RAW_MODE_HYPER_V_ROOT error code and see if the problem is still occurring.


In case the issue is still not resolved, move down to the next potential fix below.
5. Enable Virtualization in BIOS or UEFI
Another potential reason that might cause this problem is an instance where hardware virtualization is disabled from BIOS or UEFI settings. Keep in mind that virtualization is enabled by default on every piece of new hardware nowadays, older computer configurations might not have this option enabled by defaults.
If you have an older PC configuration, you might need to enable hardware virtualization manually from your BIOS or UEFI settings. Several affected users have confirmed that the issue was completely resolved after they did this.
Here’s a quick guide on enabling Virtualization from your BIOS or UEFI settings:
- In case you have a BIOS-powered computer, start it up and start pressing the Setup key repeatedly as soon as you see the startup screen. With most configurations, the Setup key is either one of the F keys (F2, F4, F6, F8) or the Del key.
 Note: If you’re using a UEFI-based computer, follow the steps (here) to boot directly into the Advanced Startup options menu. Once you’re there, you can access the UEFI firmware settings directly from that menu.
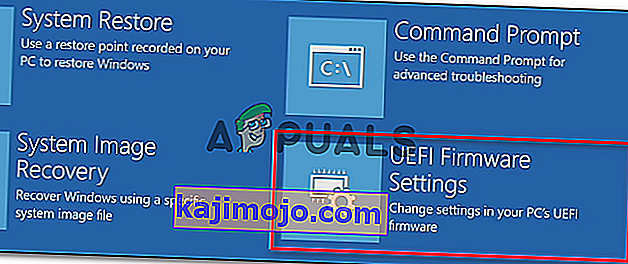
- As soon as you land in your BIOS or UEFI settings, start browsing the menus to find your motherboard equivalent to the virtualization technology (Intel VT-x, Intel Virtualization Technology, AMD-V, Vanderpool, etc.)
- When you manage to locate it, ensure that you set it to Enabled.
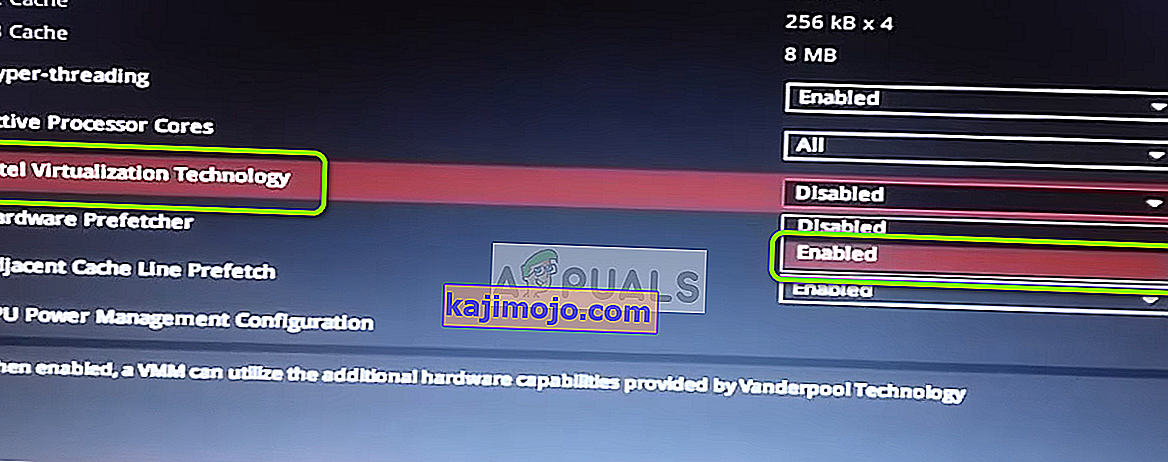
Note: In most cases, you will find this option under Processor, Security, Chipset, Advanced, Advanced Chipset Control or Advanced CPU configuration. But keep in mind that your screen might be wildly different from ours depending on the motherboard that you’re using and the CPU manufacturer. In case you’re not able to find the option by yourself, search online for specific steps according to your configuration.
- After you manage to enable the virtualization technology, save the changes you made to your BIOS or UEFI settings and restart your computer to allow it to boot normally.
- At the next startup sequence, repeat the action that was causing the “Raw-mode is unavailable courtesy of Hyper-V” error and see if the problem is now resolved.
 Note: If you’re using a UEFI-based computer, follow the steps (here) to boot directly into the Advanced Startup options menu. Once you’re there, you can access the UEFI firmware settings directly from that menu.

In case the same problem is still persisting, move down to the next potential fix below.